

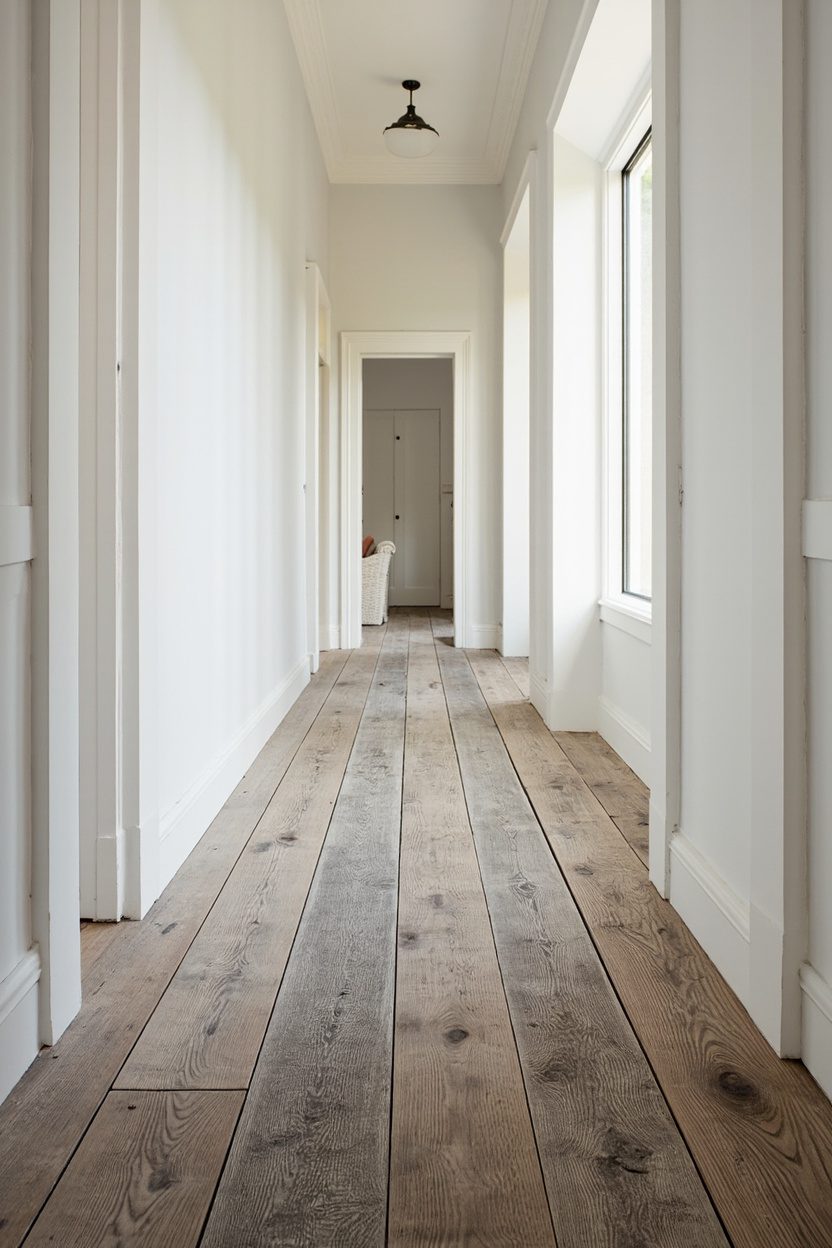
Narrow halls can still feel generous when you lean on honest materials and clean lines. For farmhouse hallway decor, think hardworking pieces that double up: light that anchors art, hooks that style and store, and textures that quiet footsteps. The look stays grounded in natural wood, matte metals, and cotton or jute underfoot.
Because hallways are pass-through zones, scale and placement matter; edit every choice to half a step slimmer than you think, and keep the palette tight.
Then add one lived-in detail, like a vintage runner or a well-used peg rail, so it reads warm, not staged.
Smart Pick: A slim jute runner with a rug pad, because it adds texture, softens sound, and grips safely without bulking up a tight walkway.
1. Aged Wood Runners
- Effort Level: Weekend DIY.
- Estimated Budget: 100-500.
- Maintenance Level: Low (Wipe clean).
- Best For: Small, low-light spaces.
Choose a vintage-look runner in muted earth tones, like tobacco, clay, and faded indigo. The broken pattern hides scuffs, while the low pile keeps doors swinging freely.
Measure to leave 3 to 4 inches of floor showing on each side. This border frames the runner, which makes the hallway feel longer and more intentional.
If your floors are new, pick a pre-distressed or overdyed option. It reads warm without pretending to be antique, and it can handle daily shoes and pet traffic.
Use a natural felt pad trimmed an inch shorter than the rug. It prevents creeping, and it adds just enough cushion without creating a trip edge.
Why This Works?
An aged runner brings instant character, so the hallway looks storied instead of sparse. Because the pattern is forgiving, you will spend less time spot-cleaning and more time enjoying that soft, quiet walk.
If you lean coastal, a salt-air palette can bridge to nearby rooms, like a light-handed take from Coastal Farmhouse Homes.
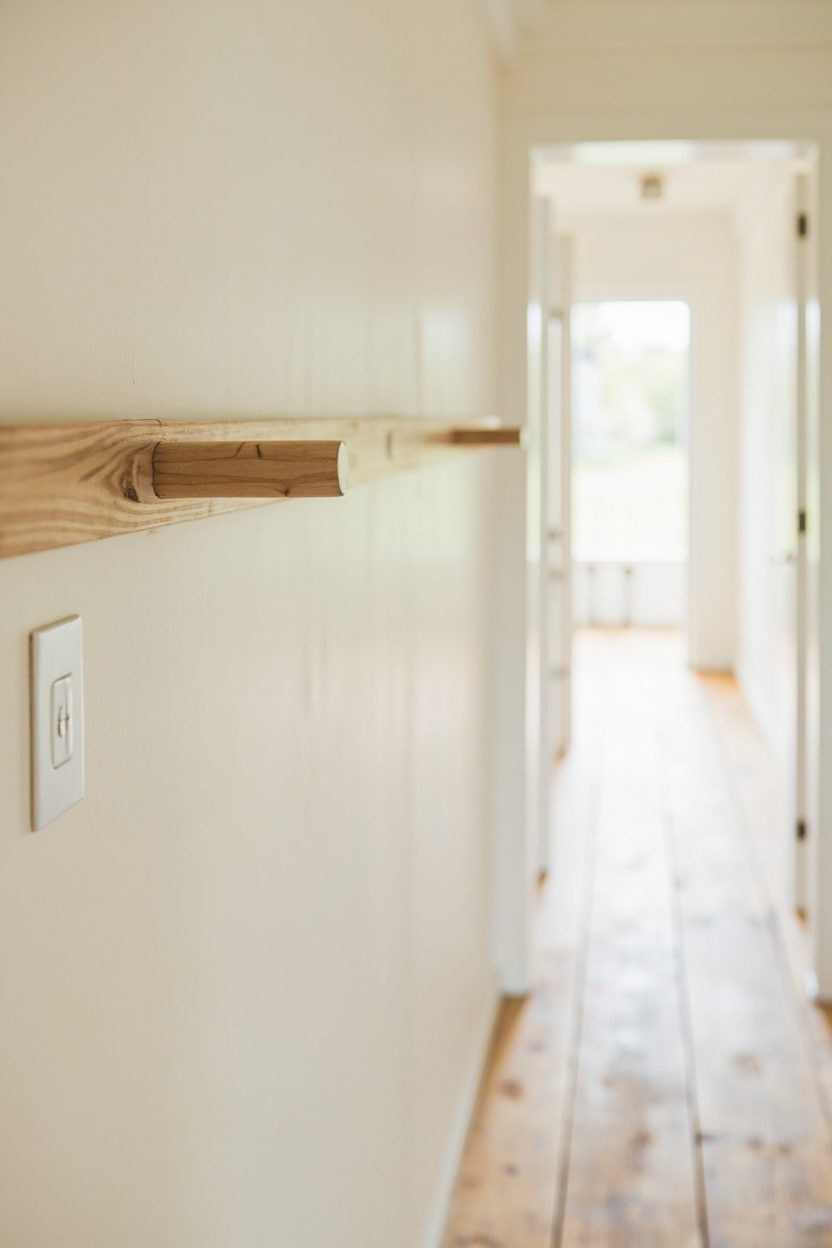
2. Shaker Peg Rails
- Effort Level: Weekend DIY.
- Estimated Budget: 50-250.
- Maintenance Level: Low (Wipe clean).
- Best For: Small, low-light spaces.
Run a continuous peg rail the full hallway length, mounted at 64 to 66 inches high. The line draws the eye forward, adds storage, and protects walls from bag dents.
Choose maple or poplar rails, then paint to match the trim for a built-in look. Or oil the wood if your baseboards are stained and you want warmth to continue.
Keep what you hang light and narrow. Think market totes, straw hats, seasonal wreaths, and a slim umbrella, not bulky backpacks that jut into the walkway.
Space pegs 6 to 8 inches apart to avoid crowding. If the hall is very tight, choose shallow pegs and cap hooks to minimize snagging sleeves as you pass.
The Golden Rule Here
Treat the peg rail as display and storage, but edit weekly. Rotate in one soft-texture item, like a scarf, for warmth, and one sculptural piece, like a handled basket, for shape. For walls that scuff, a satin enamel stands up to bumps and wipes back clean.
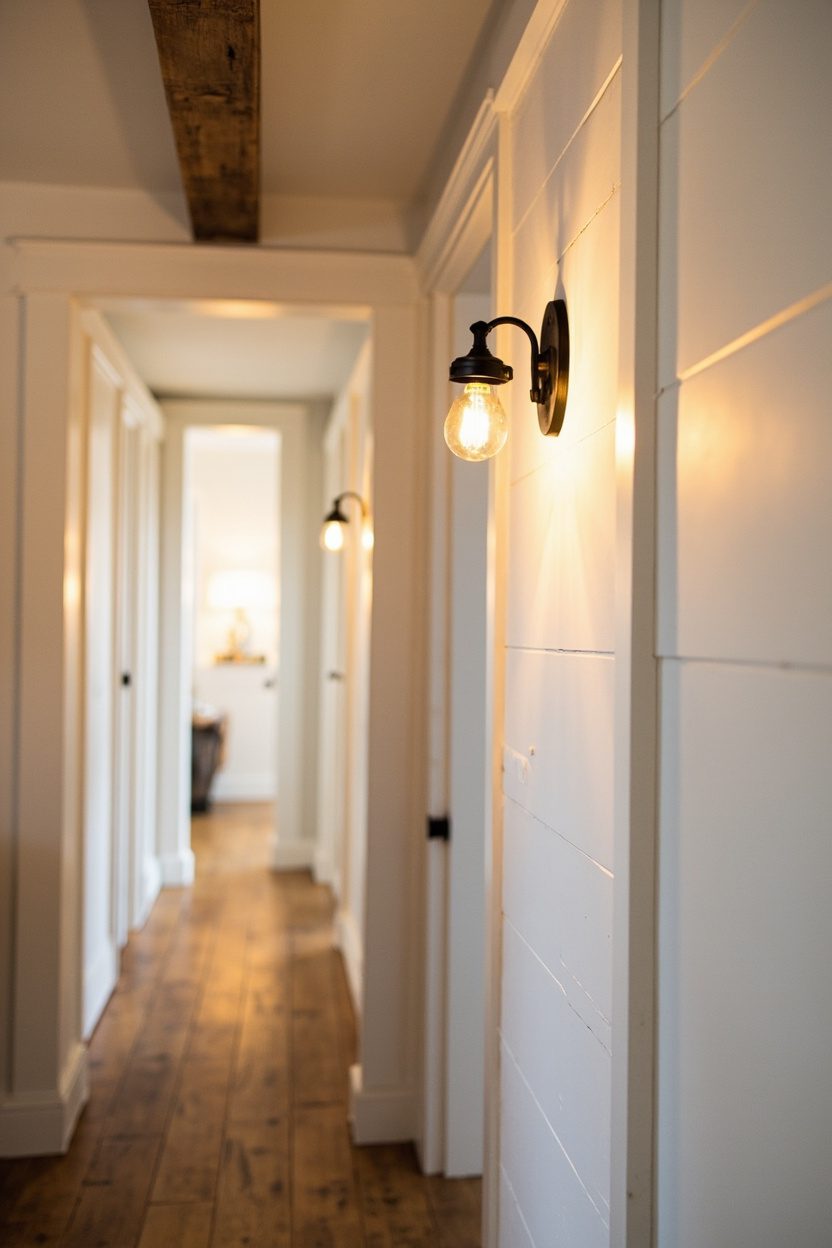
3. Black Iron Sconces
- Effort Level: Weekend DIY.
- Estimated Budget: 120-600.
- Maintenance Level: Low (Wipe clean).
- Best For: Small, low-light spaces.
Go for matte black iron with simple cups or conical shades. The dark tone outlines the wall, which helps a narrow corridor feel crisp rather than cramped.
Install sconces at 60 to 66 inches to avoid glare. Stagger them opposite door swings, spacing 6 to 8 feet apart so light overlaps without hot spots.
Choose warm 2700K bulbs and dimmers. Soft output flatters wood grain and antiques, and dimming lets art and family photos read without harsh shine.
If hardwiring is tricky, pick UL-listed plug-ins with cord covers painted to match the wall. The look stays tidy, and you can place light exactly where it earns its keep.
Stylist’s Note
Black iron lands the farmhouse look without tipping rustic. Pair sconces with a slim gallery of family photos or small landscape prints, and let the fixtures frame the story.
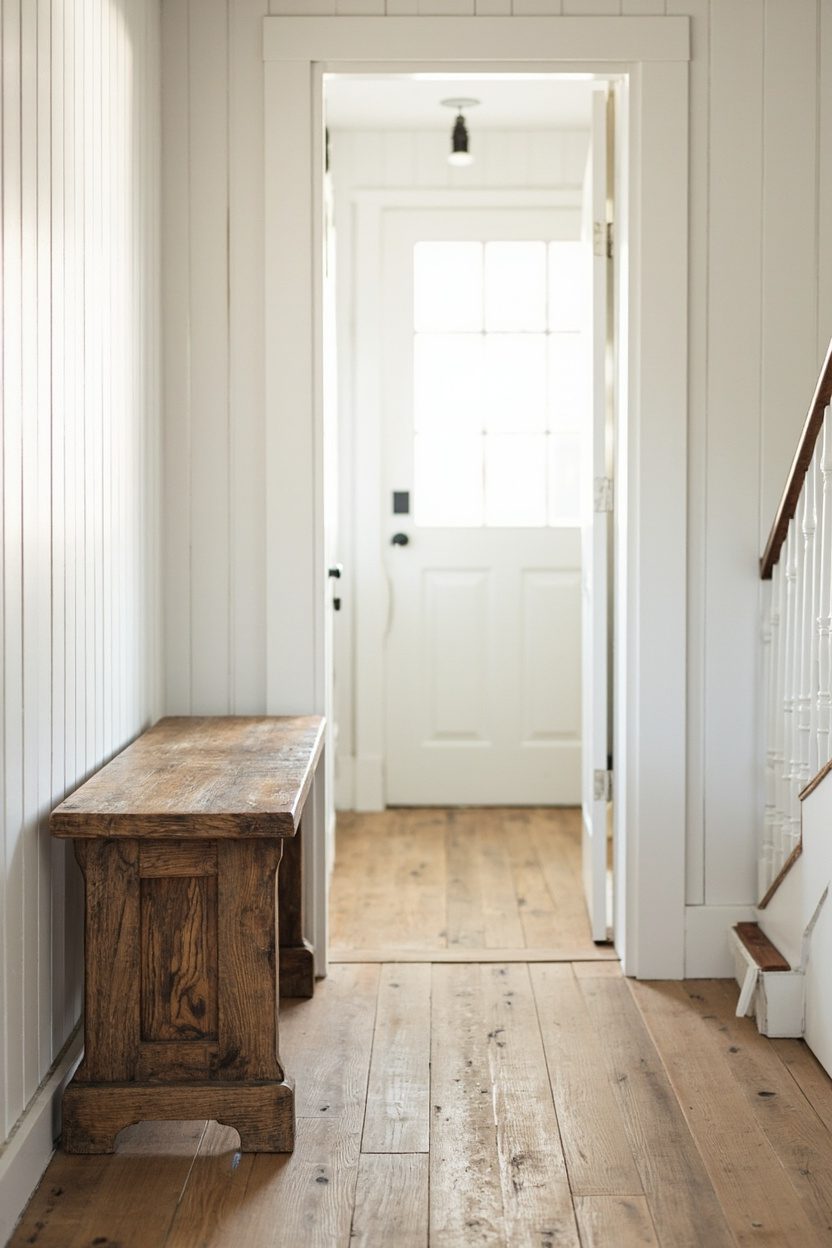
4. Antique Farmhouse Benches
- Effort Level: Weekend DIY.
- Estimated Budget: 150-600.
- Maintenance Level: Low (Wipe clean).
- Best For: Busy entry halls.
What You’ll Need:
- Vintage bench or new pine bench, paste wax, felt pads, baskets, or crates.
- Measuring tape, stud finder, wall hooks, and level.
- Throw cushion inserts, washable linen, or canvas covers.
A slim antique bench anchors a narrow farmhouse hall and adds instant warmth. Choose 12 to 16 inches deep so circulation stays easy, and leave at least 36 inches of walkway clearance.
Because storage matters in tight spaces, slide two low baskets under the bench. Label wicker or wire options for shoes and scarves, and choose handles that tuck in to avoid snags.
For comfort, layer one long lumbar cushion in a washable linen. Avoid too many small pillows, since they read fussy and steal seating inches in an already narrow run.
If your bench wood feels orange, tone it with a cooler brown paste wax. It calms the finish, while protecting against scuffs from bags and dog leashes.
Add a trio of black iron hooks above the bench for hats and totes. Space them 8 to 10 inches apart, and mount them into studs for weight.
Stylist’s Note
Hunt for benches with stretcher bars and honest wear. They photograph beautifully, but more importantly, they are sturdy. If you cannot find an antique, a simple new pine bench with a hand-rubbed wax finish passes the vibe test.
I also like pairing a bench with a small vintage landscape above the hooks. It gives a focal point without crowding the wall, and it ties colors from runners and baskets together.
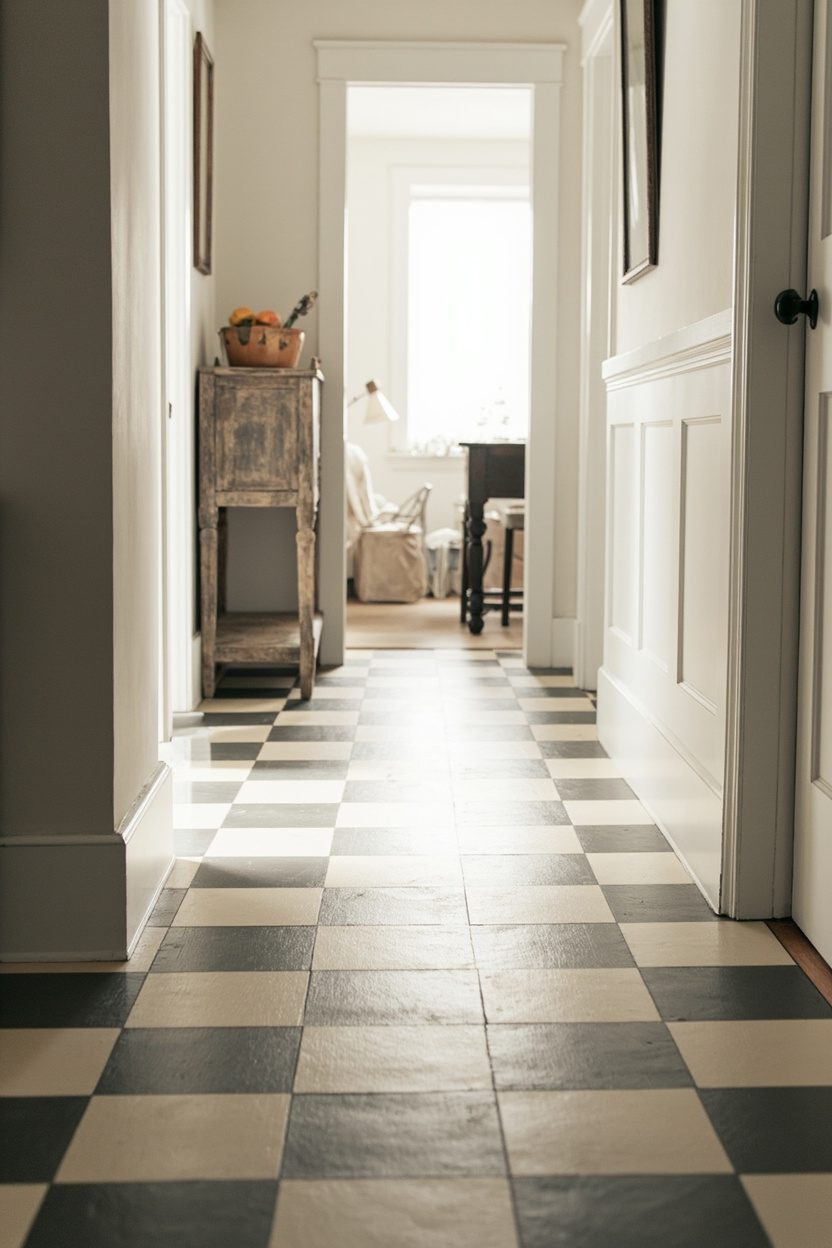
5. Checkerboard Floor Paint
- Effort Level: Weekend DIY.
- Estimated Budget: 120-350.
- Maintenance Level: Moderate (Recoat as needed).
- Best For: Worn wood or concrete floors.
A painted checkerboard wakes up a plain hallway and fits the farmhouse character. Choose muted contrast, like warm putty and soft cream, instead of stark black and white for a friendlier read.
Because scale sets the tone, go for 8 to 12-inch squares in narrow halls. Larger checks feel calmer, while smaller ones can look busy when the corridor is tight.
Prep is everything. Sand lightly, vacuum, then use a bonding primer before porch and floor enamel. Tape once the primer cures, and pull tape while the second color is still slightly wet.
When I tried this in my own hallway, I rushed the cure time and scuffed corners with a laundry basket. Waiting the full 72 hours before heavy traffic saved the redo on the second pass.
If your walls are busy with shiplap or beadboard, keep the palette gentle. Then, echo one floor color in a runner border or a console accessory so the scheme feels intentional.
The Golden Rule Here
Test your colors in daylight and at night, right on the floor. Overhead bulbs can warm creams and cool grays, which shifts the pattern. If it fights your trim, nudge one color warmer and try again.
Also, seal with a water-based polyurethane in matte. Gloss shows dust in hallways, and satin can still flash. Matte keeps the pattern charming and forgiving.
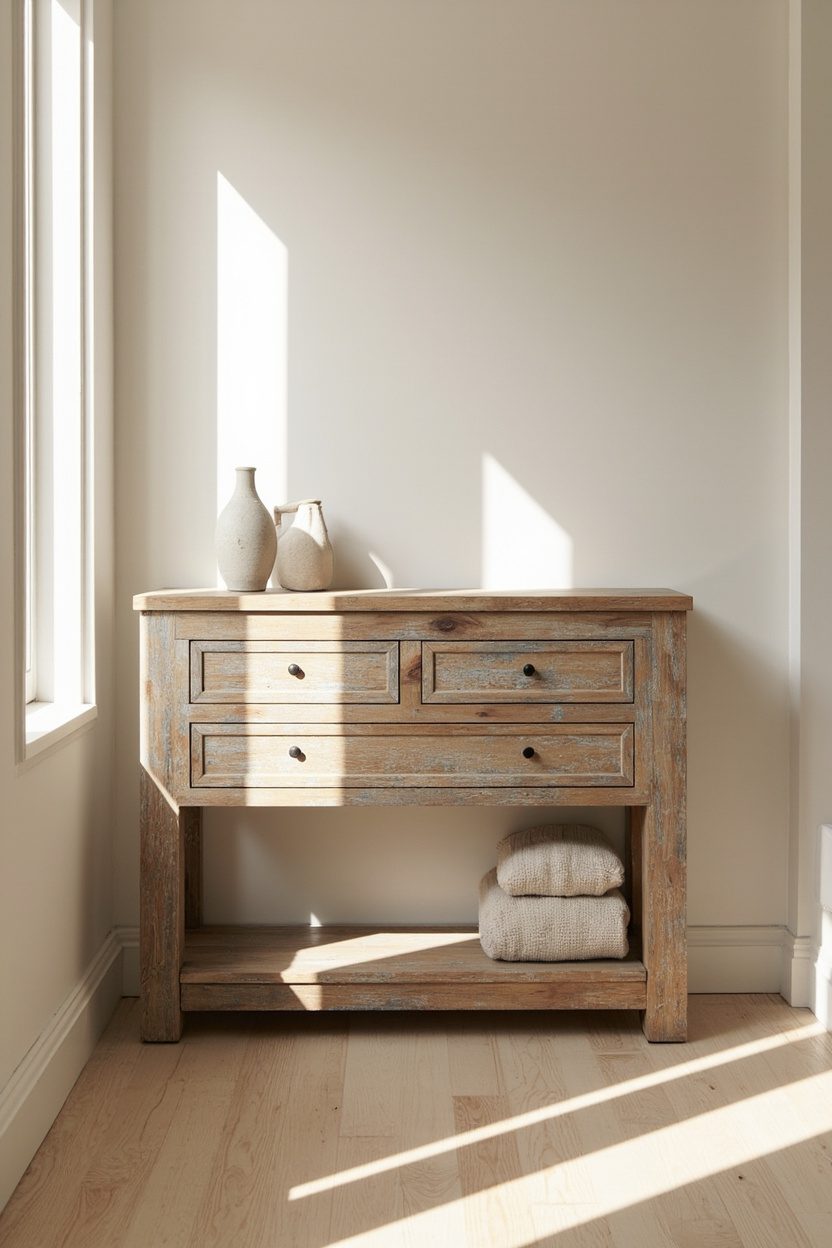
6. Weathered Console Tables
- Effort Level: Easy install.
- Estimated Budget: 200-900.
- Maintenance Level: Low (Dust and wax).
- Best For: Long, narrow hallways.
A narrow, weathered console gives you landing space without crowding the passage. Look for 10 to 14 inches deep, and choose open legs so light filters through and the hall feels airy.
Because proportion sells the farmhouse mix, pair rugged wood with a slim metal lamp. An adjustable sconce above frees surface space if the console is under 12 inches deep.
Use the lower shelf for woven bins, but cap it at two. Too many small baskets read cluttered fast. Instead, stack books horizontally to steady a petite lamp base.
Finish choices matter. A limewashed oak or wire-brushed pine hides dust and dings better than smooth lacquer. If you love darker stains, keep the wall paint light to balance.
Integrate one statement mirror over the console to stretch the corridor. Hang it with the center at 60 inches, and keep frames simple so the wood texture does the talking.
Before You Buy
Measure baseboards and outlets first. I often see consoles that sit proud of the wall because a baseboard cap gets in the way. A unit with a shallow cutout or inset back solves this cleanly.
If you are curating accents, one ceramic crock, a small lamp, and a catchall tray is enough. The hallway is for moving through, so edit with a firm hand and spend on the lamp shade you love.
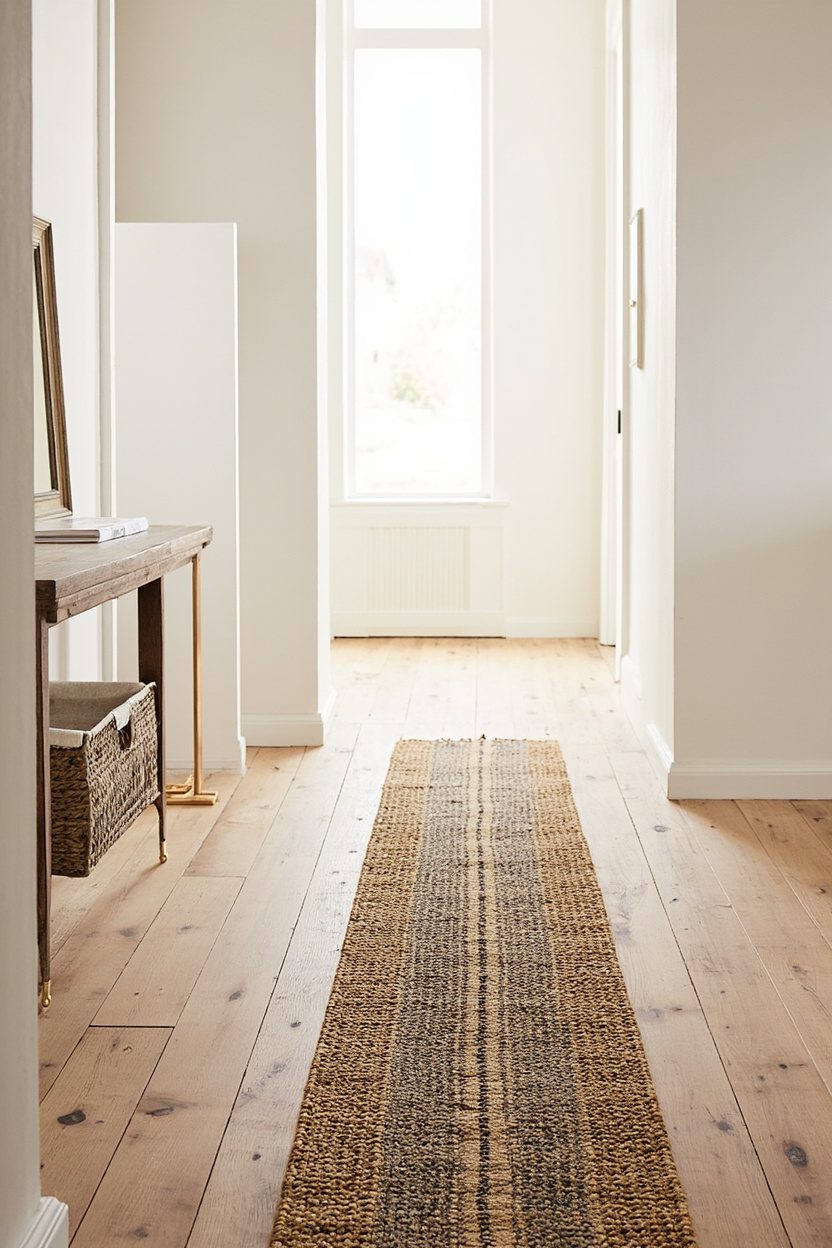
7. Striped Jute Runners
- Effort Level: Weekend DIY.
- Estimated Budget: 100-500.
- Maintenance Level: Low (Wipe clean).
- Best For: Small, low-light spaces.
Choose a flatweave jute runner with a subtle stripe, like oatmeal with charcoal or cream with tan. Narrow stripes elongate the hall visually, because the eye tracks the lines end to end.
Pick a runner 3 to 4 inches narrower than your walkway so baseboards still breathe. However, keep at least 4 inches of floor showing on both sides for a tailored look.
If your hallway bends, use two identical runners with a 2-inch overlap under the curve. The pattern will read continuous, and you can lift one for spot cleaning without fuss.
For sound control, pair natural jute with a felt rug pad trimmed 1 inch smaller. It grips better than PVC, and it softens footsteps in an echo-prone corridor.
If pets live here, look for a jute and cotton blend about 6 to 8 mm thick. It vacuums easily, but it is heavy enough not to ripple.
Stylist’s Note
I like a stripe that echoes other linear details, such as stair balusters or shiplap seams. Therefore, the runner feels integrated, not random. If your doors are dark, pull that tone into the stripe for quiet cohesion.
For a farmhouse mix, layer a small vintage kilim at the entry end over the jute. It adds story without overwhelming the narrow run. Rotate both rugs seasonally to even wear and sun fade.
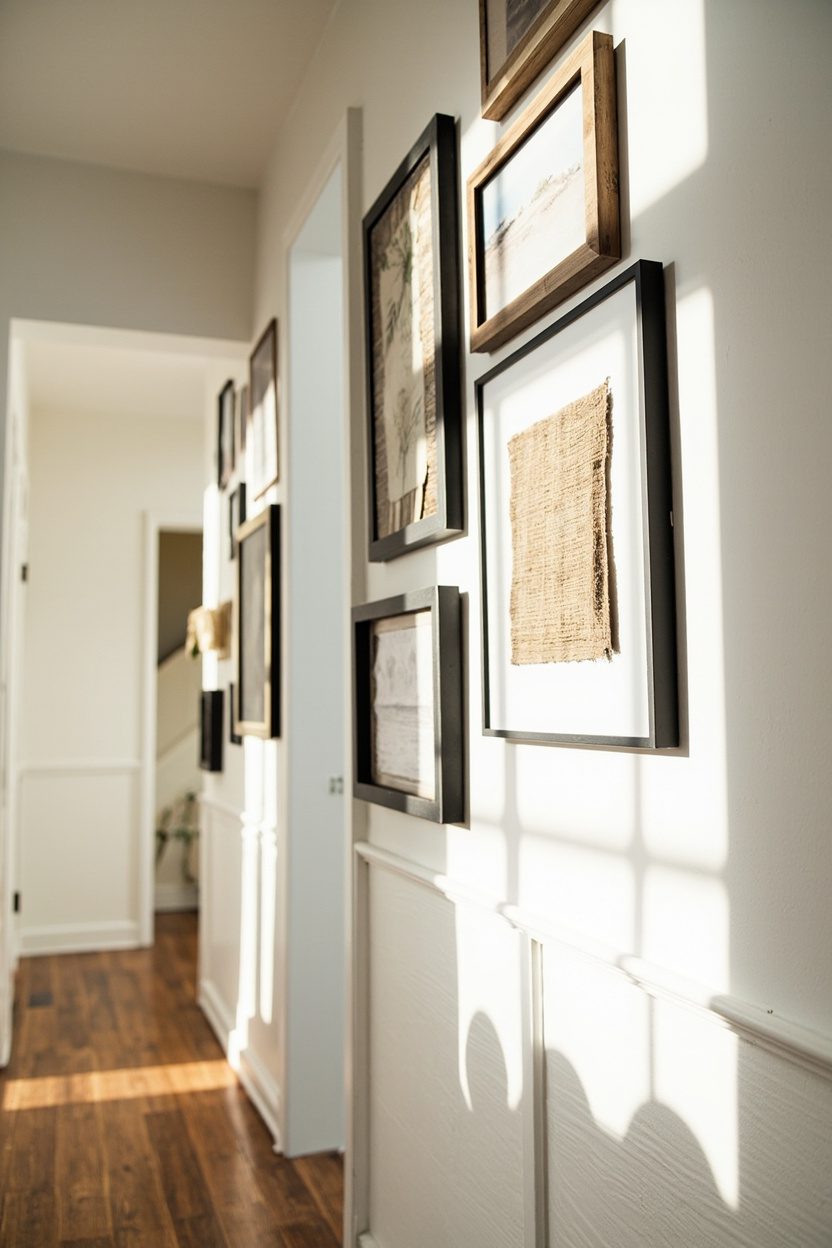
8. Gallery Wall Mix
- Effort Level: Weekend DIY.
- Estimated Budget: 100-500.
- Maintenance Level: Low (Wipe clean).
- Best For: Small, low-light spaces.
Anchor one side with a linear gallery, hung at 57 inches to center for most homes. Use consistent spacing, around 2 inches, so the hall still reads neat and passable.
Mix black, oak, and antique brass frames for a collected farmhouse note. Because the hallway is narrow, keep art sizes under 16 by 20 inches to avoid crowding.
Balance family photos with a few botanicals, vintage landscapes, and one mirror. The mirror bounces light, which matters if the hall lacks windows.
Map your arrangement on the floor first, then transfer with painter’s tape. It reduces extra holes and helps you fine-tune sightlines from each end.
Consider non-glare acrylic instead of glass for safety in tight spaces. It looks crisp, and it weighs less, which keeps hardware simple.
Splurge vs. Save
Save by thrift frames in similar sizes, then unifying them with off-white mats cut to the same reveal. Print photos in matte finishes, and add one vintage page from a botanical book for texture.
Splurge on custom framing for two hero pieces, ideally the mirror and a landscape with a linen mat. Museum acrylic keeps reflections low in narrow light, and better hardware means fewer wall repairs later.
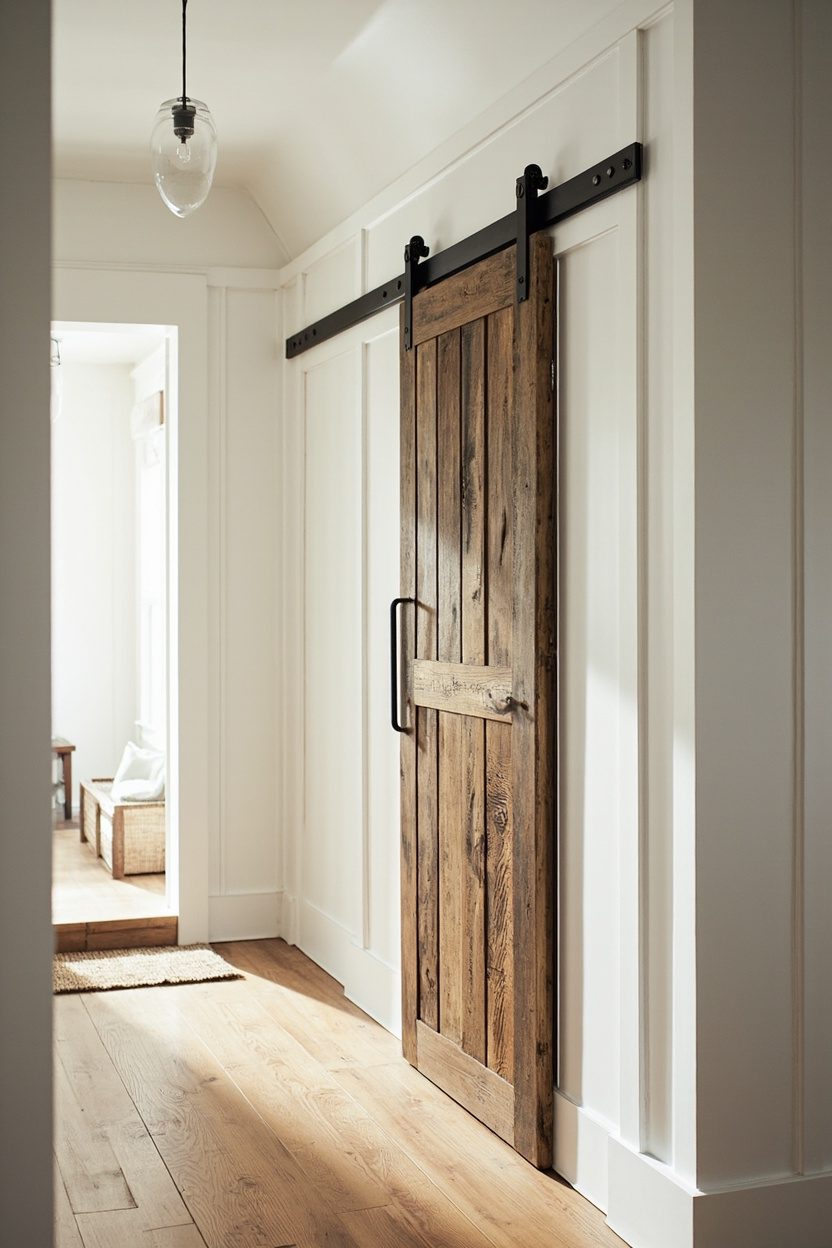
9. Barn Door Moments
- Effort Level: Weekend DIY.
- Estimated Budget: 100-500.
- Maintenance Level: Low (Wipe clean).
- Best For: Small, low-light spaces.
Swap a swing door for a slim barn door to free floor clearance. Choose a simple plank or V-groove design in painted pine for a softer farmhouse feel.
Because hardware steals focus, pick matte black or antiqued brass with quiet stops. Measure track length at least twice the door width for a full, clean slide.
If your hall is tight, keep the door thickness near 1.25 inches and add a low-profile handle. A flush pull prevents hip bumps in pass-through zones.
Paint the door the same color as the trim for calm, or contrast lightly, like warm greige against white. Heavier contrast works best when floors are dark and can ground it.
Mind sound. Add a brush sweep at the bottom and felt bumpers on the jamb side. It softens noise, which helps in bedtime corridors.
Why This Works?
A barn door solves a real traffic issue, not just style. In narrow halls, a swing eats space and catches on rugs. Sliding hardware keeps the path open, and the door itself becomes a gentle focal point.
If you want a coastal farmhouse slant, opt for a whitewash and woven runner nearby, then echo black hardware in a small sconce or frame.
10. Woven Basket Storage
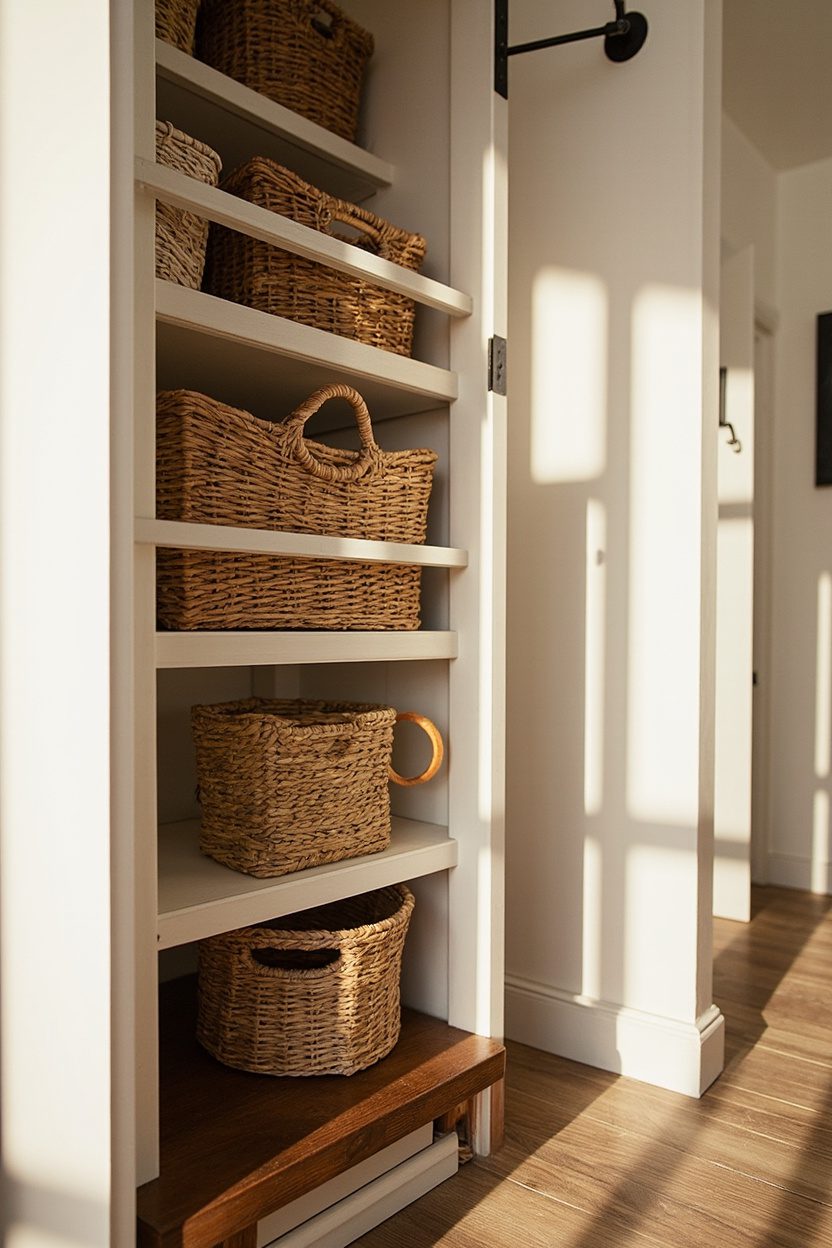
- Effort Level: Weekend DIY.
- Estimated Budget: 100-500.
- Maintenance Level: Low (Wipe clean).
- Best For: Small, low-light spaces.
- What You’ll Need: Lidded seagrass or rattan baskets, low console or wall shelf, felt pads, measuring tape.
Choose lidded seagrass or rattan baskets in two sizes, then repeat them down the hall. Because a consistent shape looks tidy, aim for three to five identical pieces per shelf. Measure first so they slide in cleanly.
Park a slim console or wall shelf at 10 to 12 inches deep. It keeps traffic flowing, even in a 36-inch-wide corridor. Then, tuck baskets beneath for shoes, scarves, and dog leashes.
Mix textures so it feels farmhouse, not fussy. Pair chunky weave baskets with a matte black rail, or a reclaimed pine top with smooth rattan. The contrast keeps the storage from being bulky.
Label subtly so guests find things. Leather tags or small brass frames give a refined note, while chalk tags skew casual. Keep the font simple, and place labels low for kids’ reach.
Plan a rhythm along the wall. For example, a basket, an umbrella stand, a basket boot tray. It reads intentional, not like overflow storage. Leave at least 6 inches between groupings for visual breathing room.
Designer Secret
If your hallway reads dark, pick baskets with a lighter honey tone. They bounce more light than espresso finishes, which can feel heavy in a narrow pass. I also slid felt pads under each basket so they glide without scuffing baseboards.
When the budget is tight, look to sets from big box stores, then upgrade the console. A simple, solid-wood top instantly makes affordable baskets feel bespoke, especially once you add tidy labels and keep the palette consistent.
11. Classic Windsor Chairs

- Effort Level: Weekend DIY.
- Estimated Budget: 100-500.
- Maintenance Level: Low (Wipe clean).
- Best For: Small, low-light spaces.
One slim Windsor chair can anchor a landing spot without blocking movement. Choose a low back or sack-back style at 16 to 18 inches deep. Place it in a niche or near the door for quick shoe changes.
Painted finishes read classic farmhouse. However, bare ash or oak works if you like a softer look. If your trim is white, try a charcoal or milk-white chair for contrast and easy touch-ups.
Add a petite cushion or linen pillow, but keep it lean. Because the spindles are graceful, bulky textiles look off. A 16-inch square cushion in ticking stripe or windowpane plaid suits the silhouette.
Create a mini moment overhead. A peg rail or small art grouping hung 58 to 60 inches off the floor frames the chair. Keep art narrow, about 12 to 18 inches wide, so the wall still feels open.
Mind spacing. Leave 6 inches between the chair and any radiator cover or console edge. Therefore, doors swing freely, and the hallway keeps its clear path line.
Why This Works?
A Windsor brings heritage without visual weight, thanks to those airy spindles. In a tight hallway, you get a seat, a style cue, and a place to perch a market bag, all in a tidy footprint.
If you love a coastal lean, a salt-kissed black finish pairs well with woven runners and pale woods, echoing the mood from Coastal Farmhouse Homes. For thrifted finds, scan for tight joints and even leg lengths, then refresh with a wipe-on poly or milk paint.
You can pair this with ideas from 15 Farmhouse Bathroom Ideas from Shiplap Walls to Clawfoot Tubs.
FAQ
In most homes, aim for pieces 10 to 12 inches deep to preserve a comfortable walkway. If your corridor is only 36 inches wide, keep depths closer to 9 or 10 inches and avoid protruding hardware.
Start with warm whites or soft greige on walls, then add contrast through black metal, aged brass, and honey woods. Because hallways often lack daylight, a light rug runner and pale baskets help lift shadows.
Yes, if you choose tight weaves like rattan or water hyacinth, and avoid dragging them on rough floors. Place felt pads underneath, and rotate baskets occasionally so one side does not take all the scuffing.
Group like items, repeat materials, and leave negative space between zones. For example, run a trio of matching baskets under one console, then leave a clear span before introducing a chair or peg rail vignette.