

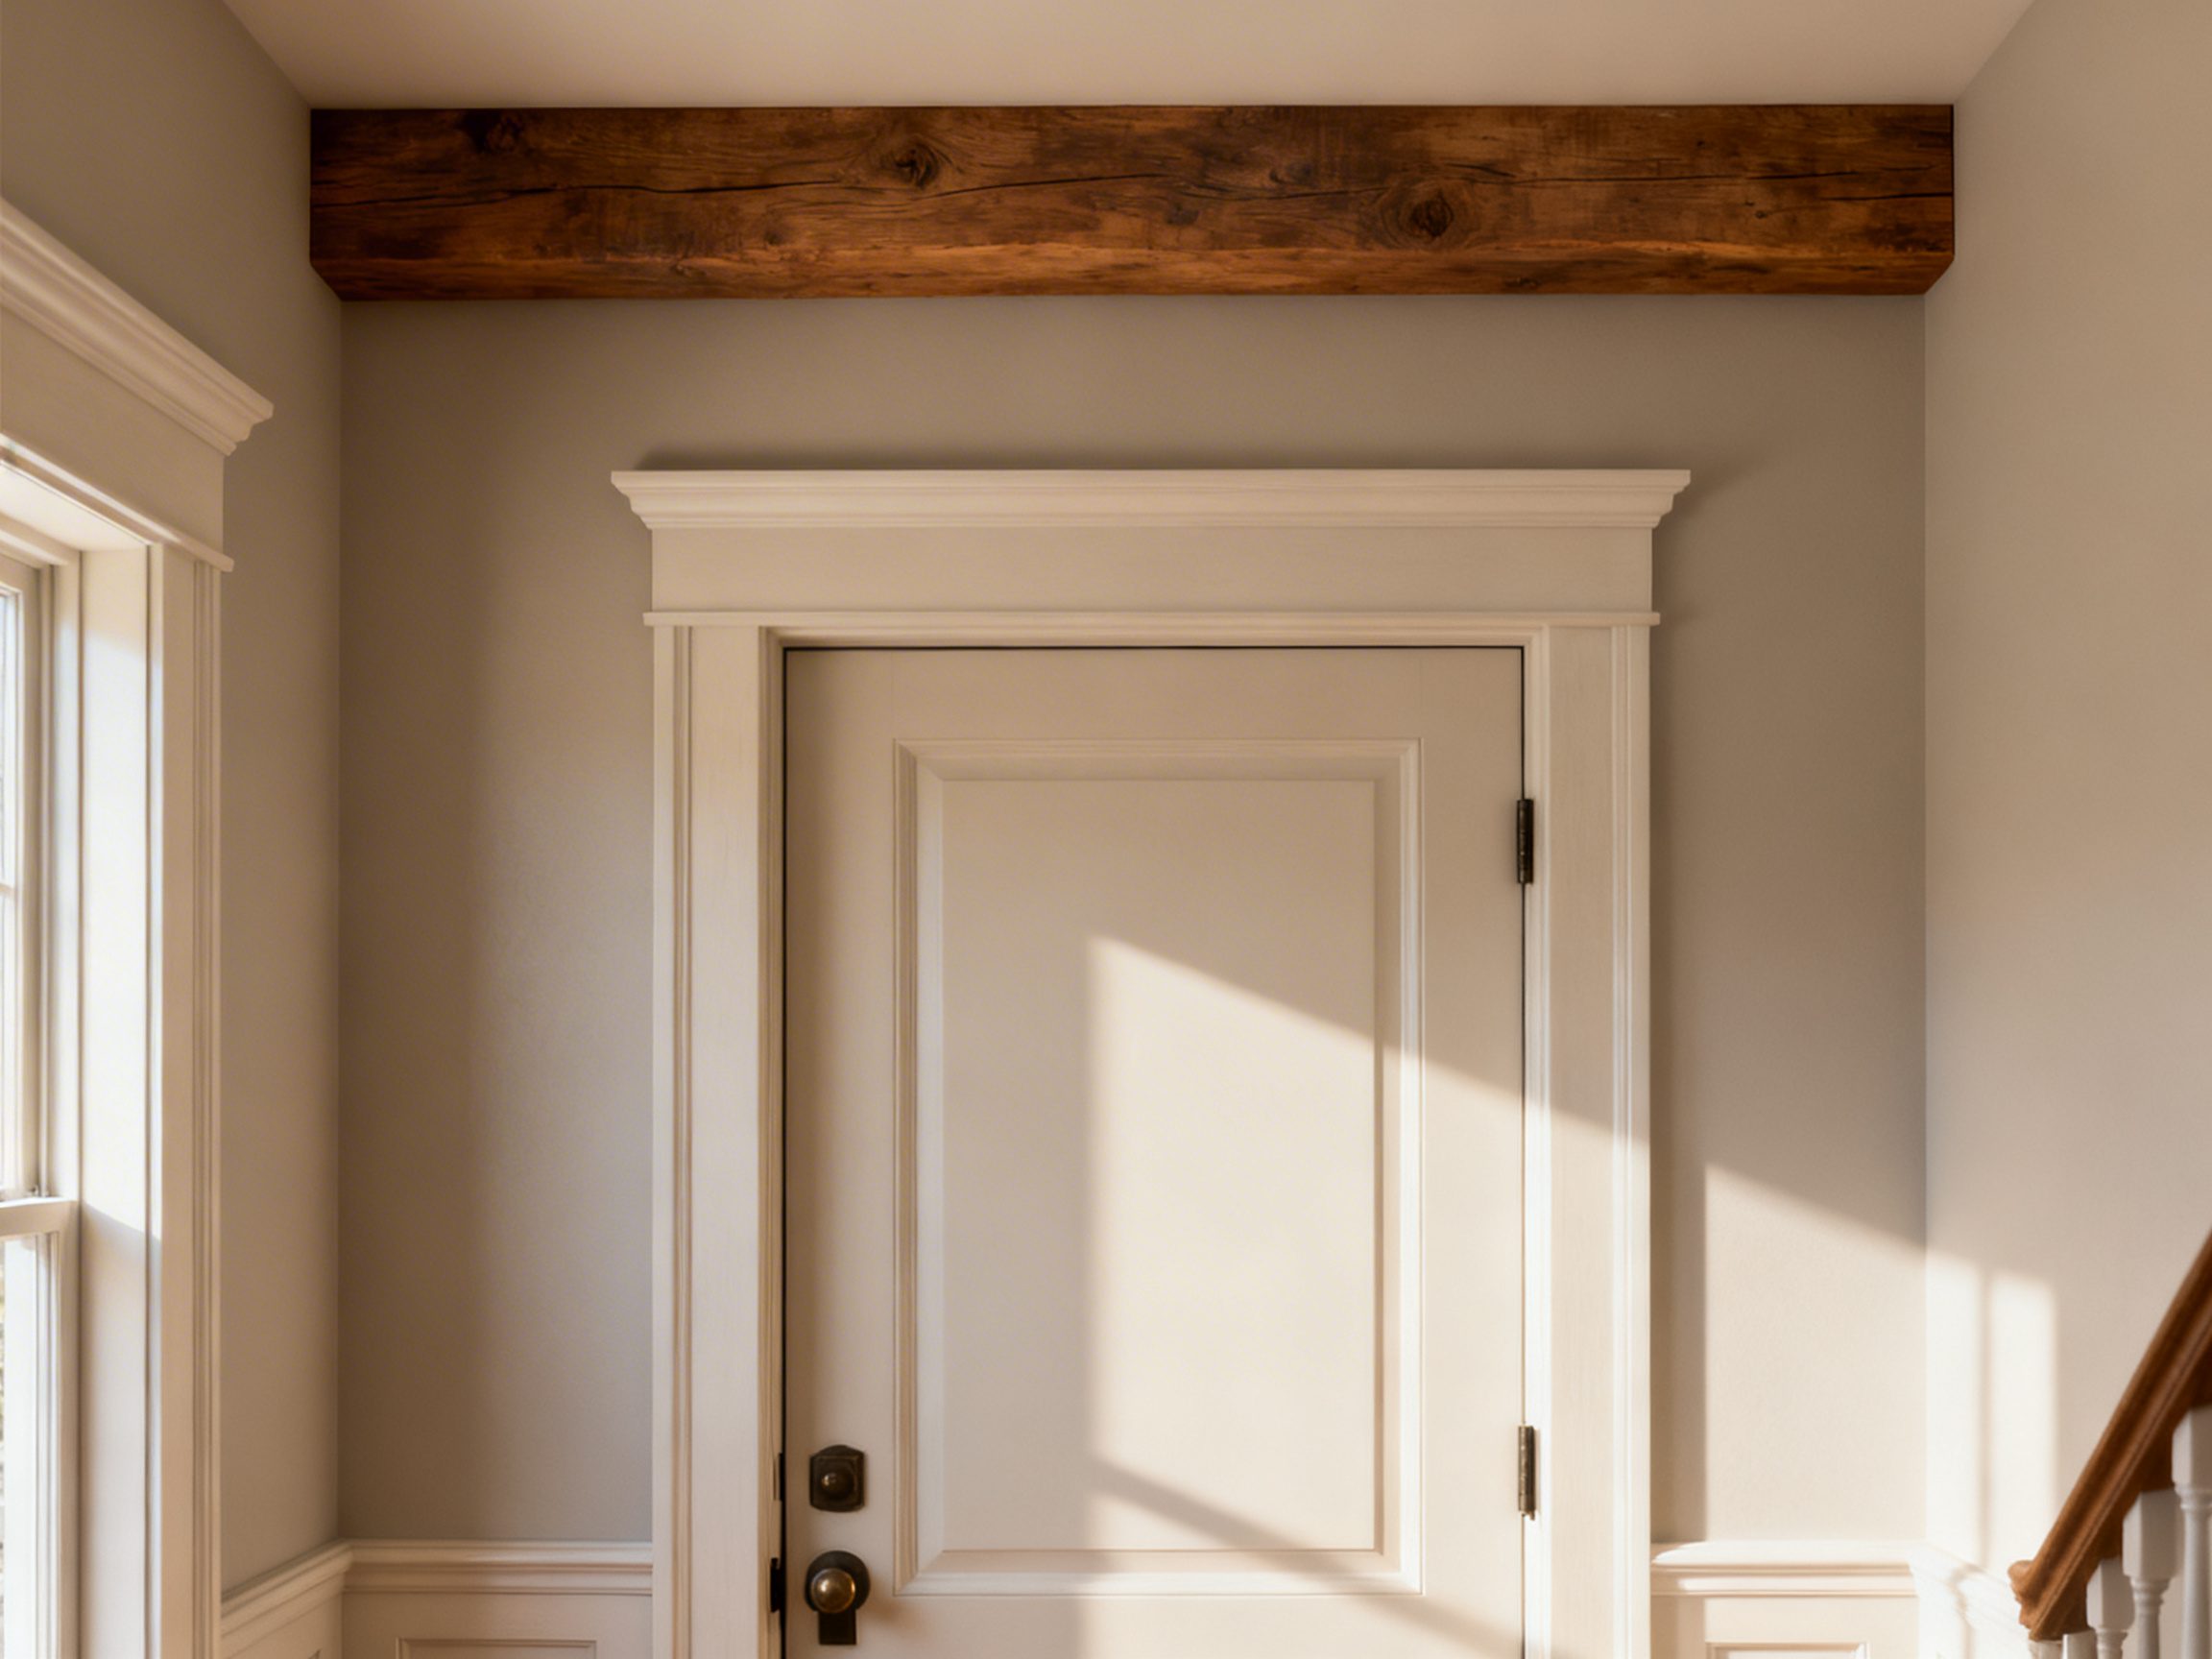
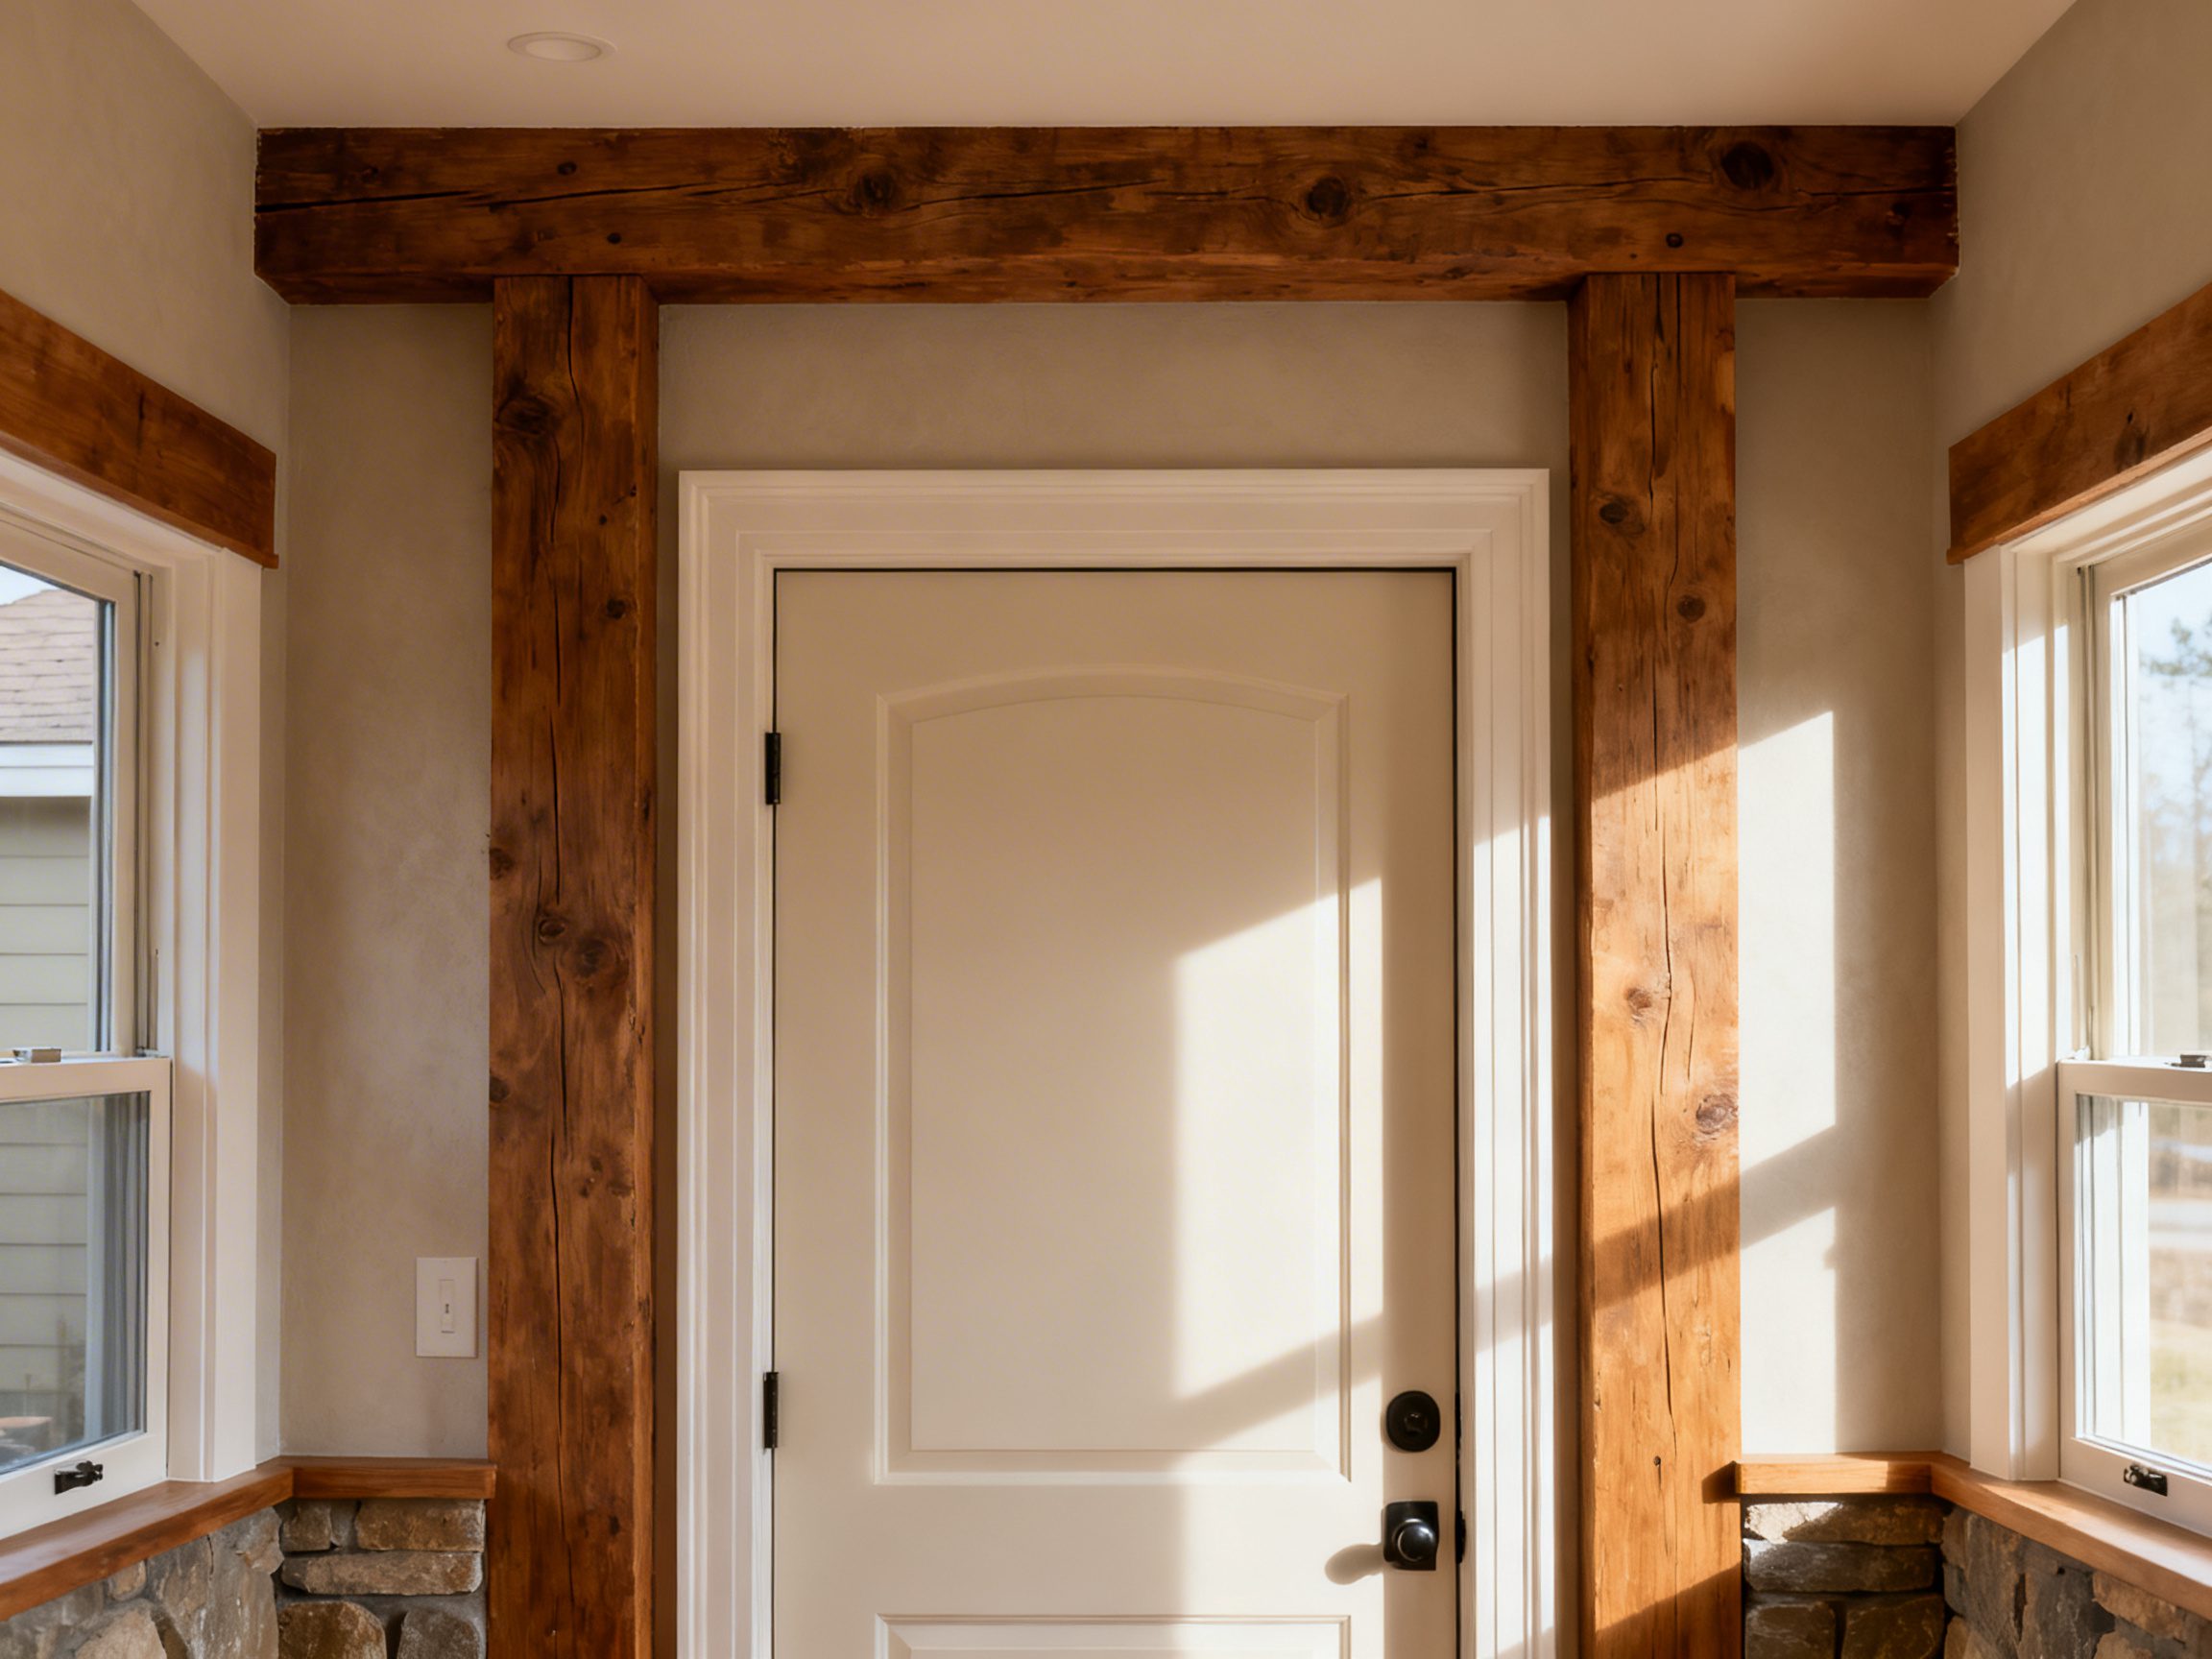
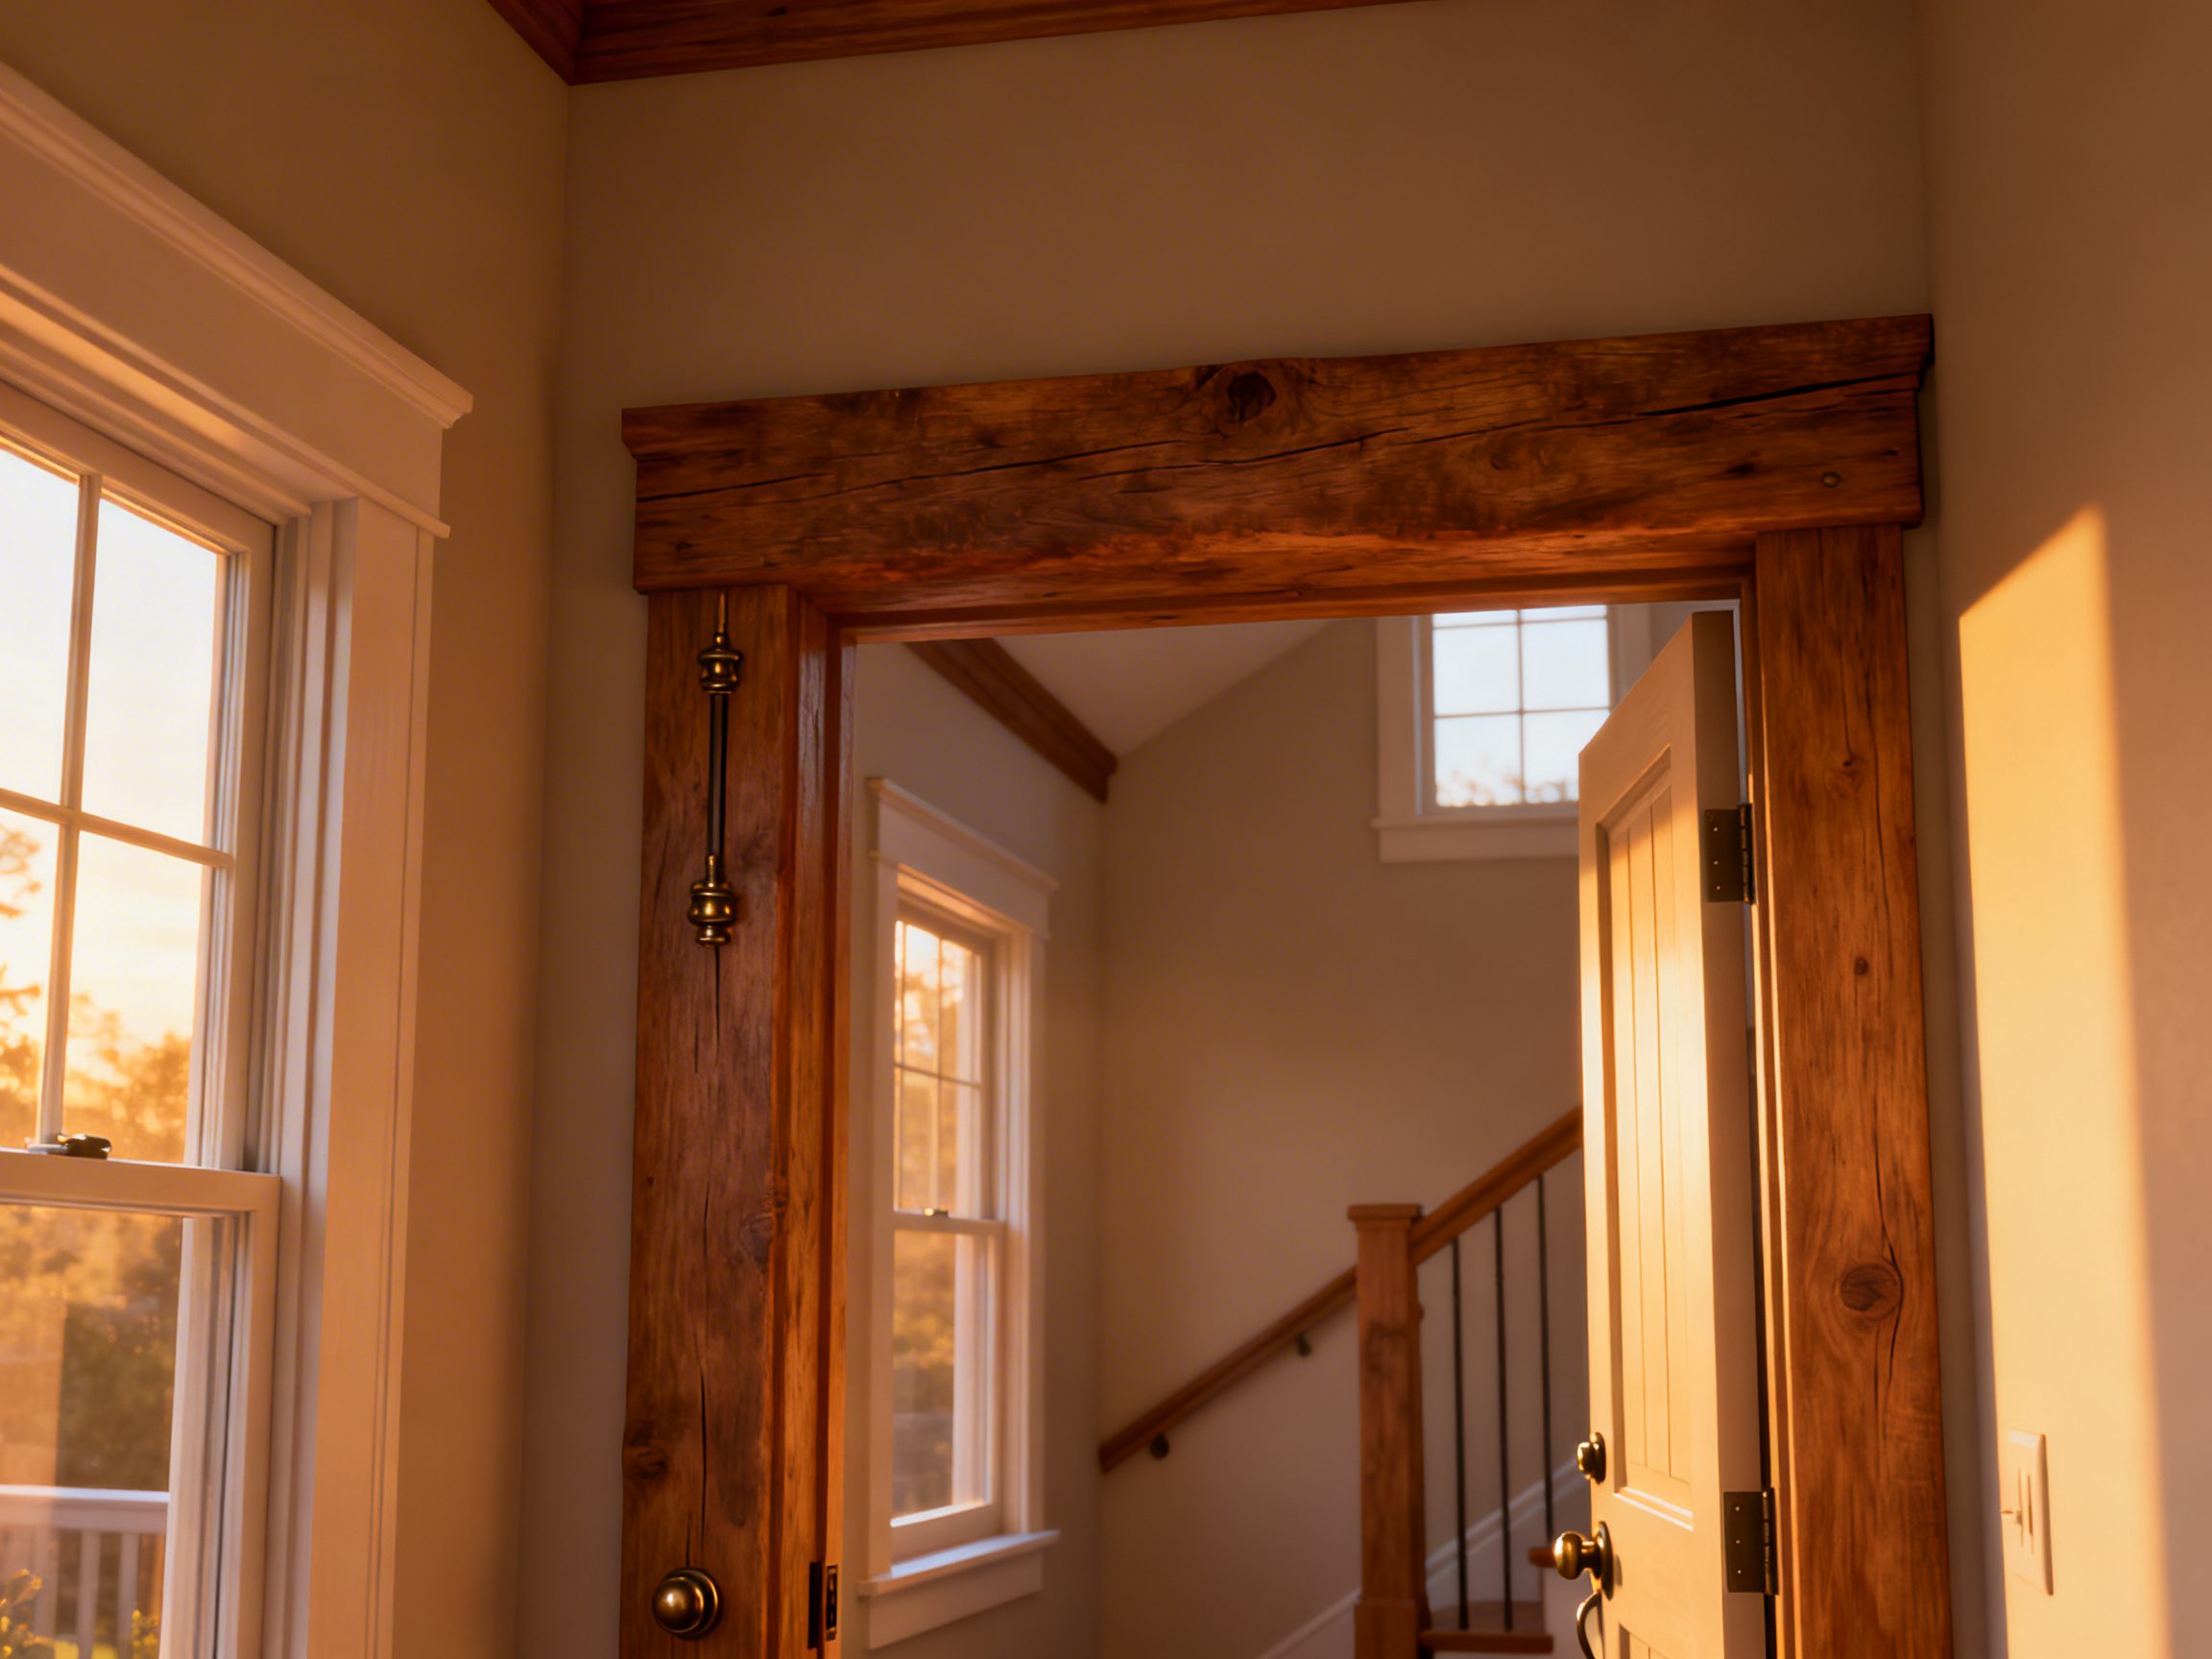
A wood beam doorway can transform a bland opening into architectural punctuation. In my experience, the right beam reads like the original structure, even in new builds, and it instantly grounds open concept spaces that feel too airy.
The key is choosing a beam profile, species, and finish that echo adjacent millwork and flooring, so the detail looks intentional, not tacked on.
Meanwhile, 2026 interiors are putting doors and openings back in the spotlight, with cleaner-lined millwork and expressive wood tones gaining ground.
I continually see clients surprised by how a beam-framed opening can zone a room, align sightlines, and add texture without closing off flow.
If you are building out a casual dining zone, pair the beam with layered greenery for softness, similar to how I style thresholds near a Boho Dining Room for collected warmth.
- Load‑bearing vs. decorative beam doorways explained
- Best woods for beam-framed openings by room
- Sizing a beam for standard and arched door spans
- Integrating concealed doors within a beam portal
- Joinery, fasteners, and hardware for beam lintels
- Fire codes, headroom, and structural clearances
- Finishes that complement modern and rustic schemes
- DIY vs. pro costs and installation timelines
- FAQ
- Final Thoughts
Load‑bearing vs. decorative beam doorways explained
What does a load‑bearing beam actually do?
A true structural beam carries loads from above and transfers them to posts or jack studs, keeping the opening stable. If you widen a wall or remove a header, your beam becomes the header, so species, grade, and section depth matter.
In renovations, I work with an engineer early, since span, live load, and tributary width dictate whether you need solid sawn, LVL, or a concealed steel flitch.
When is a decorative beam the smarter move?
If the wall is not load-bearing, you can use a hollow box beam that slips over the drywall return, wiring, or a modest plywood arch form.
This approach gives you scale and character without reengineering the house, and it often finishes in a weekend. I like to spec miter‑folded box beams for tight seams and a removable side for hidden lighting or future cabling.
How to decide: structure, budget, timeline
Use this table to align intent with constraints. I build this matrix into every scope conversation to avoid scope creep.
| No structural benefit, sounds hollow if poorly built | Best for | Typical materials | Installed cost range | Permits/engineering | Lead time | Pros | Cons |
|---|---|---|---|---|---|---|---|
| Structural, exposed | Widened openings, load paths | LVL with wood wrap, solid glulam | $2,500–$7,500+ | Usually required | 3–8 weeks | Authentic, code compliant | Higher cost, drywall and finish disruption |
| Decorative box beam | Non‑load walls, quick upgrades | 3‑sided mitered oak, pine, or ash | $450–$1,800 | Not required | 1–2 weeks | Lightweight, reversible | No structural benefit, sound hollow if poorly built |
| Decorative arched box beam | Softening transitions, classic look | Bent plywood form with veneer or thin planks | $900–$3,500 | Not required | 2–4 weeks | Custom radius, elegant | Precision templating needed |
Practical steps to avoid mistakes
- Open the wall to confirm bearing status before ordering anything. Never rely on guesswork.
- Match beam depth to nearby casings and ceiling height. Shallow rooms hate chunky beams.
- For structural spans, request stamped calcs and specify fire blocking and hanger hardware in writing.
Best woods for beam-framed openings by room
Entry and main hallways: durability first
In high traffic zones, I favor quarter-sawn white oak for its stability and tight ray fleck that resists cupping. A matte hardwax oil keeps the grain legible without yellowing under daylight.
If your floors are a cool mid oak, specify a neutral oil to avoid a mismatched orange cast.
Kitchen thresholds: cleanability and tone
Kitchens live hard, so I often wrap LVLs in hard maple or ash, both dense and forgiving with splatters. Ash takes a cerused finish beautifully, which ties into light Scandinavian schemes and Minimalist Lifestyle Decor without reading rustic. Keep edges slightly eased to avoid finish wear on sharp corners.
Living rooms: warmth and patina
For living spaces, reclaimed fir or hemlock brings soft grain and instant age. I frequently wire brush and stain to a mid brown that coordinates with cabinetry and media walls, then seal with low sheen polyurethane for wipeability.
If you are pairing with layered shelving, consider cues from Farmhouse Bookshelf Decor to balance texture and proportion.
Dining areas and arch moments: expressive grain
Walnut introduces sophistication in formal dining thresholds, especially when arched. Its chocolate undertones pair with brass and linen, while a satin conversion varnish keeps finger marks at bay.
For eclectic rooms with plants and collected art, rift oak with a natural oil complements greenery, similar to ideas in Boho Plant Decor.
Bathrooms and laundry: moisture mindful
Humidity demands closed-grain species and disciplined sealing. I prefer teak veneer on a moisture-resistant substrate or well-sealed maple, finishing all faces, edges, and the interior of box beams. Maintain a 1/4 inch clearance from tile to avoid wicking during mopping.
Outdoor or pool house transitions
If the opening is semi-exterior, choose thermally modified ash or cedar with UV inhibiting marine finish. In pool houses,
I often echo the beam tone with decking or trim for cohesion, a trick that also plays nicely beside a rustic water feature like a Farmhouse Plunge Pool.
Sizing a beam for standard and arched door spans

Standard spans: proportion and head clearance
For 28 to 48 inch openings, I size decorative beam depth between 4 and 7 inches, thickness 1 to 2 inches per face on a hollow build.
Keep the underside no lower than 80 inches clear, ideally 82 to 84 inches in taller spaces. In rooms with eight-foot ceilings, I cap total beam drop at 3 inches to avoid a low-brow effect.
Arched spans: radius, rise, and template strategy
A comfortable residential arch uses a radius between 36 and 60 inches, with a rise of 6 to 12 inches on a 36 to 48 inch span.
I template with 1/4 inch MDF, dry fit, then skin with 1/8 inch bendable plywood before applying the finished wood. The thicker the face boards, the tighter your kerf spacing must be to prevent telegraphing.
Rule‑of‑thumb sizing table
This table reflects typical decorative box beam dimensions I specify for visual balance. Structural members must be engineered separately.
| Clear opening width | Ceiling height | Beam face height (visible) | Beam thickness (each side) | Arch rise recommendation |
|---|---|---|---|---|
| 30–36 in | 8 ft | 3–3.5 in | 3/4–1 in | 4–6 in |
| 36–48 in | 8–9 ft | 4–5 in | 1 in | 6–9 in |
| 48–60 in | 9–10 ft | 5–6.5 in | 1–1.25 in | 8–12 in |
| 60–72 in | 10 ft+ | 6.5–8 in | 1.25–1.5 in | 10–14 in |
Installation checks before you cut
- Confirm the jamb plumb and header level. A twisted opening will telegraph in your miters.
- Pre‑finish all parts, then scribe to the walls. Touch-ups are cleaner than finishing in place.
- Anchor to blocking, not drywall. I lay screws into 2x backing at 12–16 inch centers.
Integrating concealed doors within a beam portal
Deciding between true hidden doors and quiet, low-profile doors
A concealed door in a beam portal works when the door, casing, and wall read as one continuous volume. In my experience, you either go fully flush with a jambless pivot door or you opt for a quiet reveal with shadow line trims and concealed hinges.
The beam portal becomes the frame that visually swallows the door, so you must commit to the illusion with matching veneers, grain direction, and aligned joints.
Structure first, then the camouflage
Treat the beam portal as a standalone opening with a proper header sized by your engineer, then layer the concealment. I typically run a full-height flush jamb system with magnetic latches, floor pivots, and a soft-close closer in the head.
The face gets a continuous wood cladding that spans beam leg to leg, so the door seam lands on a V-groove, faux butt joint, or shadow reveal.
Veneer, grain, and reveal strategy
Concealment lives or dies by grain. Sequence matched veneer across the beam legs, lintel, and door slab, with the grain running in one direction, usually vertical for height.
I keep a 3 to 5 mm shadow reveal around the slab to accept seasonal movement, then echo the same reveal as a negative detail where beam meets drywall to keep the language consistent.
| Door Type | Hinge/Mechanism | Best Use | Notes | Budget Impact |
|---|---|---|---|---|
| Flush pivot door | Floor/ceiling pivot with concealed closer | Wider openings, dramatic minimal look | Requires strong subfloor blocking and precise alignment | $$$ |
| Concealed hinge swing door | 3D adjustable concealed hinges | Standard openings, easier service | Needs jambless or flush jamb kit, great for retrofits | $$ |
| Sliding pocket door | Soft-close pocket track | Tight clearances, no swing area | Beam legs must hide pocket return, thicker walls | $$$ for quality tracks |
Electrical, access, and everyday use
Plan for magnetic contact switches if the concealed door controls lighting, and route wiring before beam cladding. I like push-to-open magnetic latches paired with a discrete finger pull routed into a faux joint, which reads as part of the beam pattern.
For kids and guests, add a subtle cue, like a slightly offset groove or warmer stain on the active edge, so it feels intuitive.
Styling cues that keep the illusion
Carry the same species and finish from the beam portal onto adjacent millwork, for example, a bookshelf return or a paneled wall, so the door seam gets lost among verticals. If your home skews rustic, a light hand with texture helps, but avoid exaggerated distressing that telegraphs the door edge.
For boho or open plan spaces, integrate plant-height lines and furniture sightlines to distract the eye, similar to how I layer greenery in this guide to Boho Plant Decor, and keep flow clear as in Open Concept Floor Plans.
- Mock up reveals with painter’s tape to preview seam visibility in daylight and at night.
- Order 10 to 15 percent extra veneer for sequence matching across the moving slab.
- Test magnet strengths on site; heavy slabs need stronger catches to sit perfectly flush.
Joinery, fasteners, and hardware for beam lintels
Timber joinery that looks right and carries load
A beam portal is not just trim; it is a small frame. I usually specify a concealed steel header or LVL for the structure, then a decorative wood cladding built with proper joinery.
For visible authenticity, use drawbored mortise and tenon at the corners, or concealed loose tenons for clean lines, keeping the decorative beam independent of the structural member.
Fasteners and hidden reinforcement
Where spans are modest, structural screws and steel knife plates let you keep faces clean. I have great results setting a steel angle or knife plate into routed pockets at the beam ends, then plugging with grain-matched dutchmen.
Predrill for long structural screws, angle into studs or posts through the beam legs, and avoid face nailing that will telegraph through clear finishes.
| Connection | Application | Pros | Cautions | Cost |
|---|---|---|---|---|
| Mortise and tenon (drawbored) | Visible joints, rustic or craftsman look | Mechanical lock without metal, period-correct | Needs precise layout, wood movement planning | $$ |
| Loose tenons/Dominos | Clean modern beams, fast assembly | Strong, invisible, repeatable | Not a substitute for structure, use with hidden steel | $$ |
| Knife plates/steel angles | Structural tie-in at jambs and header | High capacity, compact | Requires routing, careful fire blocking | $$$ |
| Structural screws (6–10 in.) | Anchoring legs to framing | No predrilled lag holes, high shear values | Mind edge distances, conceal with plugs | $ |
Hardware for function and longevity
Choose hardware to suit the door system within the portal. For pivot doors, specify adjustable pivots with integrated closers and a stainless or brass finish that tolerates seasonal shifts. For swing doors, 3D adjustable concealed hinges and magnetic latches keep lines crisp, and for pockets, invest in heavy-duty, soft-close carriers with aluminum tracks to prevent racking.
Movement, finishing, and serviceability
Wood moves, so I leave 1/8 inch expansion gaps at concealed interfaces, then back-prime all faces before installation. Use high-quality construction adhesive only where you can still service hardware; never glue access panels shut.
Finally, pre-finish beam components in a controlled shop environment for color consistency, a lesson I learned after chasing blotchy stain touchups on a cold job site.
- Dry fit the entire lintel assembly, then mark screw and plate locations before finishing.
- Align the door axis with the beam’s visual centerline to avoid odd shadow breaks.
- Plug visible fasteners with grain-oriented dowels for a near-invisible repair path.
Fire codes, headroom, and structural clearances
Know your minimums before you draw
Clearances are not negotiable. In most jurisdictions, 80 inches is the minimum door head height, and egress doors need at least 32 inches clear width, measured with the door open 90 degrees. The beam lintel must sit high enough to maintain that headroom, and any decorative drop should not intrude into the required egress envelope.
Separation, ratings, and materials
If your beam portal lands on a garage entry or between a dwelling and an attached unit, expect a 20-minute door and rated jamb assembly. I avoid solid-sawn decorative beams in rated separations unless they can be encapsulated in Type X gypsum per code and approved by the AHJ.
For interior room-to-room portals, non-rated is typical, but always keep smoke migration in mind, especially with open concepts.
| A decorative beam is cladding over the structure | Typical Requirement | Design Implication | Notes |
|---|---|---|---|
| Primary egress door | 32 in. clear, 80 in. head minimum | Beam underside above 80 in. | Verify swing and hardware projections |
| Garage to house | 20-minute door, self-closing, sealed | Do not breach rated assembly with decorative beam | Consult local amendments |
| Hallway opening | 36 in. typical in new builds | Maintain full corridor width under beam | ADA clearances may apply |
| Load-bearing wall | Engineer-sized header, jack/king studs | Decorative beam is cladding over structure | Leave inspection access where required |
Mechanical, electrical, and sprinkler conflicts
Before you commit to a deep lintel, scan for ducts, wiring, and sprinkler heads that could clash with a lowered beam. I keep at least 2 inches of buffer from any head to a decorative element to prevent shadowing and clearance violations.
Rerouting often costs more than the beam, so coordinate early with your trades and shift the opening if needed.
Tolerances, reveals, and inspection strategy
Keep a consistent 1/2 inch drywall reveal around the beam legs and underside when using shadow trims, which buys you tolerance if framing is out.
For renovations, I prefer installing the structural header first, passing inspection, then boxing with the decorative beam so there is a clear record of what is structural. When you finish, ensure your beam does not reduce stair headroom, a common miss in older homes with tight runs.
- Mark finished floor elevation first, then pulled all head heights from that datum.
- Confirm door closer envelopes so hardware does not collide with the lintel.
- Photograph open walls and beam cavities for future maintenance and permitting.
Finishes that complement modern and rustic schemes
Modern: low-sheen clarity and crisp grain
Modern interiors favor restraint, so choose a finish that reads intentional rather than “craft project.” I specify waterborne polyurethane in matte or satin for its crystal-clear tone that does not amber, which keeps white oak or ash looking fresh and architectural.
A light wire-brush before finishing lifts the grain subtly, adding shadow without heavy texture, and a 5 percent whitewash can neutralize a yellow cast while preserving grain.
Rustic: warmth, depth, and hand-touched texture
For rustic rooms, depth matters more than gloss. I reach for oil-based penetrating stains in mid to dark tones like walnut, espresso, or aged chestnut, followed by a satin topcoat to catch the light softly.
A pre-stain conditioner on softwoods like pine prevents blotching, while a light hand-scrape or distressed edge gives the beam instant age without looking contrived.
Transitional blends: bridging clean lines and patina
When the home mixes modern and farmhouse notes, a neutral mid-tone finish is the safest mediator. Fumed or smoked effects on white oak create gray-brown complexity that pairs as easily with plaster as with shiplap.
I often finish with a hardwax oil for a velvety feel that is repairable in place, useful in busy open spaces, especially if you are working toward cohesive lines with an adjacent Open Concept Floor Plans layout.
Species, stain, and sealer combinations worth considering
Use species and finish together to steer the mood. Rift sawn white oak with matte waterborne poly reads gallery-clean, while knotty alder with an oil stain feels lodge-warm.
If you want color control, start with a dye stain for even saturation, then glaze selectively to emphasize joinery or faux pegs for character.
| Look | Wood Species | Finish System | Tone Outcome | Where It Works |
|---|---|---|---|---|
| Modern minimal | Rift white oak | Matte waterborne poly, no stain | Neutral, non-amber, crisp grain | Contemporary flats, minimal corridors |
| Warm rustic | Knotty alder or pine | Oil stain + satin poly | Amber warmth, visible knots | Farmhouse entries, dens |
| Transitional | White oak | Light fume effect + hardwax oil | Gray-brown, subtle patina | Open plan living near kitchens |
| Modern rustic | Douglas fir | Reactive stain + matte poly | Weathered silver-brown | Lofts, modern cabins |
Sheen level and maintenance realities
I continually see clients choosing semi-gloss for “durability,” which only highlights seams and dust. Matte or satin hides joints and touch-ups, and it photographs better under mixed lighting. If you expect seasonal movement, prefer hardwax oil or repairable matte topcoats that allow spot fixes without refinishing the entire arch.
Coordination with adjacent elements
Finish your beam to converse with neighboring woods, not fight them. If floors are red oak with orange cast, lean into cooler-toned finishes on the beam to avoid a monotone box, or echo that warmth with purpose and introduce contrast through wall color and metals.
Tie the beam to shelving tone for cohesion, particularly if you are styling nearby built-ins with ideas like Farmhouse Bookshelf Decor.
DIY vs. pro costs and installation timelines
How to choose between DIY and pro?
In my experience, the decision hinges on structural changes, ceiling height, and finish expectations. If you are cladding a simple drywall opening with non-structural box beams, a confident DIYer can execute cleanly with a miter saw, pocket screws, and a brad nailer.
If you are widening an opening, hiding HVAC or wiring, or tying into load-bearing framing, hire a pro and get permits.
Typical scope, tools, and hidden complexities
DIY projects slow down at template making, scribing to out-of-plumb walls, and achieving invisible seams. Pros bring lasers, track saws, and shop-built mitered boxes that arrive square, which saves on-site wrestling and finish touch-ups.
Expect pros to prefinish in the shop for dust control and color consistency, which I strongly prefer for darker stains.
| 2–5 days on site, permits extend the total to 2–4 weeks | Scope | Estimated Cost | Timeline | Pros | Cons |
|---|---|---|---|---|---|
| DIY, non-structural box beam | Clad existing opening with hollow beam, light trim | $200–$700 materials, plus tool rental $50–$150 | 1–2 weekends including finishing | Budget friendly, full finish control | Learning curve, visible seams if walls are out of square |
| Pro carpenter, non-structural | Custom mitered box, scribing, prefinishing | $800–$2,000 installed | 1 day site work, 1–2 weeks lead | Crisp joins, minimal mess, predictable result | Higher cost, scheduling |
| GC/finish carpenter, structural modification | Widen opening, add LVL/header, inspections | $2,500–$8,000+, region dependent | 2–5 days on site, permits extend total to 2–4 weeks | Code compliant, true arch or radius options | Dust, higher budget, permit timelines |
| Millwork shop + installer | Shop-built arch kit, shop finish, on-site install | $1,500–$4,000 | 3–6 weeks fabrication, 1 day install | Flawless curves, color-matched finishing | Longer lead time, premium pricing |
Where to spend, where to save?
Spend on accurate scribing, high-quality plywood or solid lumber faces, and a professional finish if you want a modern look. Save by using poplar for paint-grade projects, or box-beam skins over a simple cleat when the opening is square.
If you are pairing the arch with other upgrades, sequence it before wall paneling or wainscoting to avoid rework, a tactic aligned with 2026’s DIY-friendly upgrade focus highlighted in current industry roundups.
Lead times, permits, and sequencing
If structural, secure an engineer’s letter and permit first to avoid failed inspections. Order materials and prefinish panels before demolition, then install, caulk minimal gaps, and complete final finish passes after 24 hours of acclimation.
Coordinate with flooring and paint last so you can touch up edges cleanly without ladders crossing fresh stain.
FAQ
Only if you are altering or widening a load-bearing wall. If you are cladding an existing non-structural opening, a decorative box beam suffices.
I aim for a 3.5 to 4.5 inch face with a 5 to 6 inch depth, keeping proportions lean to avoid lowering the opening visually.
Yes, but request a door sample and color match using a dye plus glaze system. Factory tones often need a two-step approach for accuracy.
A matte waterborne or hardwax oil holds well if you scuff sand and apply multiple thin coats. Choose satin if you expect frequent cleaning.
Final Thoughts
A wood beam doorway arch adds presence fast, but the finish and execution make it believable. Decide early between DIY precision and professional joinery, choose a finish that complements your floors and doors, and keep proportions disciplined for a result that feels built in, not added on.