

Your front yard sets the tone, and the right trellis can deliver structure, privacy, and a hint of romance without spending big. These DIY Trellis Ideas prioritize proportion, durable materials, and plant-friendly spacing so vines establish quickly and the entry feels intentionally designed.
From crisp arches to modular grids, each project is sized for a typical front setback and mindful of sightlines. Expect practical notes on lumber specs, anchoring methods, and finishes that survive splash zones and sprinklers. For seasonal layering, see Minimalist Fall Decor Ideas.
My Pick: Compact Planter Archway Entrance — I love this in small frontage because it creates a true threshold with planters as bases, hides utility meters, and can be moved if you rework the path.
- 1. White Arch Framing a Bare Yard
- 2. Compact Planter Archway Entrance
- 3. Raised-Bed Trellis Grid System
- 4. Cedar Lattice Panel with Cap
- 5. Black Metal Obelisk for Pots
- 6. String-and-Dowel Pea Fence
- 7. Arched Pergola Over Pathway
- 8. Rustic Branch Fan Trellis
- 9. Painted Lattice Accent Wall
- 10. Copper Pipe Vine Screen
- 11. Expandable Willow Fan Trellis
- 12. Wall-Mounted Trellis with Planters
- FAQ
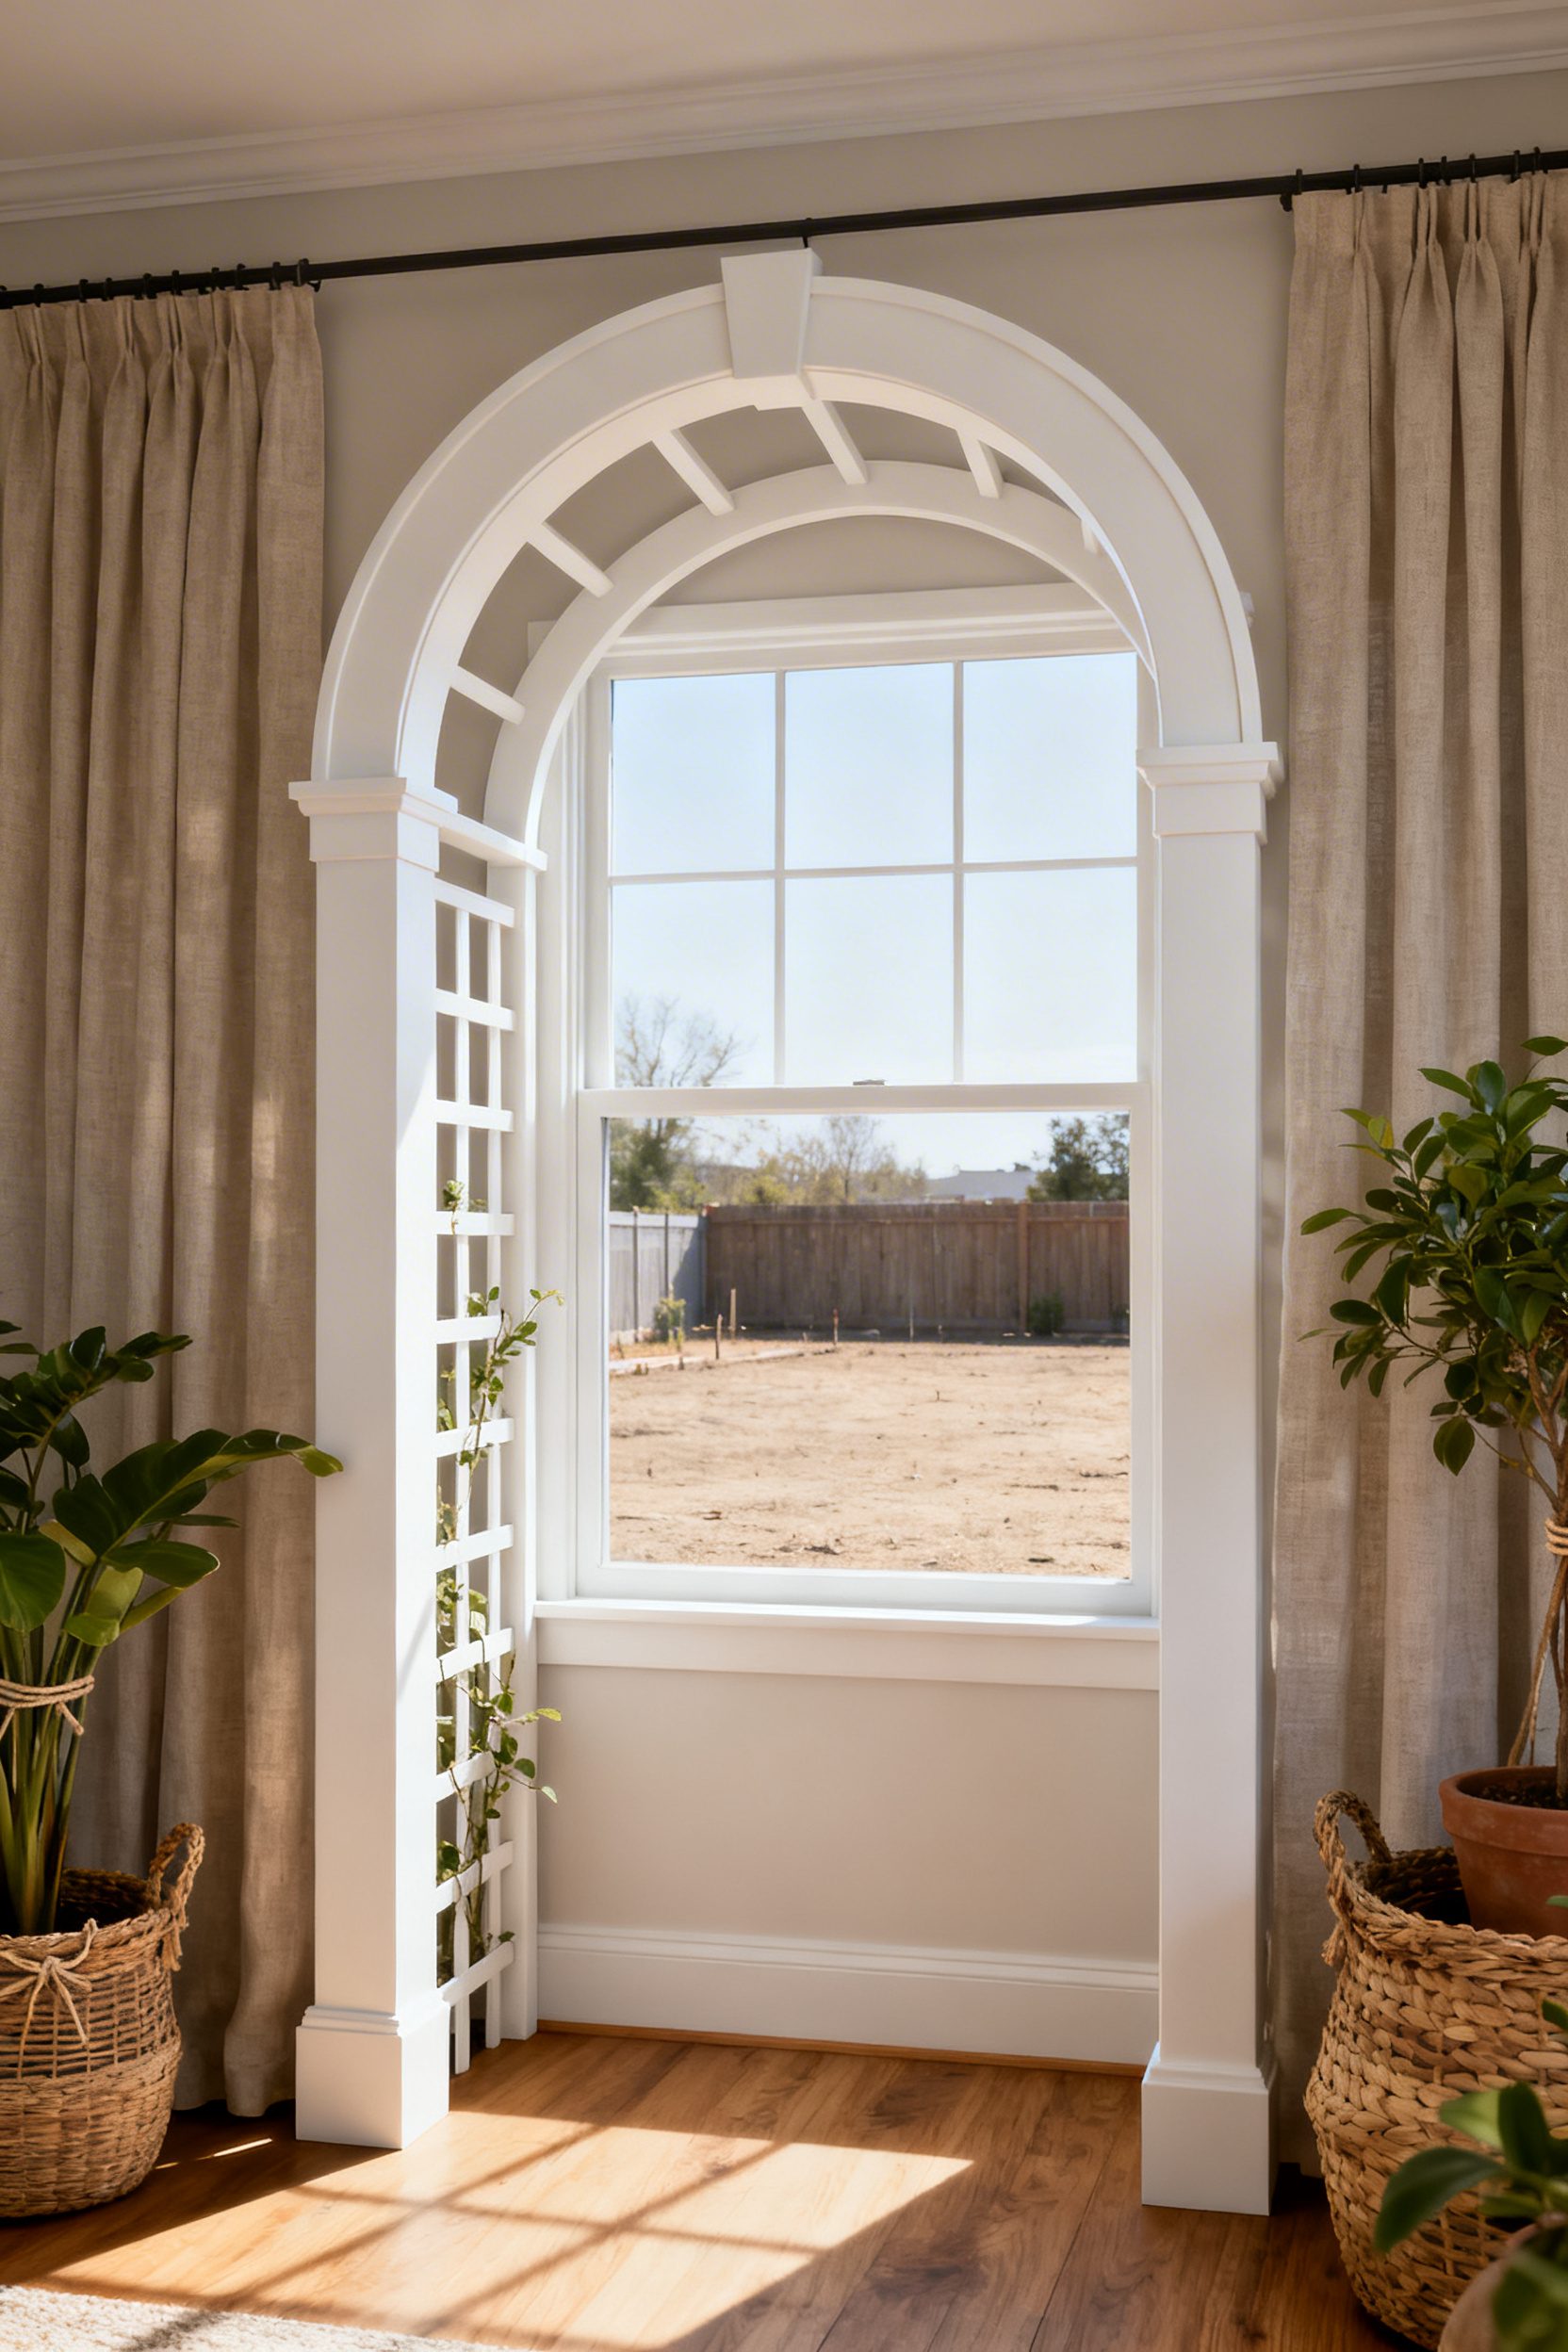
1. White Arch Framing a Bare Yard
- Effort Level: Weekend DIY.
- Estimated Budget: 100-500.
- Maintenance Level: Low (annual wash and touch-up).
- Best For: New builds or sparse front lawns.
A semi-gloss white arch instantly turns an empty lawn into a destination, especially when centered on the front door axis. Use rot-resistant wood like cedar with a high-build exterior primer, then a UV-stable enamel to keep the white crisp.
Anchor with four 24-inch rebar pins sleeved in galvanized pipe set 12 inches deep, then bolt the posts to the sleeves for swap-out ease. Keep the inner clear width at 42 to 48 inches so deliveries and strollers pass cleanly without scuffing vines.
Train fast growers like star jasmine or climbing roses, starting with a 6-inch planting setback to protect paint from moisture. For winter moments, it frames wreaths beautifully, pairing with subtle Holiday Decor Christmas accents.
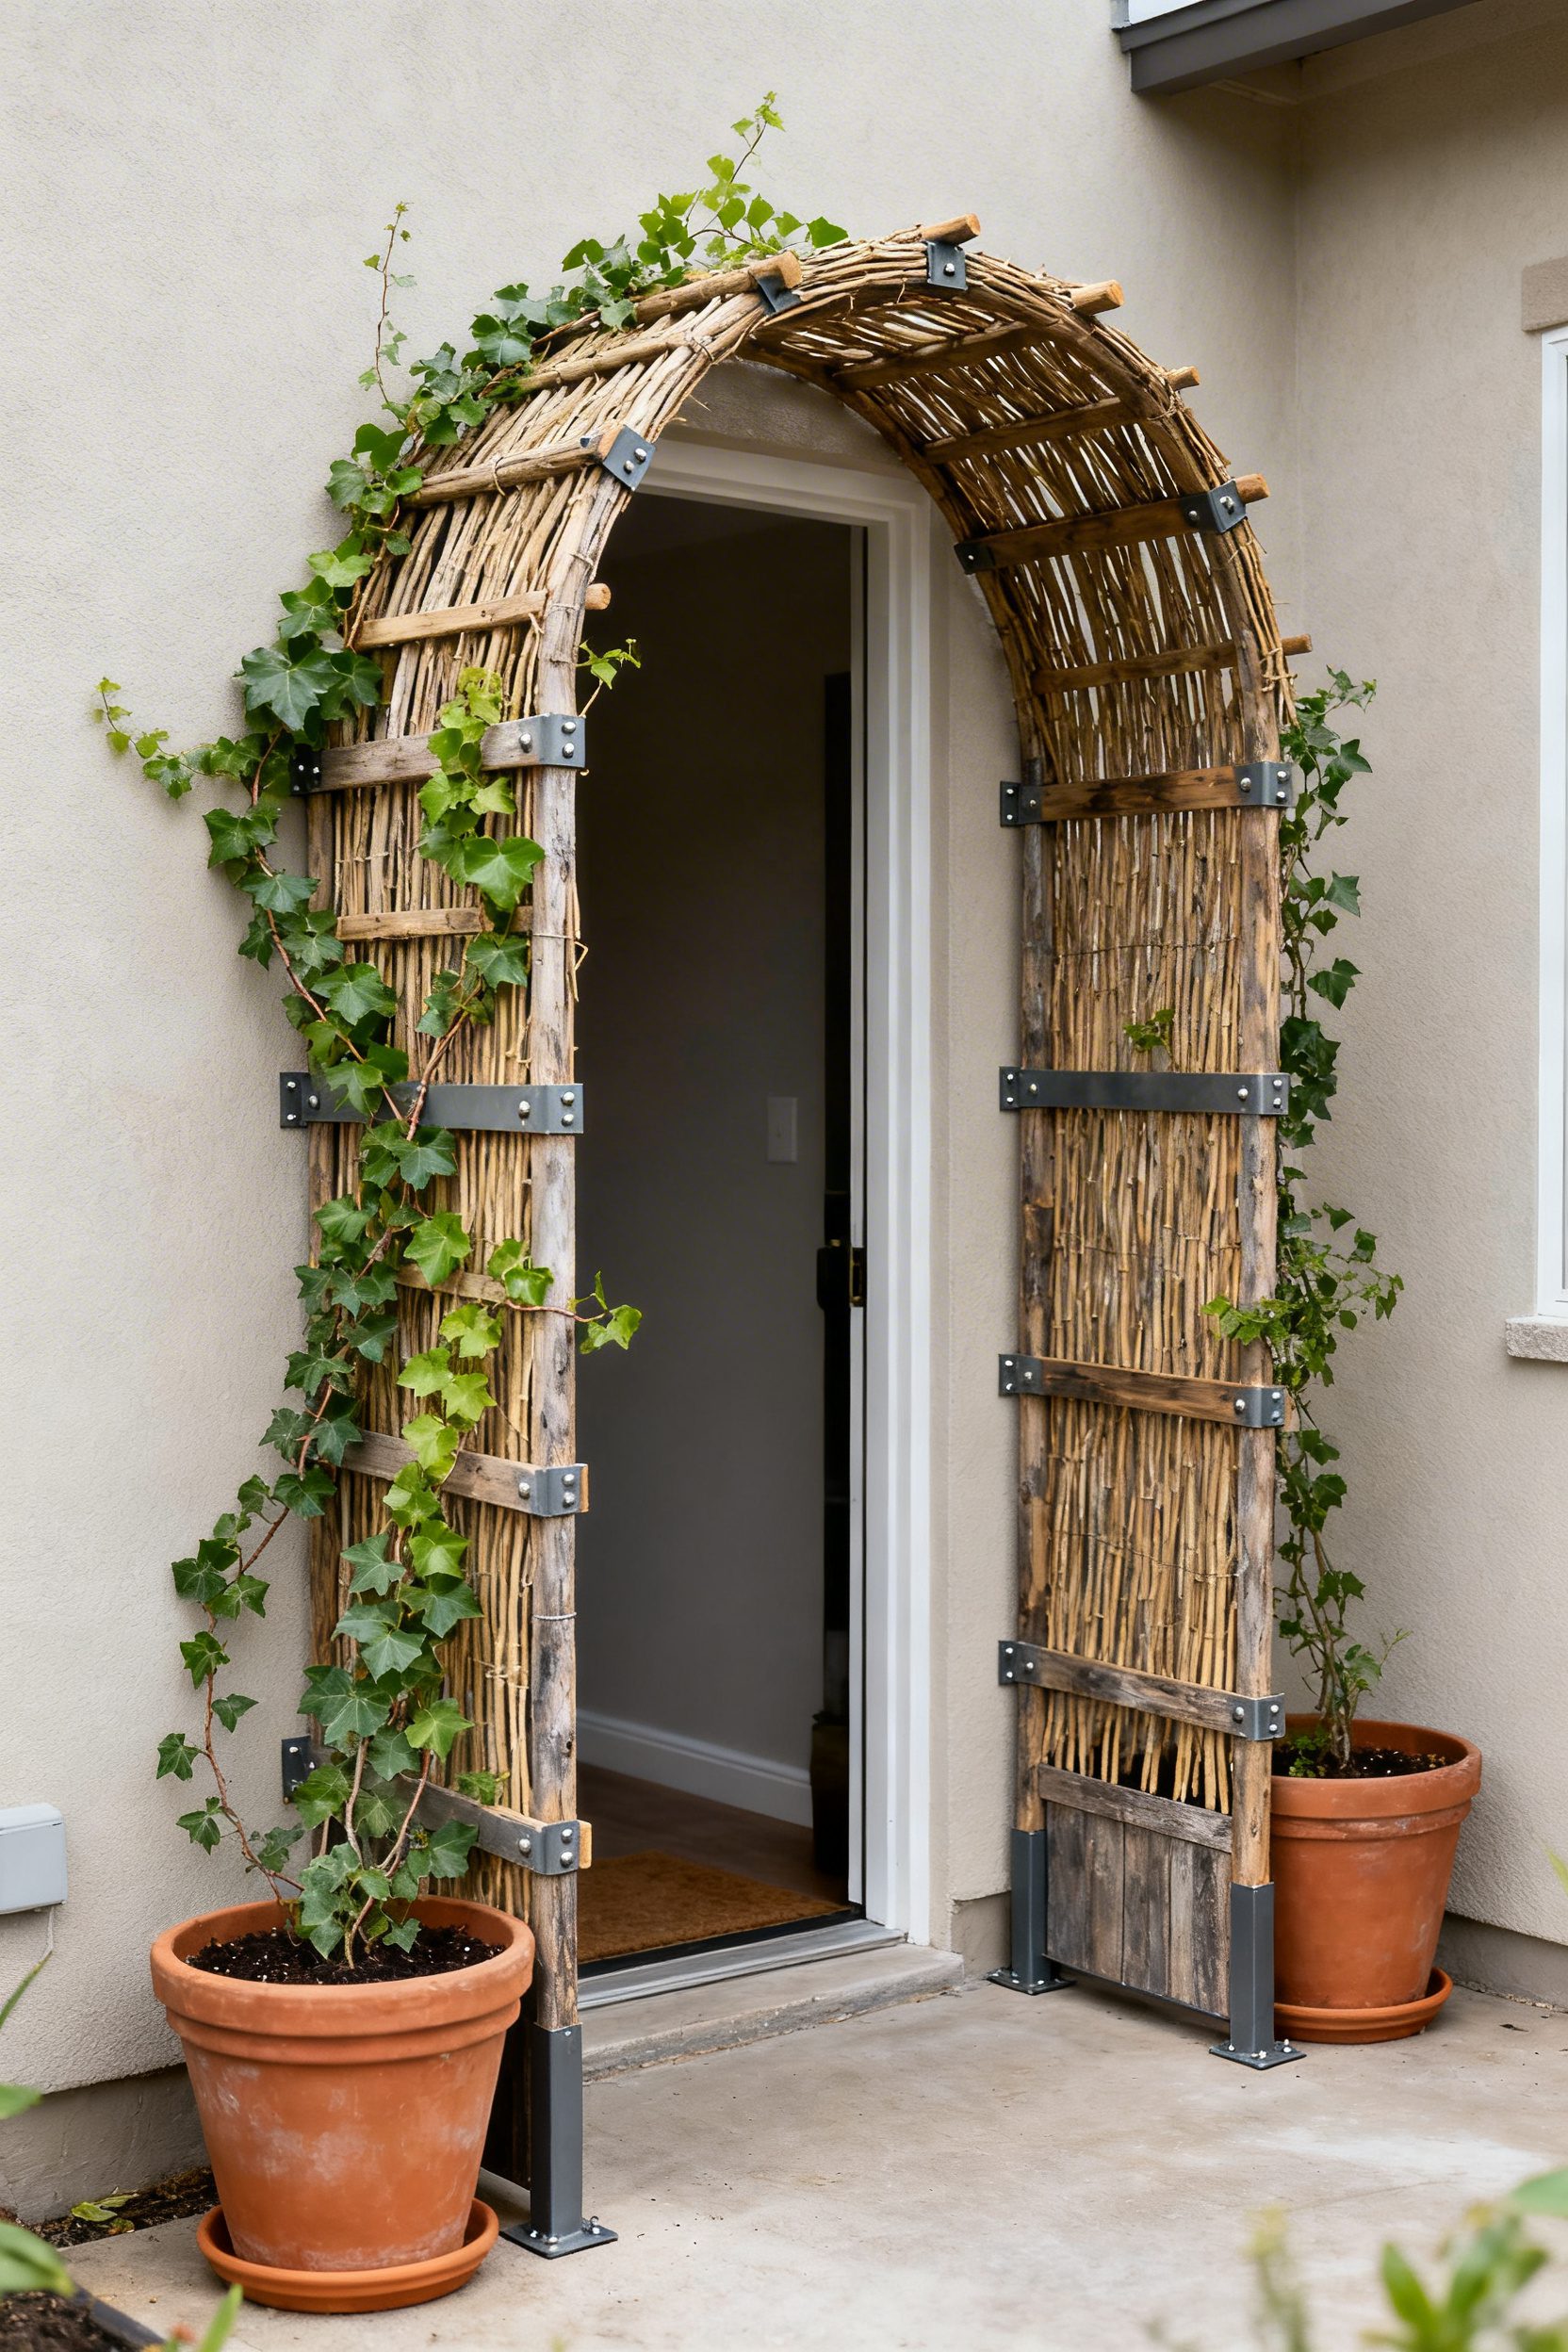
2. Compact Planter Archway Entrance
- Effort Level: Weekend DIY.
- Estimated Budget: Under 100.
- Maintenance Level: Medium (watering and seasonal pruning).
- Best For: Renters and narrow pathways.
Build a narrow arch from 1×2 cedar strips screwed into curved ribs, then seat each post inside a 20-inch planter weighted with gravel. This avoids digging near utilities and keeps the entrance movable as your garden evolves.
Choose lightweight planters with interior sleeves, and run a discreet drip line through the rear to keep vines consistent. Maintain a 36-inch walkway clearance, and pre-stain wood before assembly to prevent blotchy finishes.
Consider vining edibles like scarlet runner beans for bloom and pods, supported by a 3-inch grid so tendrils attach quickly. For inspiration on tonal restraint that lets greenery shine, explore Minimalist Bathroom Lighting.
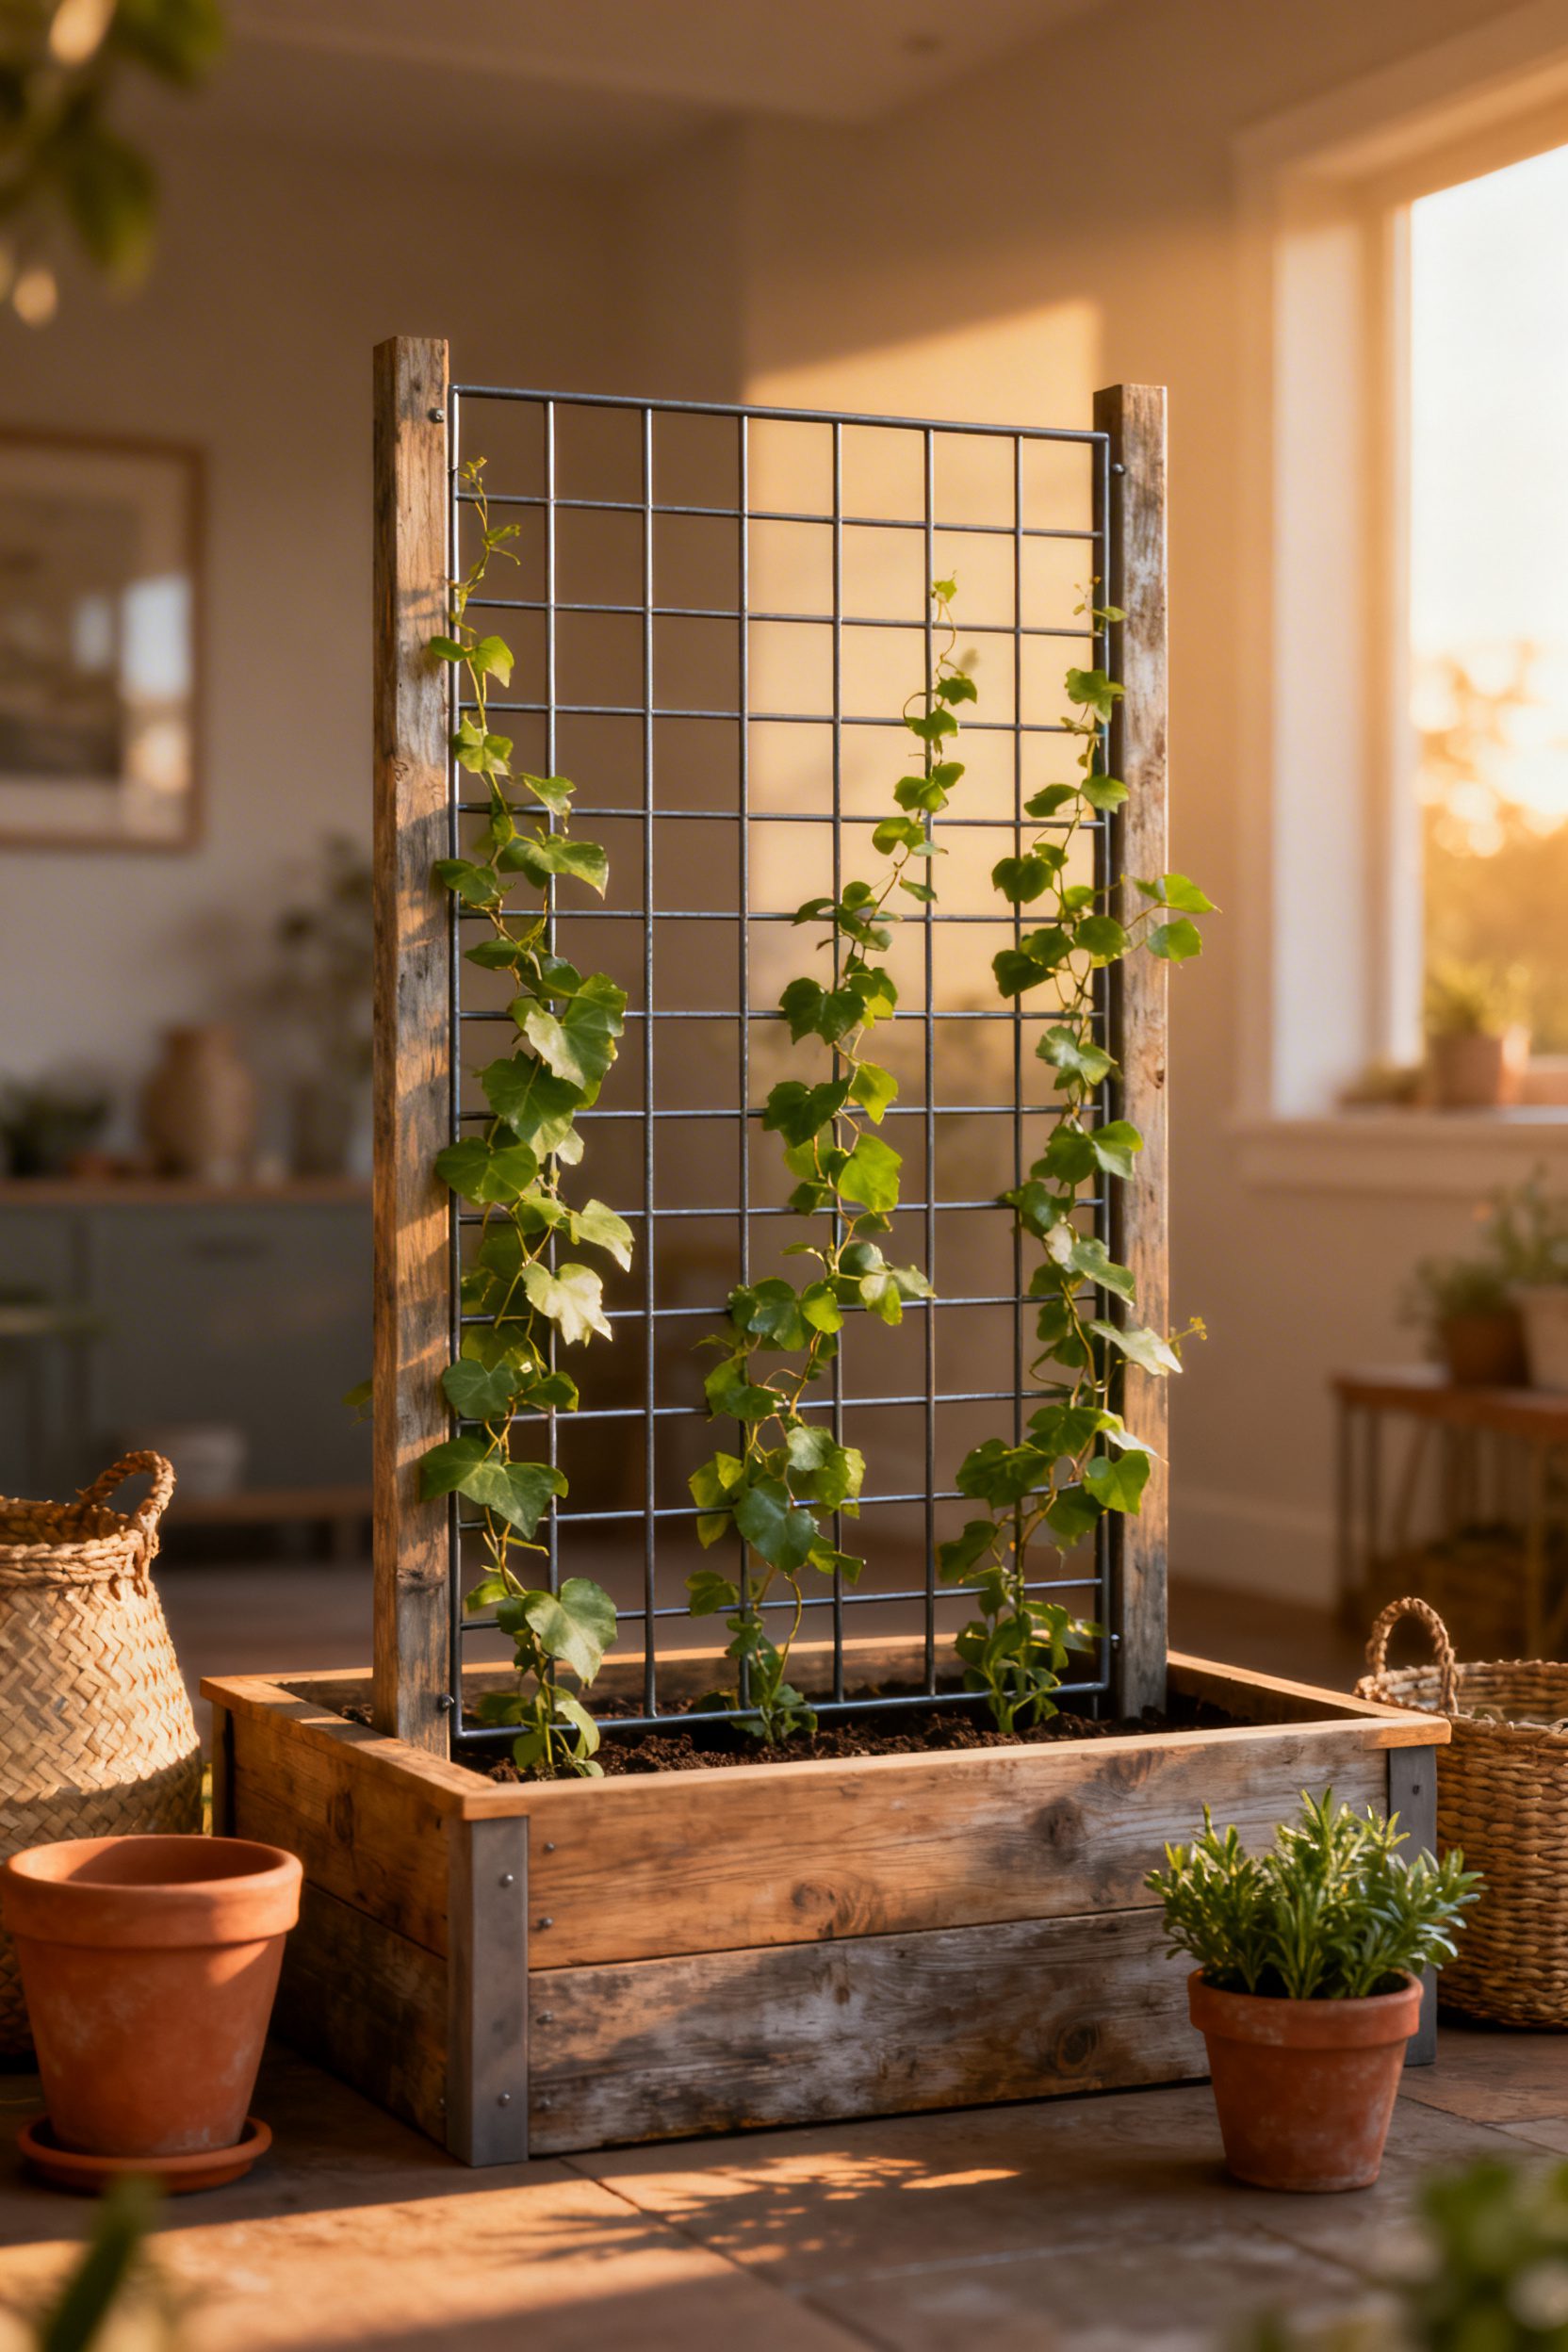
3. Raised-Bed Trellis Grid System
- Effort Level: Weekend DIY.
- Estimated Budget: 100-500.
- Maintenance Level: Low (seasonal oil or sealant).
- Best For: Corner lots and front veggie plots.
Link two or three cedar beds with a continuous 2×2 post framework and 2-inch square wire mesh, creating a tidy grid wall that reads intentional from the street. Set posts 18 inches deep with gravel for drainage, then lag into bed frames for rigidity.
Keep trellis height at 72 inches to comply with typical front setback sightlines, and step the grid to follow grade. Plant climbers at 8-inch spacing for full coverage by midsummer, and cap beds with 1×4 rails for a finished edge.
Use hot-dipped galvanized hardware and livestock panel mesh to resist rust in sprinkler zones, as recommended in Elle Decor’s trellis guide. This system neatly corrals tomatoes, peas, and cucumbers while shielding bins or AC units from view.
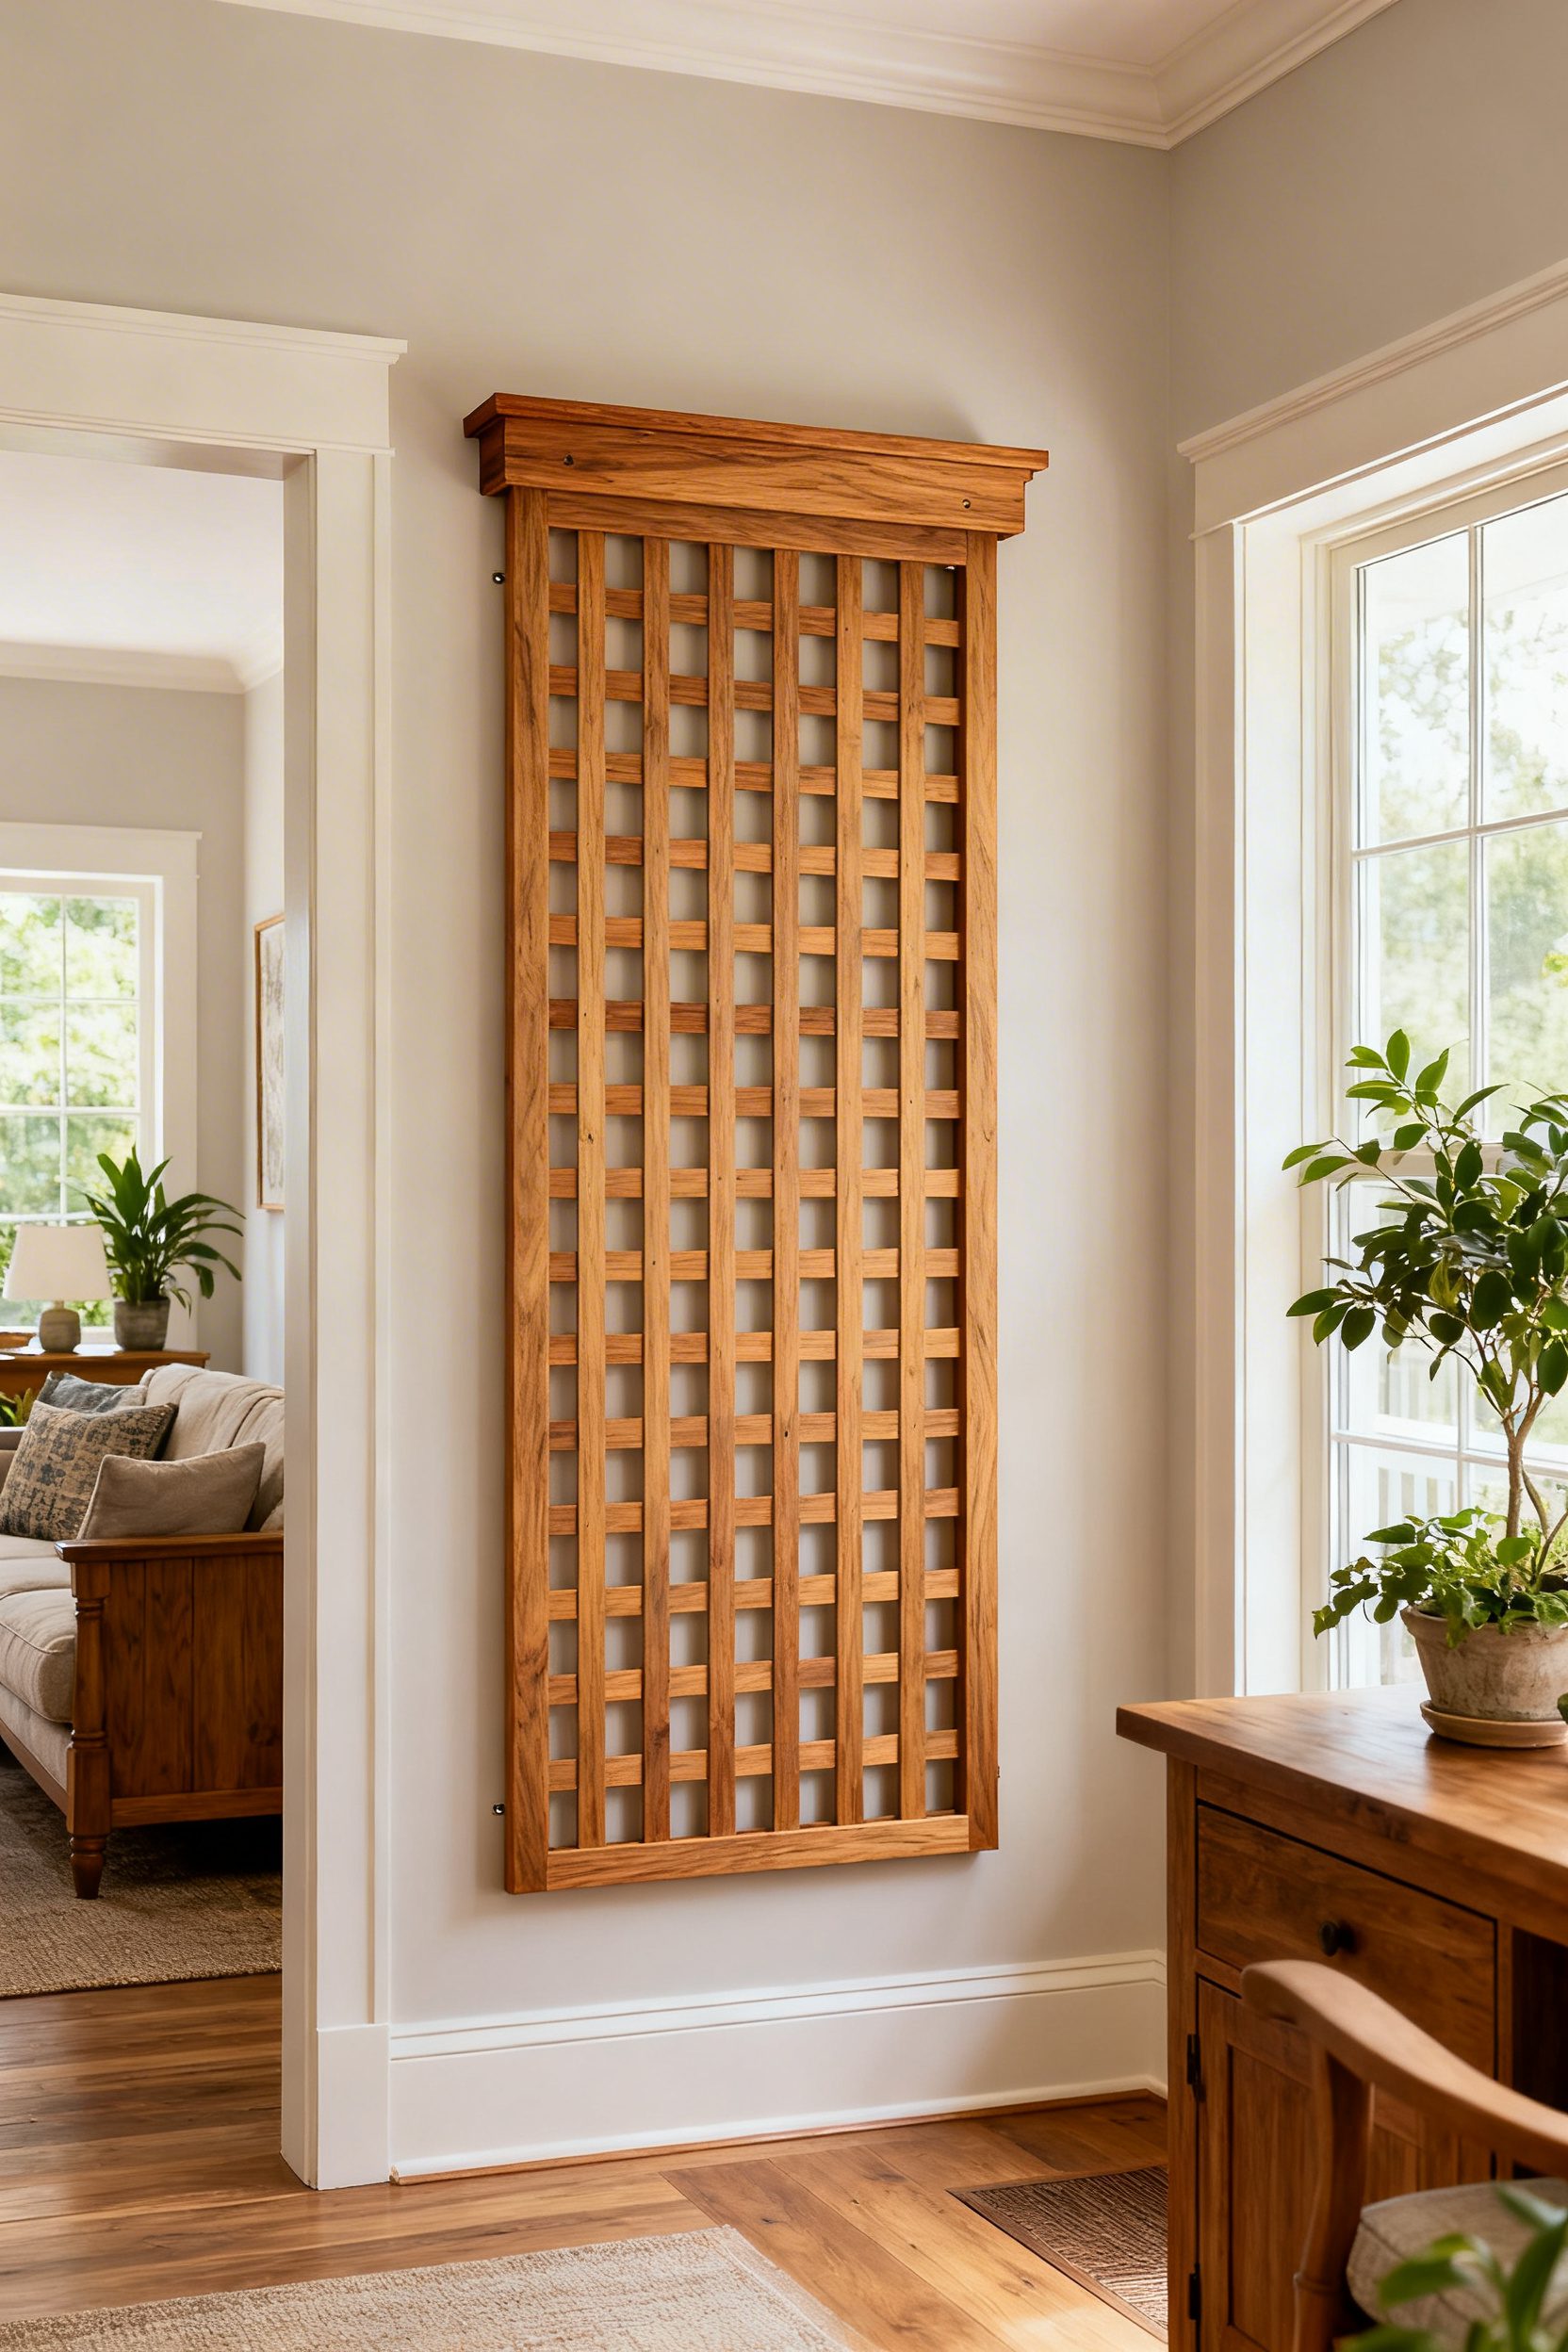
4. Cedar Lattice Panel with Cap
- Effort Level: Weekend DIY.
- Estimated Budget: 100-500.
- Maintenance Level: Medium (annual seal).
- Best For: Curb appeal screens.
Use a 4×8-foot cedar lattice trimmed with 1×2 cedar and finish the top with a 2×4 cap that projects 1 inch on each side for a clean, architectural edge. Set 4×4 posts in concrete 24 inches deep, then fasten the panel with exterior screws and 1/2 inch spacers so air can move behind climbing roses or jasmine.
Tone the wood with a penetrating oil in a natural or silver-gray finish to resist graying, and add a simple 1-inch galvanized bottom kick to lift the lattice off the soil. If you need privacy near the entry, double up two panels with a 6-inch gap to create depth without feeling bulky. For plant-pairing inspiration, see Minimalist Fall Decor Ideas.
Cap boards matter visually, but also shed water, so bevel or kerf the underside to prevent drips staining the face.
5. Black Metal Obelisk for Pots
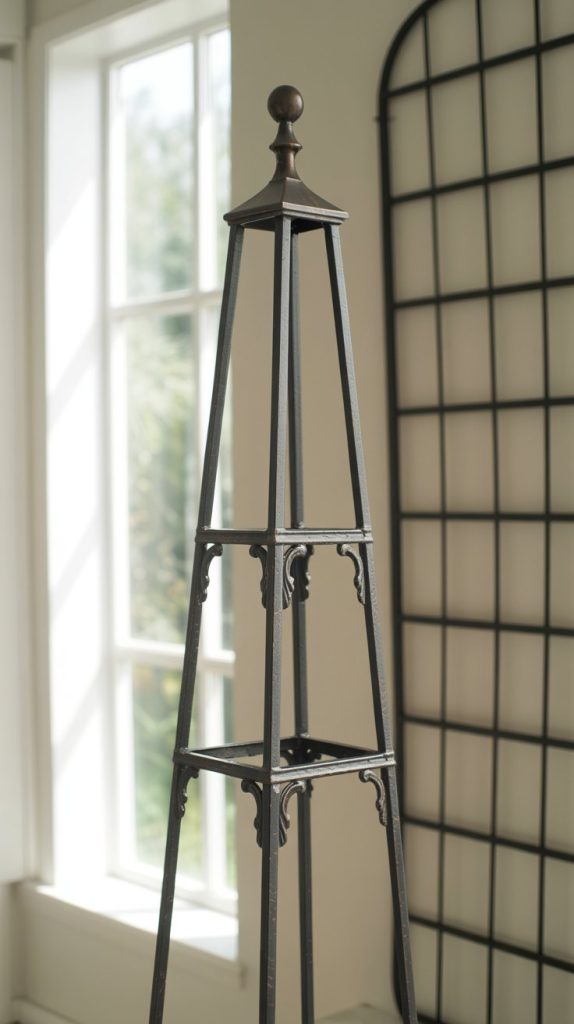
- Effort Level: Afternoon project.
- Estimated Budget: Under 100.
- Maintenance Level: Low (seasonal wipe-down).
- Best For: Small stoops and renters.
Bend 1/4 inch steel rod into four identical legs, join with cross braces every 8 to 10 inches, and finish with matte black rust-inhibiting paint. Anchor the obelisk inside a 16-inch diameter pot filled with pea gravel over soil, which adds drainage and keeps the structure plumb against wind.
Real-talk warning: I once skipped the gravel ballast and the obelisk tipped, snapping sweet pea vines in a single gust. Add at least 20 pounds of gravel and zip-tie stems loosely at two points only; plants girdle as they thicken.
Keep the silhouette slim, 12 to 14 inches at the base and about 60 inches tall, so it frames the door without blocking sightlines. Pair two flanking the steps for symmetry, or try a single piece offset with a weathered urn for a softer, collected look.
6. String-and-Dowel Pea Fence
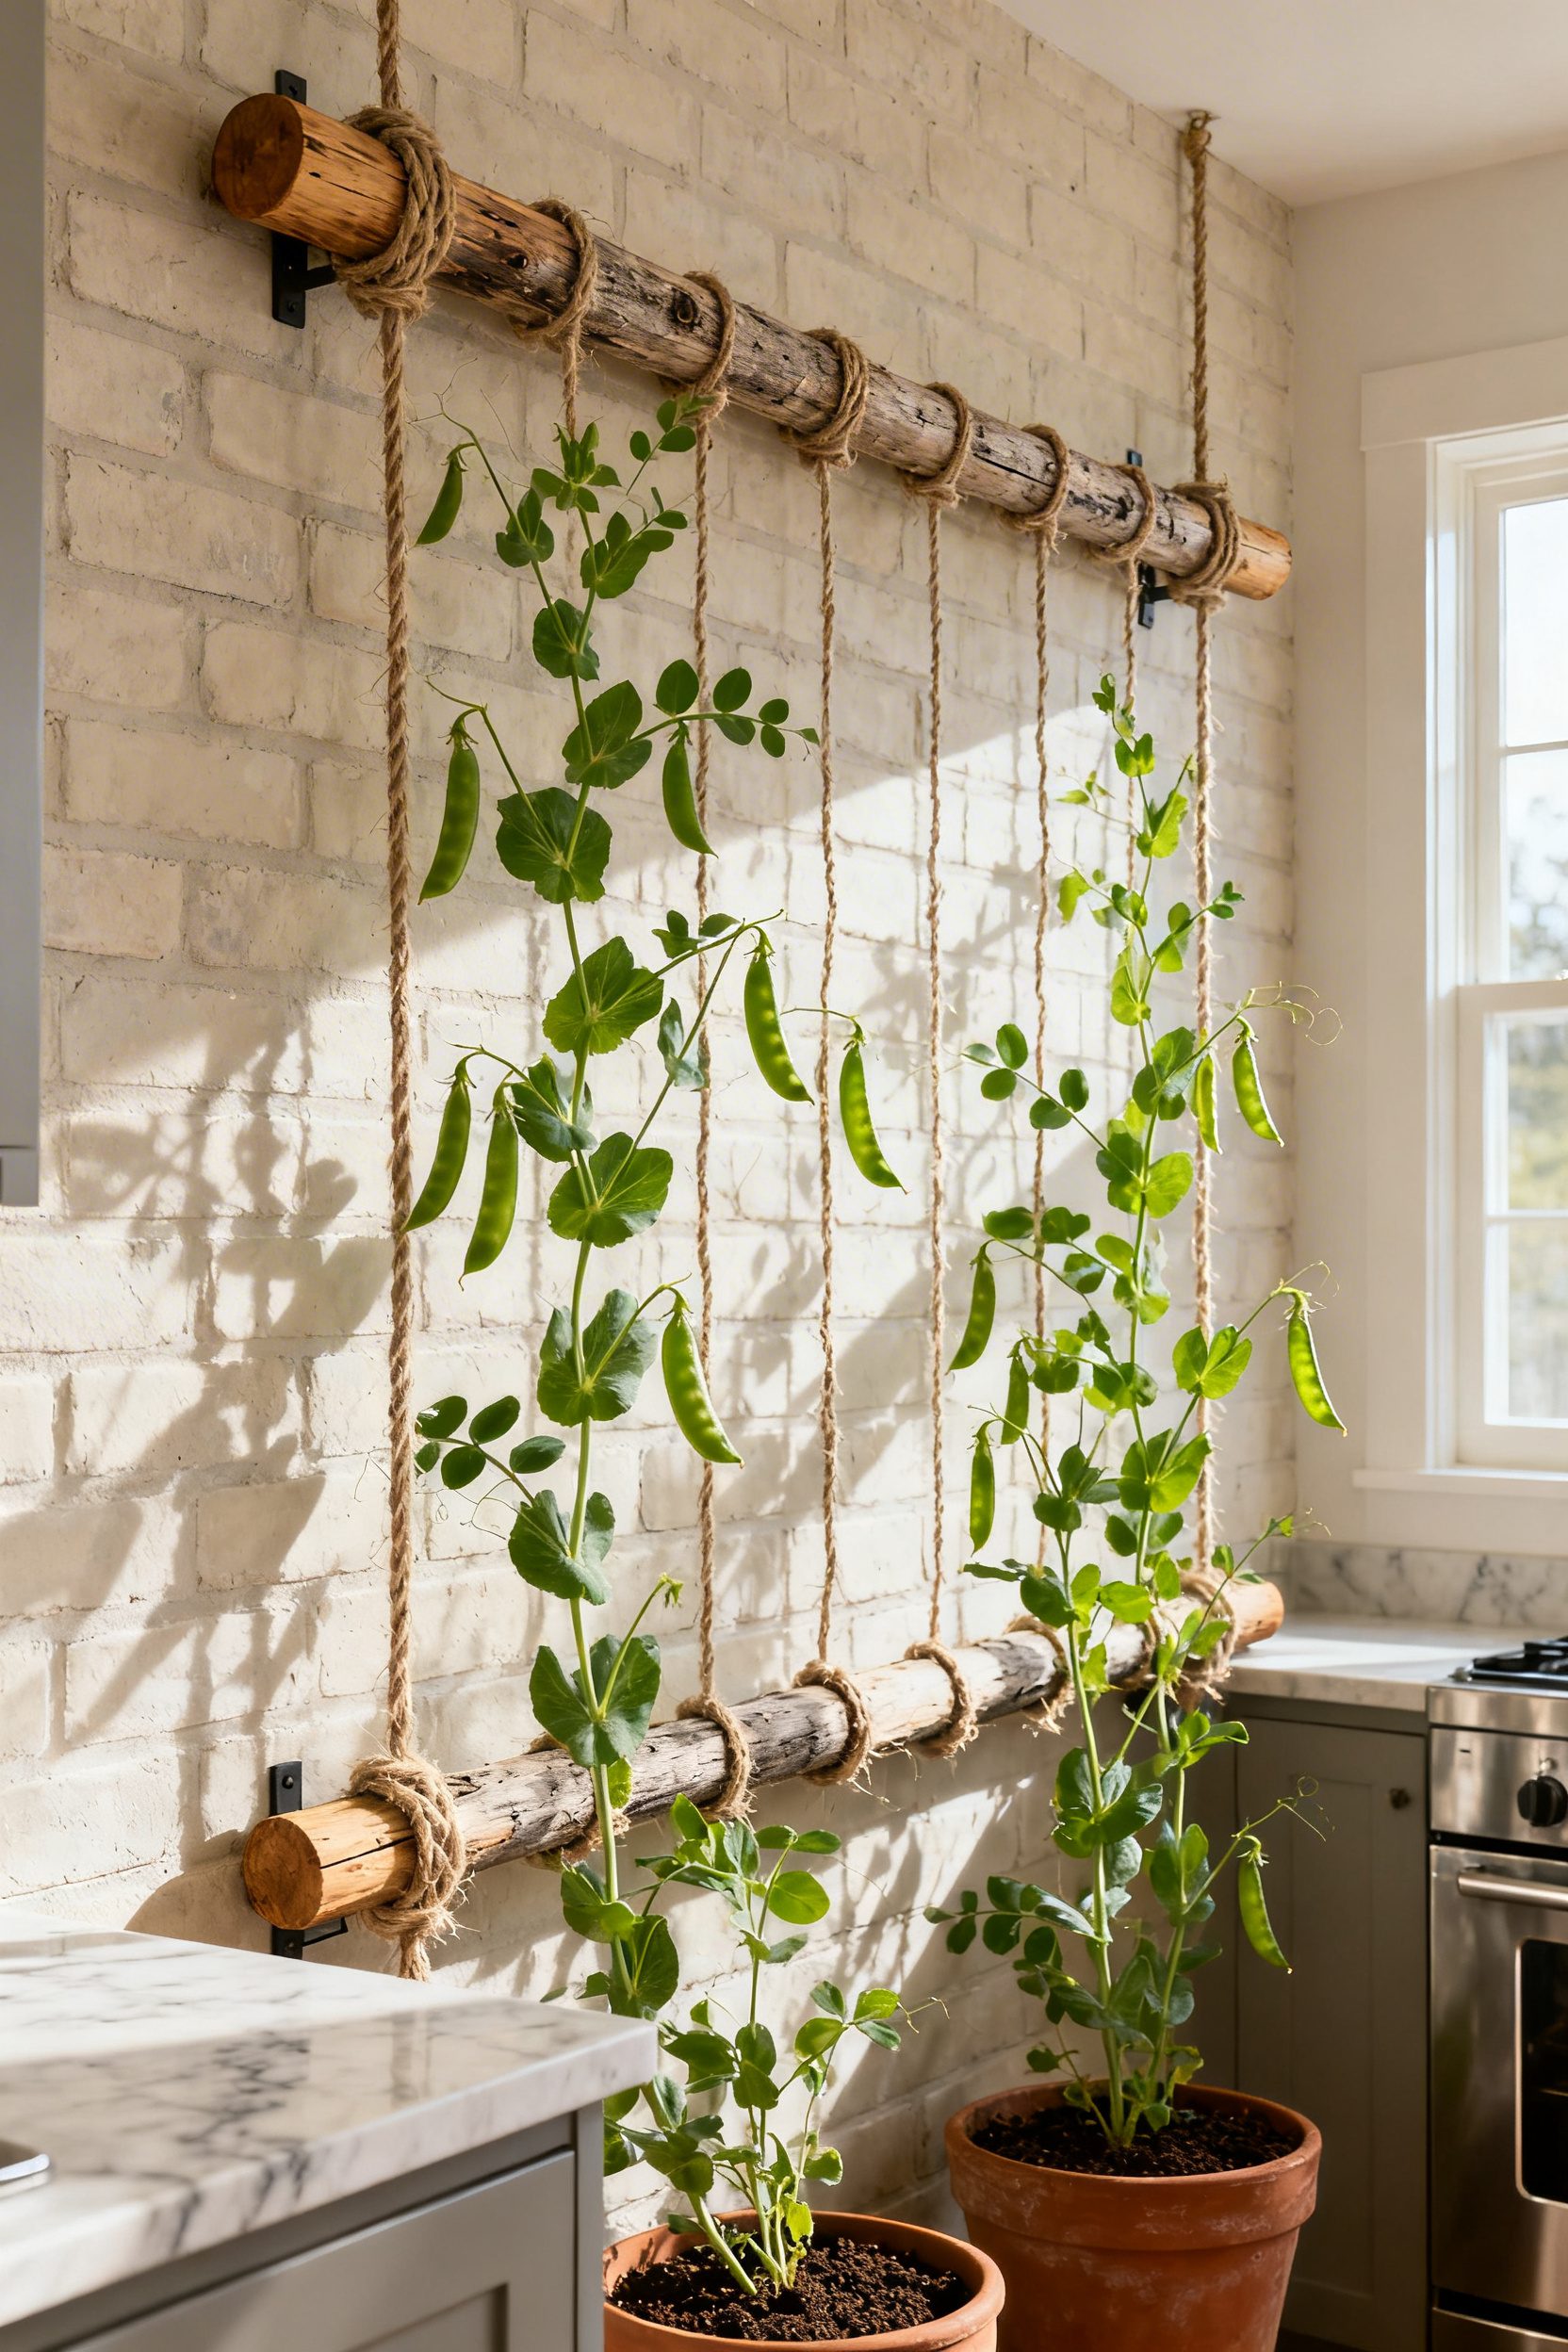
- Effort Level: Weekend DIY.
- Estimated Budget: Under 100.
- Maintenance Level: Low (retie each season).
- Best For: Edible curb strips.
Set two 1×2 cedar uprights 6 to 8 feet apart, then drill 3/8 inch holes every 6 inches to accept hardwood dowels that slide through like rungs. Run jute or mason’s line vertically from a top eye screw to ground staples, creating a grid that peas can grab from day one.
Keep the fence at 36 to 42 inches high for shelling or snap peas to avoid flopping, and pre-soak the jute so it tightens as it dries. Paint the uprights the same color as your trim for cohesion, and swap to rot-proof nylon if the fence faces sprinklers.
If you plan seasonal swaps, the modular spacing plays well with festive porch shifts; see Holiday Decor Christmas for timing cues.
A common mistake is spacing lines too far apart; aim for 3 to 4 inches so tendrils do not bridge and sag.
Add a 2×4 pressure-treated kicker at the base to keep mulch off the strings, and terminate ends with tidy clove hitches for a professional finish.
7. Arched Pergola Over Pathway

- Effort Level: Weekend DIY.
- Estimated Budget: 100-500.
- Maintenance Level: Medium (annual sealing).
- Best For: Narrow front walks.
Span a 36 to 42 inch path with two 4×4 posts set in concrete, then bend 1×2 cedar slats into shallow arches using pocket screws and exterior glue. Keep the arch rise modest, about 8 to 10 inches above the beam, so it feels airy without dwarfing the entry.
Add conduit or eye screws under the arch to guide jasmine or climbing roses, spacing anchors every 8 inches for even coverage. Paint to match trim for a cohesive facade, or leave cedar natural and seal yearly to withstand sun and sprinklers, as noted by Elle Decor.
If your front path ties into a farmhouse palette, echo the tone with muted gray stain, then coordinate planters with galvanized accents from your gray farmhouse kitchen ideas playbook. Low-voltage puck lights on the inner posts give evening definition without glare.
8. Rustic Branch Fan Trellis
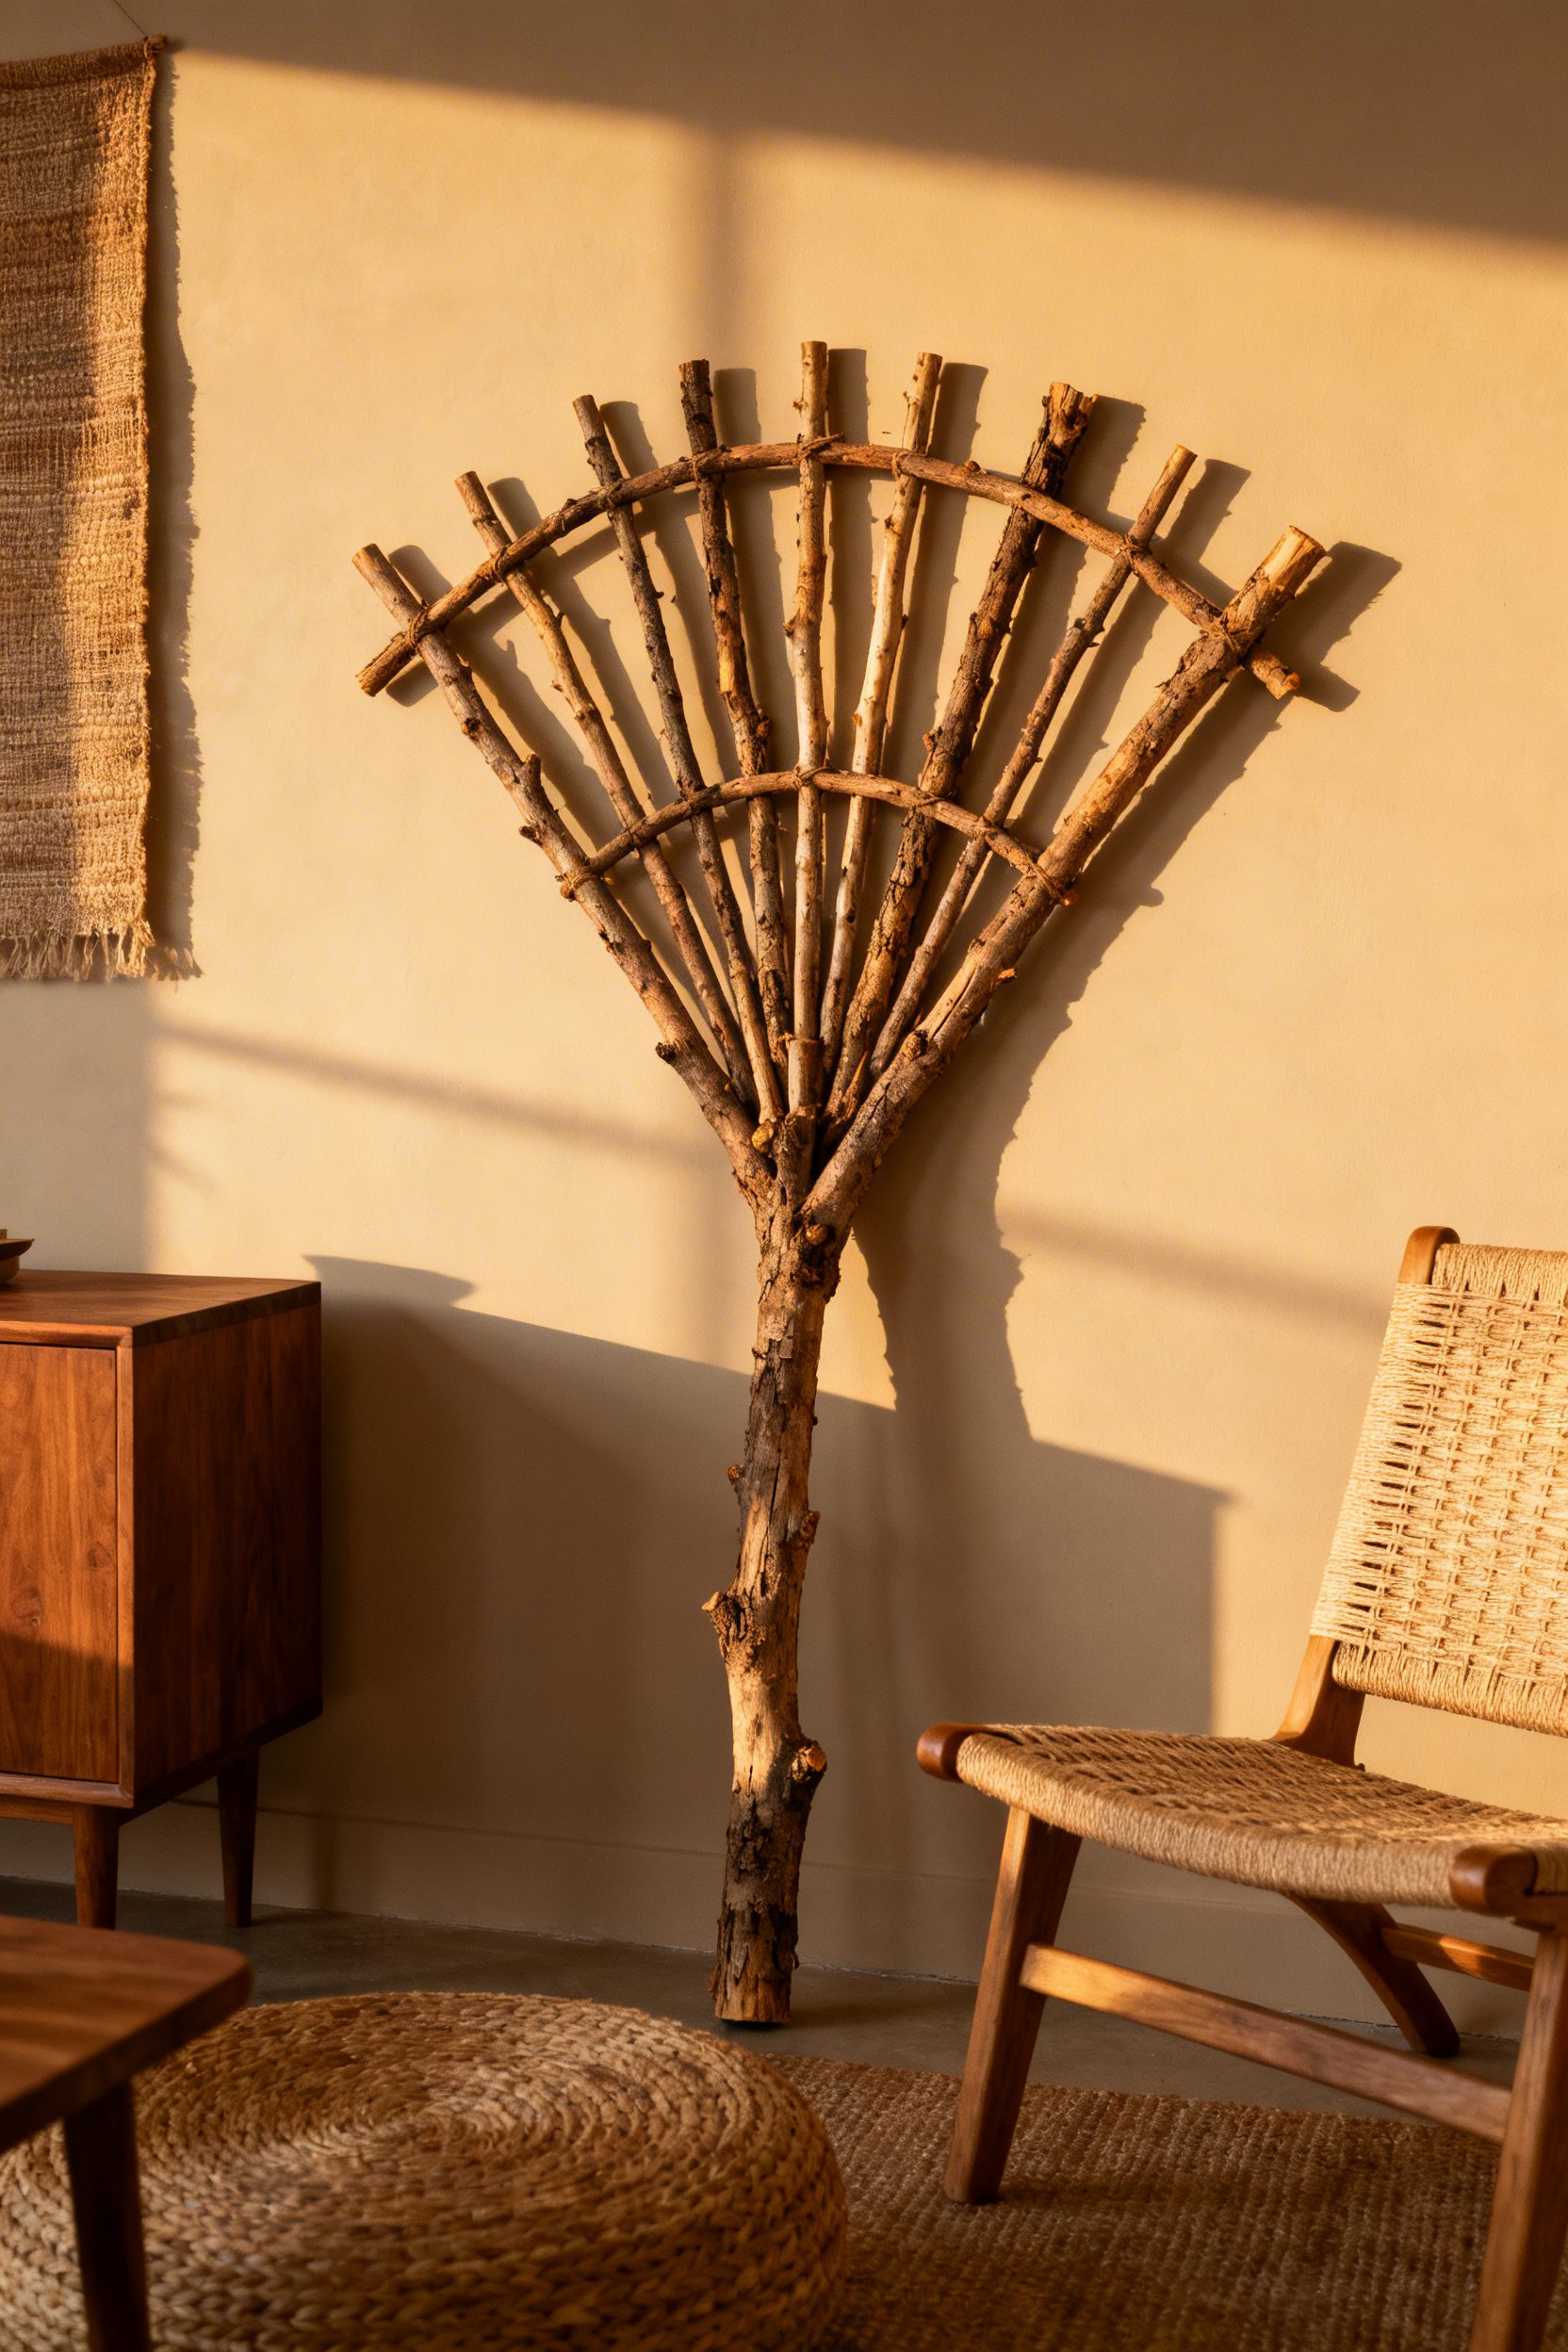
- Effort Level: Easy afternoon.
- Estimated Budget: Under 100.
- Maintenance Level: Low (seasonal check).
- Best For: Cottage-style entries.
Collect straight prunings, 1/2 to 3/4 inch thick, and splay them from a stout vertical spine to form a fan, securing joints with exterior screws and jute wraps. Set the base 8 inches off the foundation to prevent rot, and predrill to avoid splitting.
Stain in a light wash to unify mismatched woods, or leave natural for a wabi-sabi edge that flatters clematis or sweet peas. Keep the fan diameter around 30 to 36 inches so it reads intentional beside a mailbox or porch step.
For autumn, weave in a few dried vine loops and swap to evergreen twine before winter for structure, a subtle nod to simple seasonal layers in Minimalist Fall Decor Ideas. Refresh twine annually, and replace any punky branches as needed.
9. Painted Lattice Accent Wall
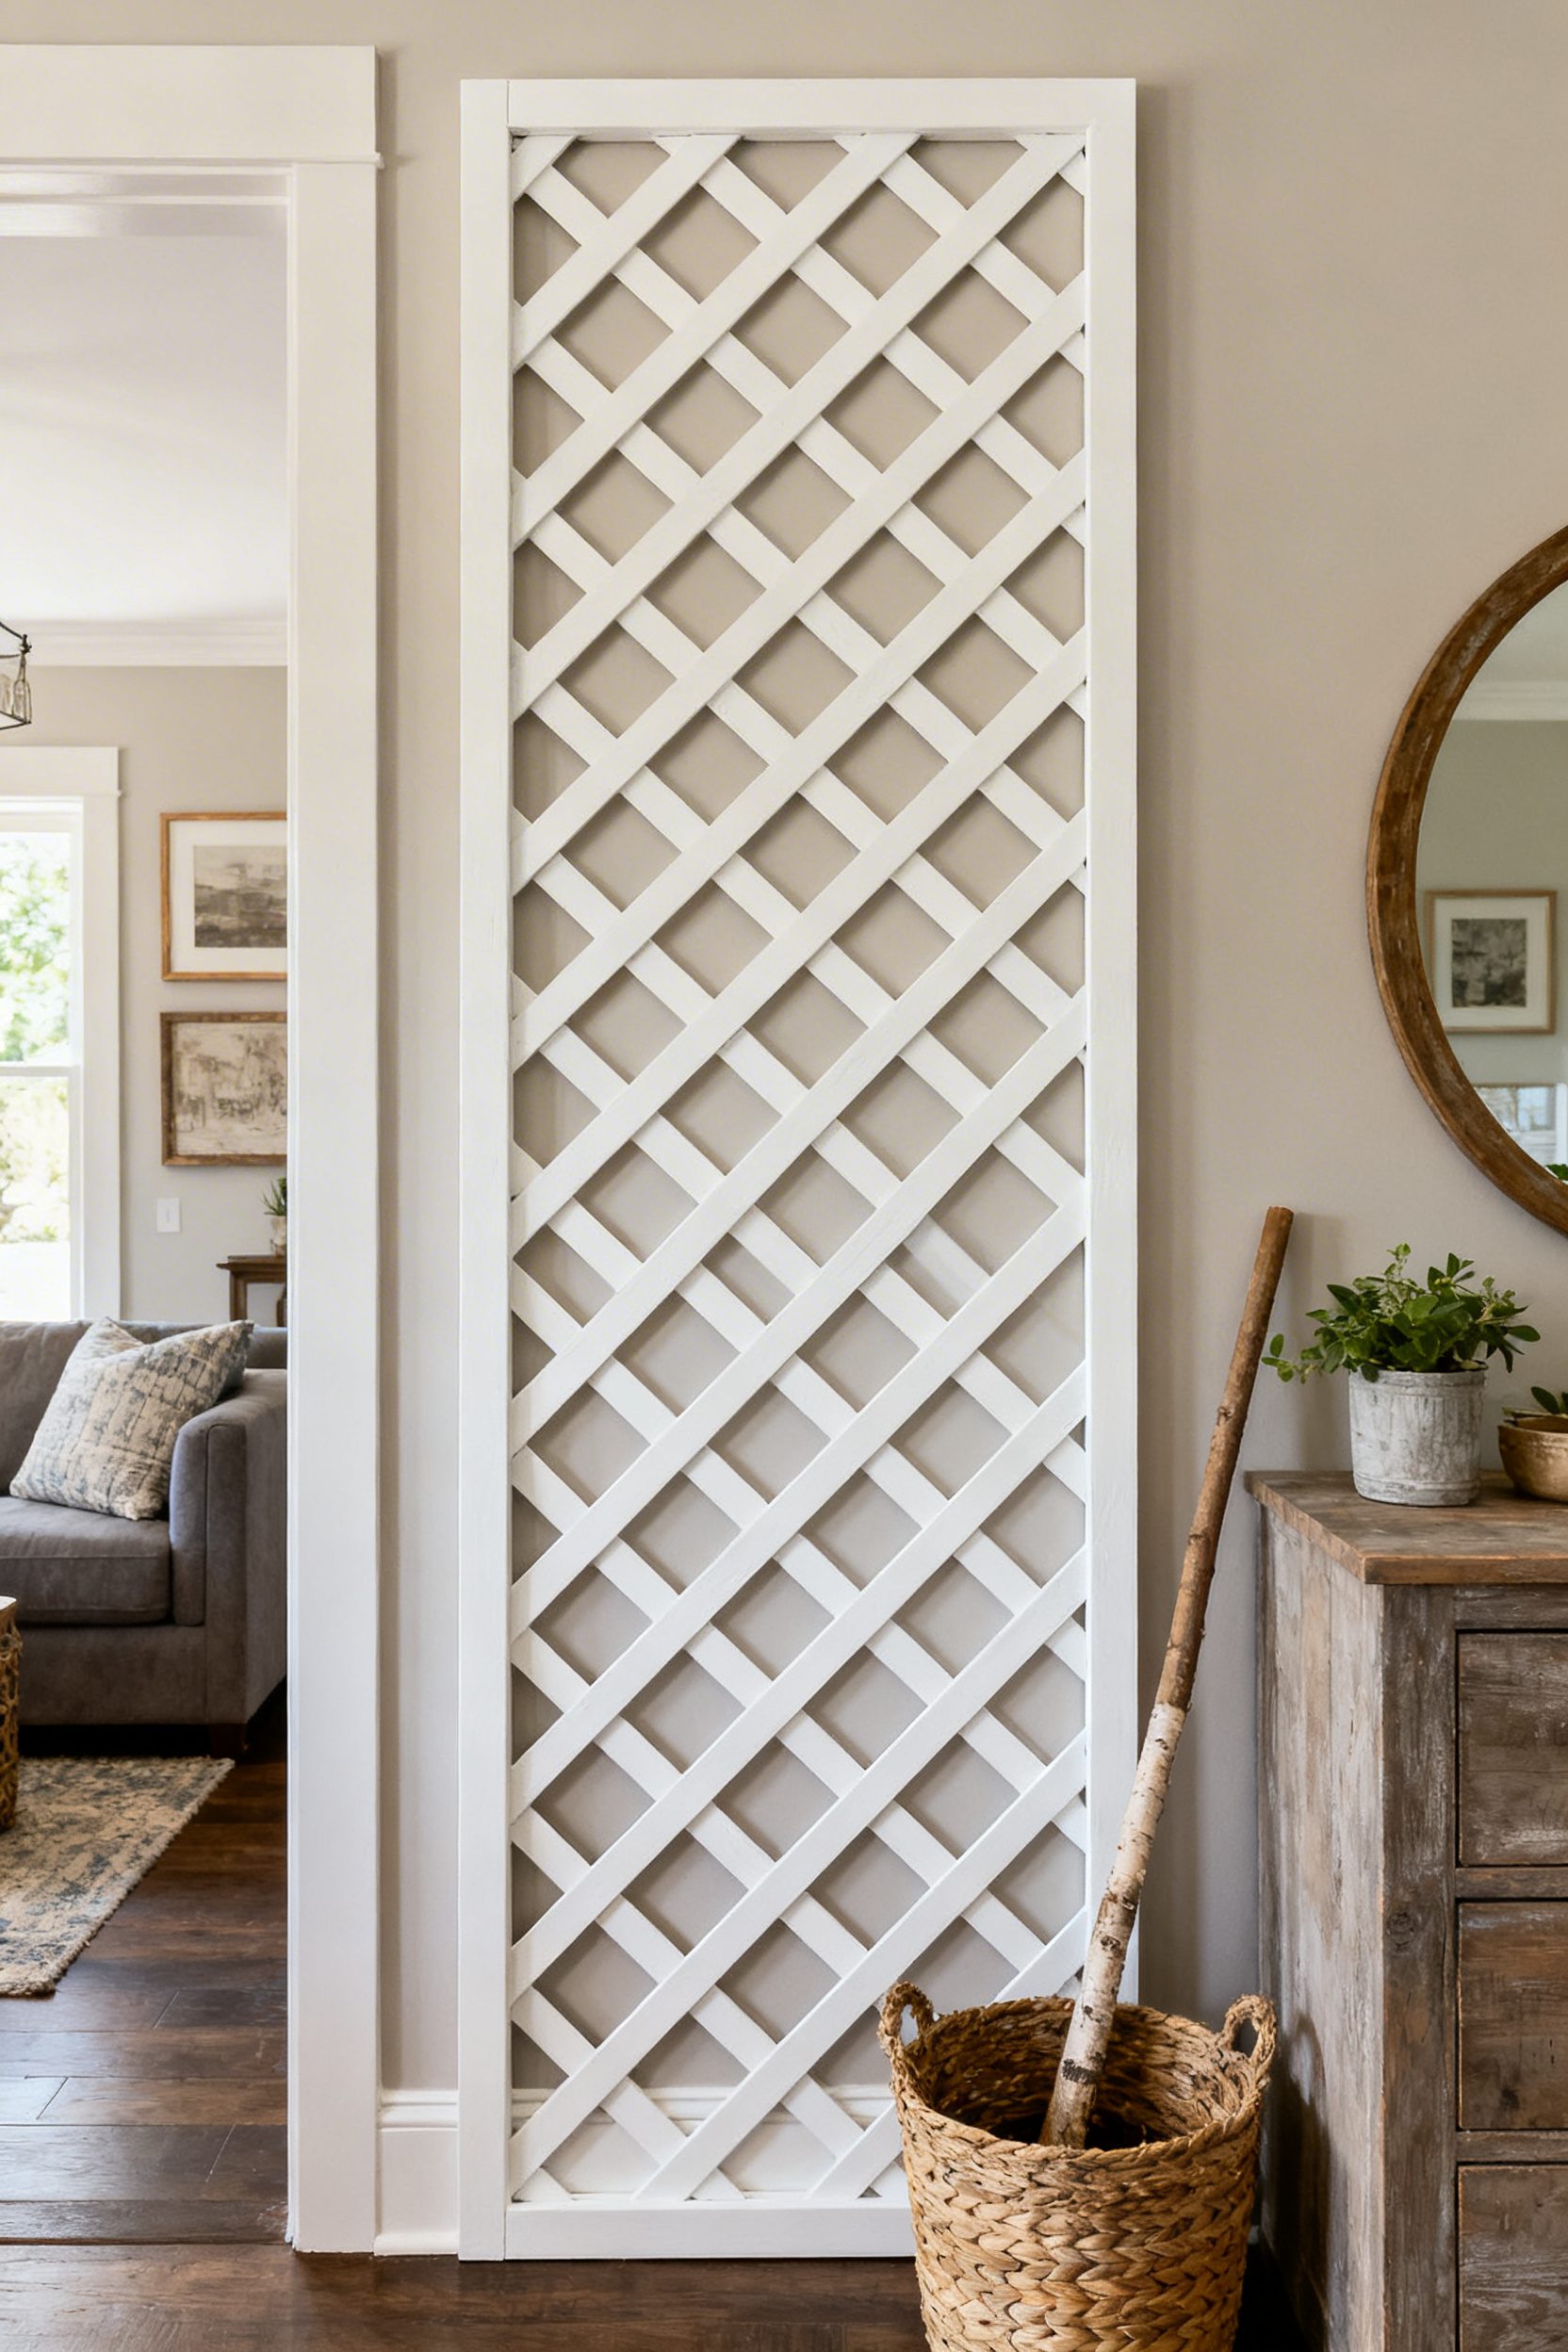
- Effort Level: Weekend DIY.
- Estimated Budget: Under 100.
- Maintenance Level: Low (touch-ups yearly).
- Best For: Flat, bland facades.
Mount vinyl lattice trimmed with 1x2s over a masonry or siding-safe furring system, then spray with exterior paint in the same sheen as your trim for a crisp built-in look. Keep the panel height at 60 to 72 inches to frame shrubs without blocking windows.
Train star jasmine or ivy using soft plant ties every 10 inches, and leave a 1-inch air gap behind the lattice to promote airflow and paint longevity. A small copper cap on the top trim sheds water and prevents swelling at cut ends.
Echo the geometry with a simple porch planter or a slim bench for symmetry, and tie the palette into understated holiday swags later in the season, as seen in Holiday Decor Christmas. Keep a labeled quart of exterior paint on hand for quick scuff fixes after storms.
10. Copper Pipe Vine Screen
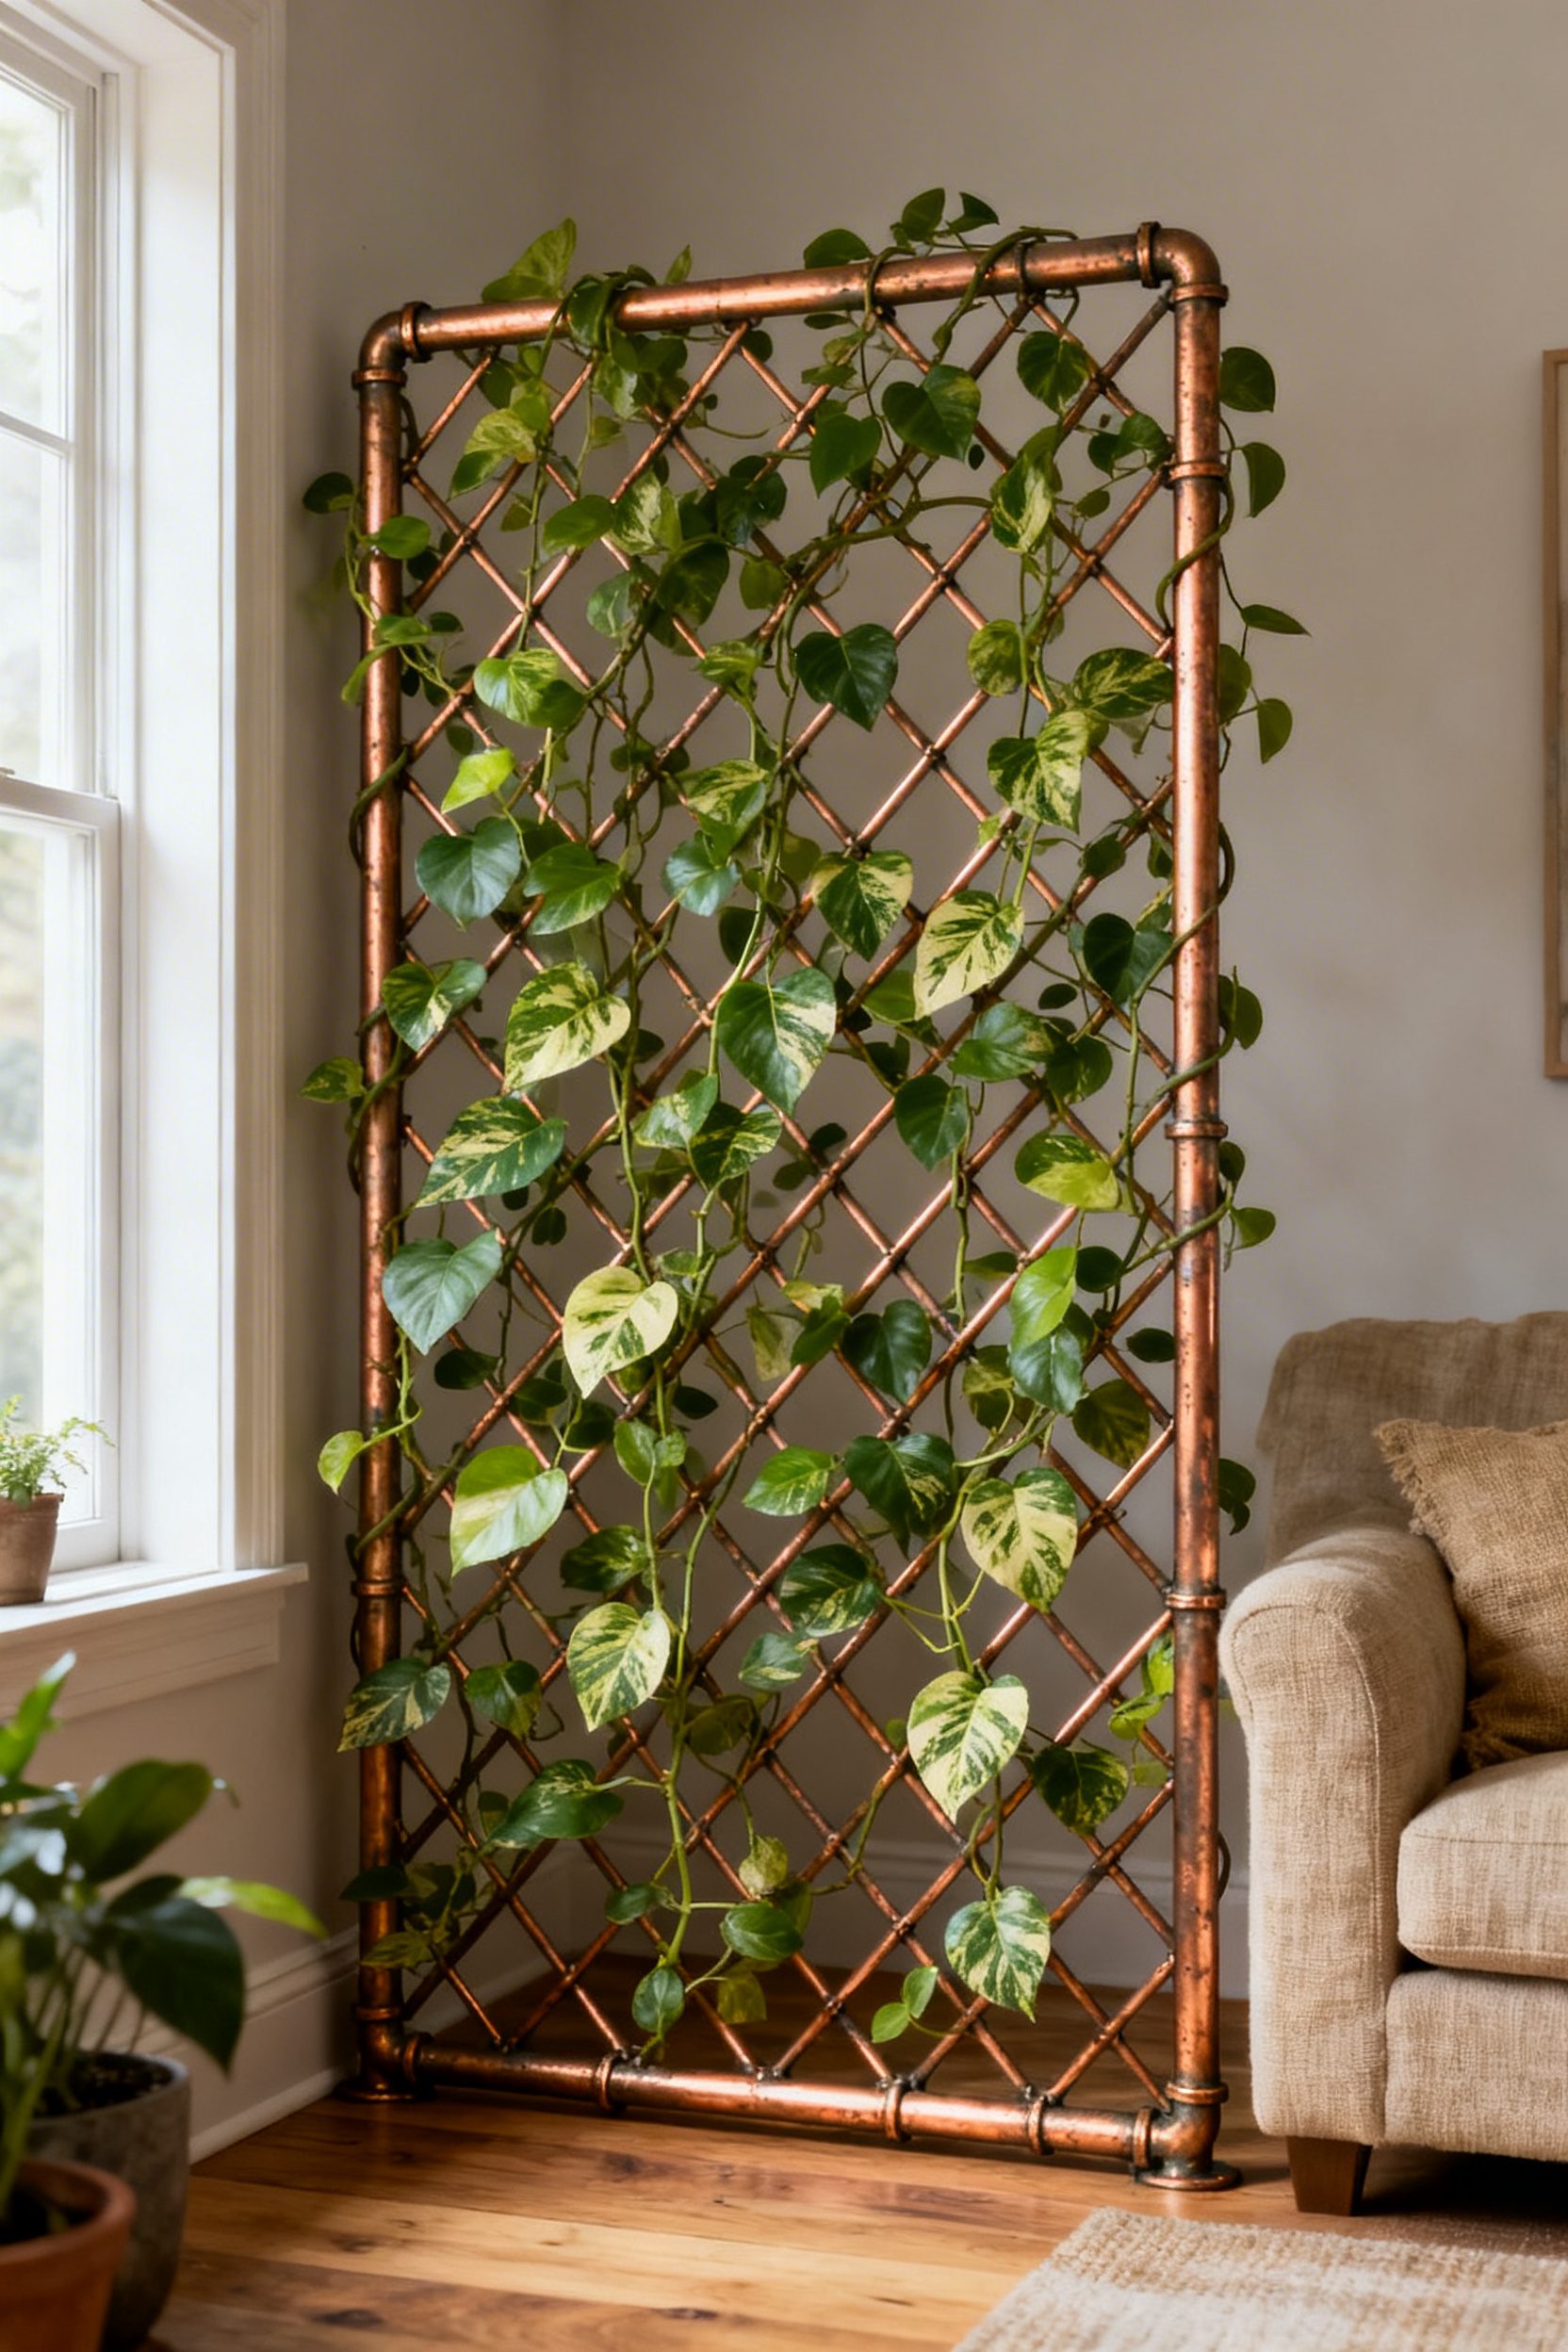
- Effort Level: Weekend DIY.
- Estimated Budget: 100-500.
- Maintenance Level: Low (wipe and inspect joints).
- Best For: Modern facades, compact entries.
Build a slim grid from 1/2 inch copper pipe, T fittings, and elbows, spacing horizontals 8 to 10 inches so tendrils can grab quickly. Mount the frame on stainless stand-offs, at least 1 inch off the wall, to keep air moving and prevent moisture stains on siding.
Let the copper patina naturally for a soft green finish, or seal with a clear exterior lacquer to lock in the shiny penny tone. Anchor the feet with steel rebar pins hidden inside pipe offcuts if you want a freestanding screen to flank your front path.
Train fast growers like jasmine or star clematis, and set a drip emitter at the base to keep water off the metal.
11. Expandable Willow Fan Trellis
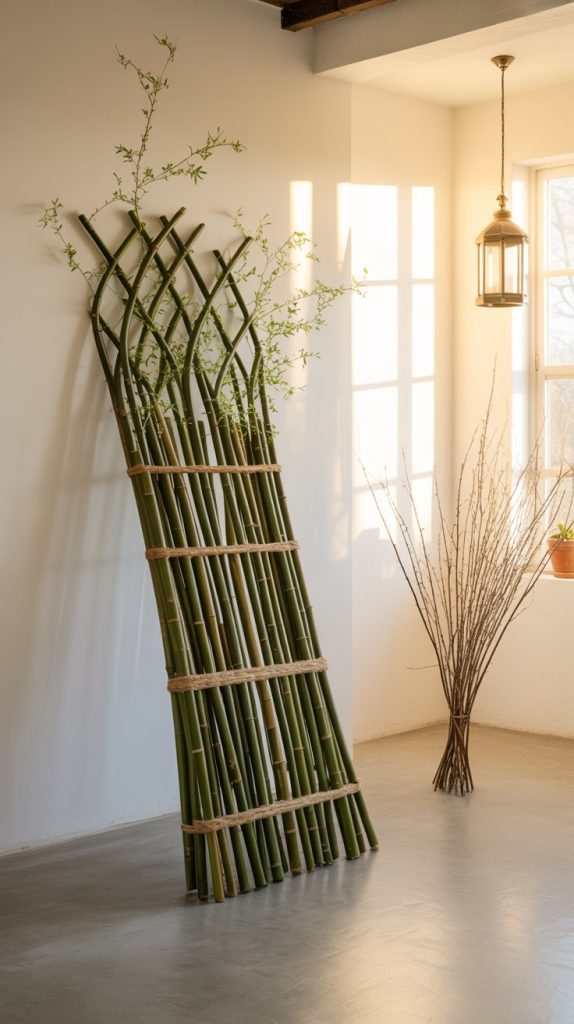
- Effort Level: Afternoon project.
- Estimated Budget: Under 100.
- Maintenance Level: Low (annual oil optional).
- Best For: Cottage fronts, rental gardens.
Choose a folding willow fan trellis and set the legs 6 to 8 inches into the soil, backfilled with gravel for drainage. Angle it slightly, about 5 degrees from vertical, so the fan shape reads sculptural from the curb rather than flat.
When I tested one beside my own porch, I learned the hard way that heavy vines bow the lattice if you skip a mid-height wall tie. A single galvanized strap at the centerline keeps the spread even and stops the trellis from racking after a storm.
Pair with lightweight climbers like sweet pea or black-eyed Susan vine to preserve the delicate silhouette.
12. Wall-Mounted Trellis with Planters
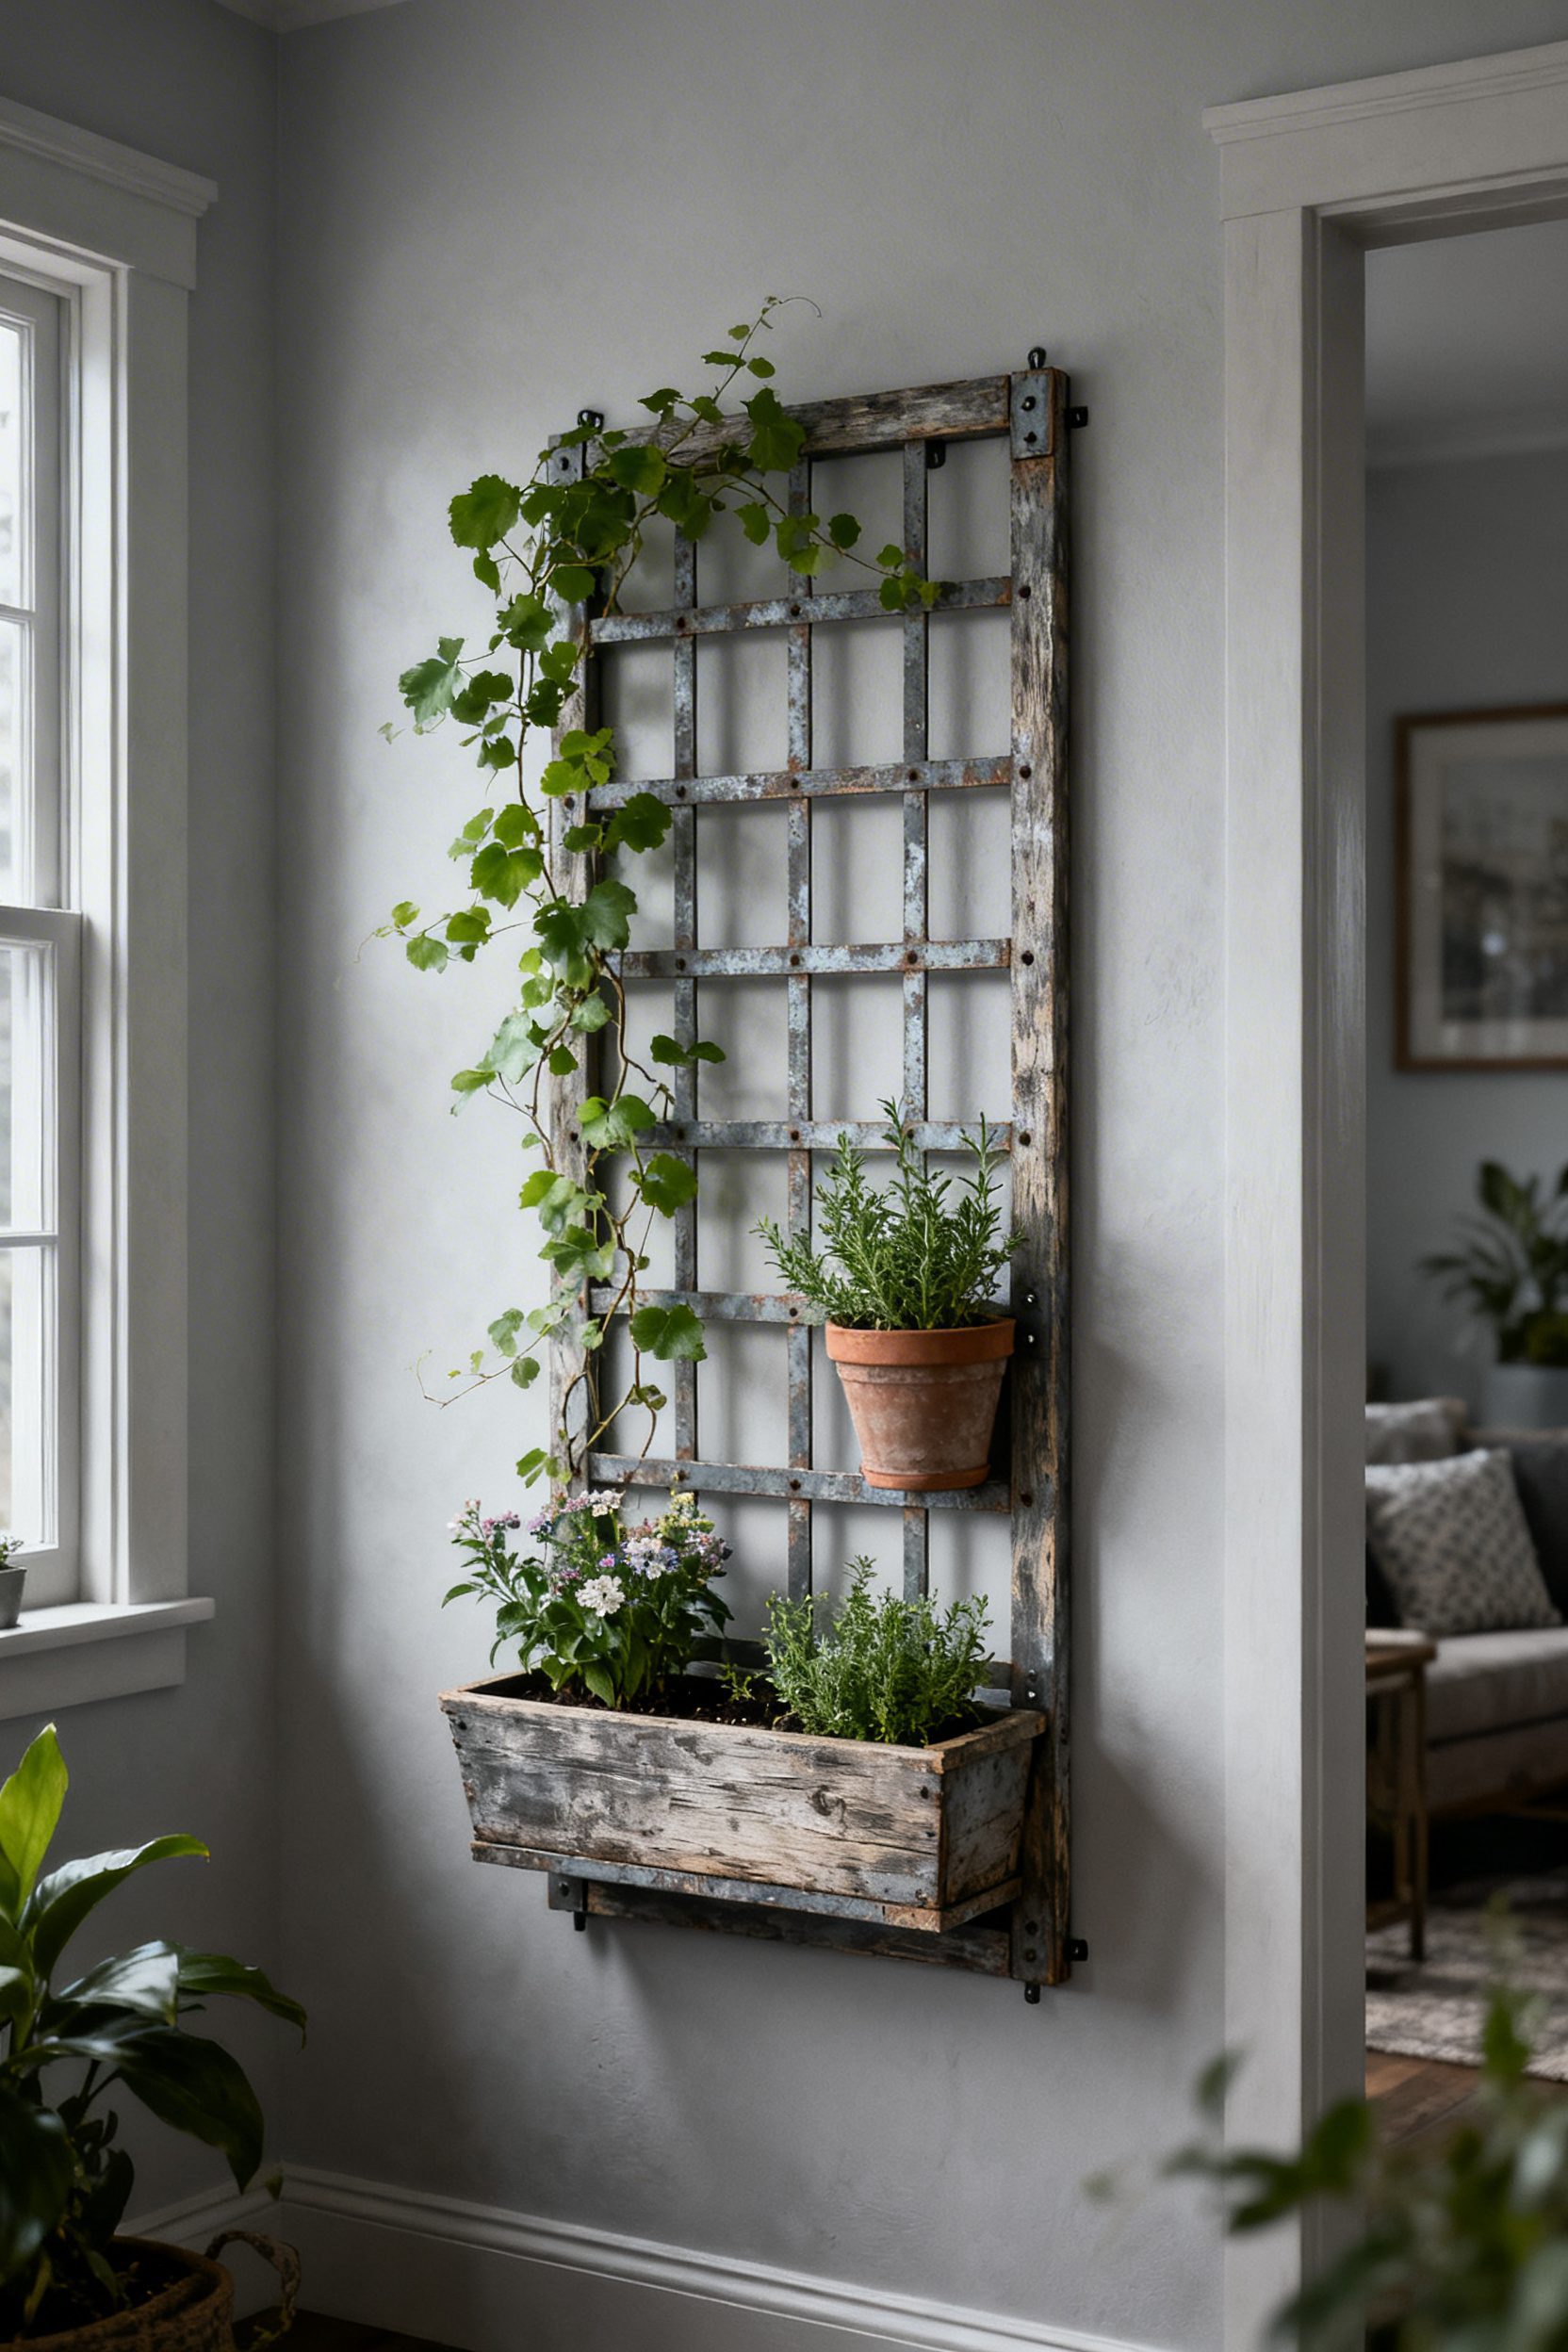
- Effort Level: Weekend DIY.
- Estimated Budget: Under 100.
- Maintenance Level: Moderate (watering and pruning).
- Best For: Small facades, townhomes.
Create a grid from cedar lath or 1x2s, spacing slats 6 inches on center, then mount over masonry with sleeve anchors or over siding by hitting studs with exterior screws. Hang two to three metal rail planters directly on the lower crosspieces to serve as rooting stations.
I made this mistake once by skipping a waterproof spacer, and moisture shadowed the paint within a month. Use 3/8 inch nylon spacers behind the frame so air can circulate, and prefinish the wood on all sides with a breathable exterior oil.
Choose compact climbers, such as dwarf honeysuckle, and tuck a soaker hose on a smart timer to keep weight consistent across the grid. For best practice on trellis forms and why spacing matters for plant health, see this overview from Elle Decor.
A useful follow-up is 11 Home Design Plans Worth Studying Before You Build or Renovate.
FAQ
Leave at least 1 inch of air gap between the trellis and the wall to prevent trapped moisture and allow vines to breathe. Use stand-offs or spacers rated for exterior use so the frame stays stable through temperature changes.
Use masonry sleeve anchors or Tapcon-style concrete screws installed into predrilled holes, and avoid mortar joints when possible for a stronger hold. Add stainless or hot-dipped galvanized hardware to resist corrosion outdoors.
Star jasmine, clematis, mandevilla, and black-eyed Susan vine establish quickly and remain tidy with light pruning. In colder zones, choose varieties suited to your USDA hardiness range to avoid dieback each winter.
Apply a clear exterior sealant if you want to maintain a bright finish, or embrace patina while using spacers and drip irrigation to keep runoff off the wall. Regularly wipe oxidation from contact points and redirect sprinklers away from the structure.