
")
A shiplap accent wall still has a place in modern homes, but only when you treat it with the same rigor you would millwork or stone.
In my experience, the best results come from disciplined layout, intentional color, and a cost plan that respects materials and labor from the start.
I have installed and specified shiplap across coastal cottages and sleek townhomes. What I love most is its ability to add rhythm and shadow without shouting.
However, 2026’s mood is moving darker and more textural, so choosing the right profile, finish, and room is what separates fresh from flat.
- What is shiplap, really, and where does it work?
- Shiplap vs mineral plaster: 2026 style debate
- Best rooms for shiplap accent walls
- Choosing board profile: nickel-gap vs square
- Color picks for 2026: Truffle, Drift, Arctic
- Moisture, movement, and bathroom installation tips
- Costs, DIY difficulty, and pro labor math
- How to finish, seal, and maintain shiplap?
- FAQ
- Final Thoughts
- Related Decor Reads
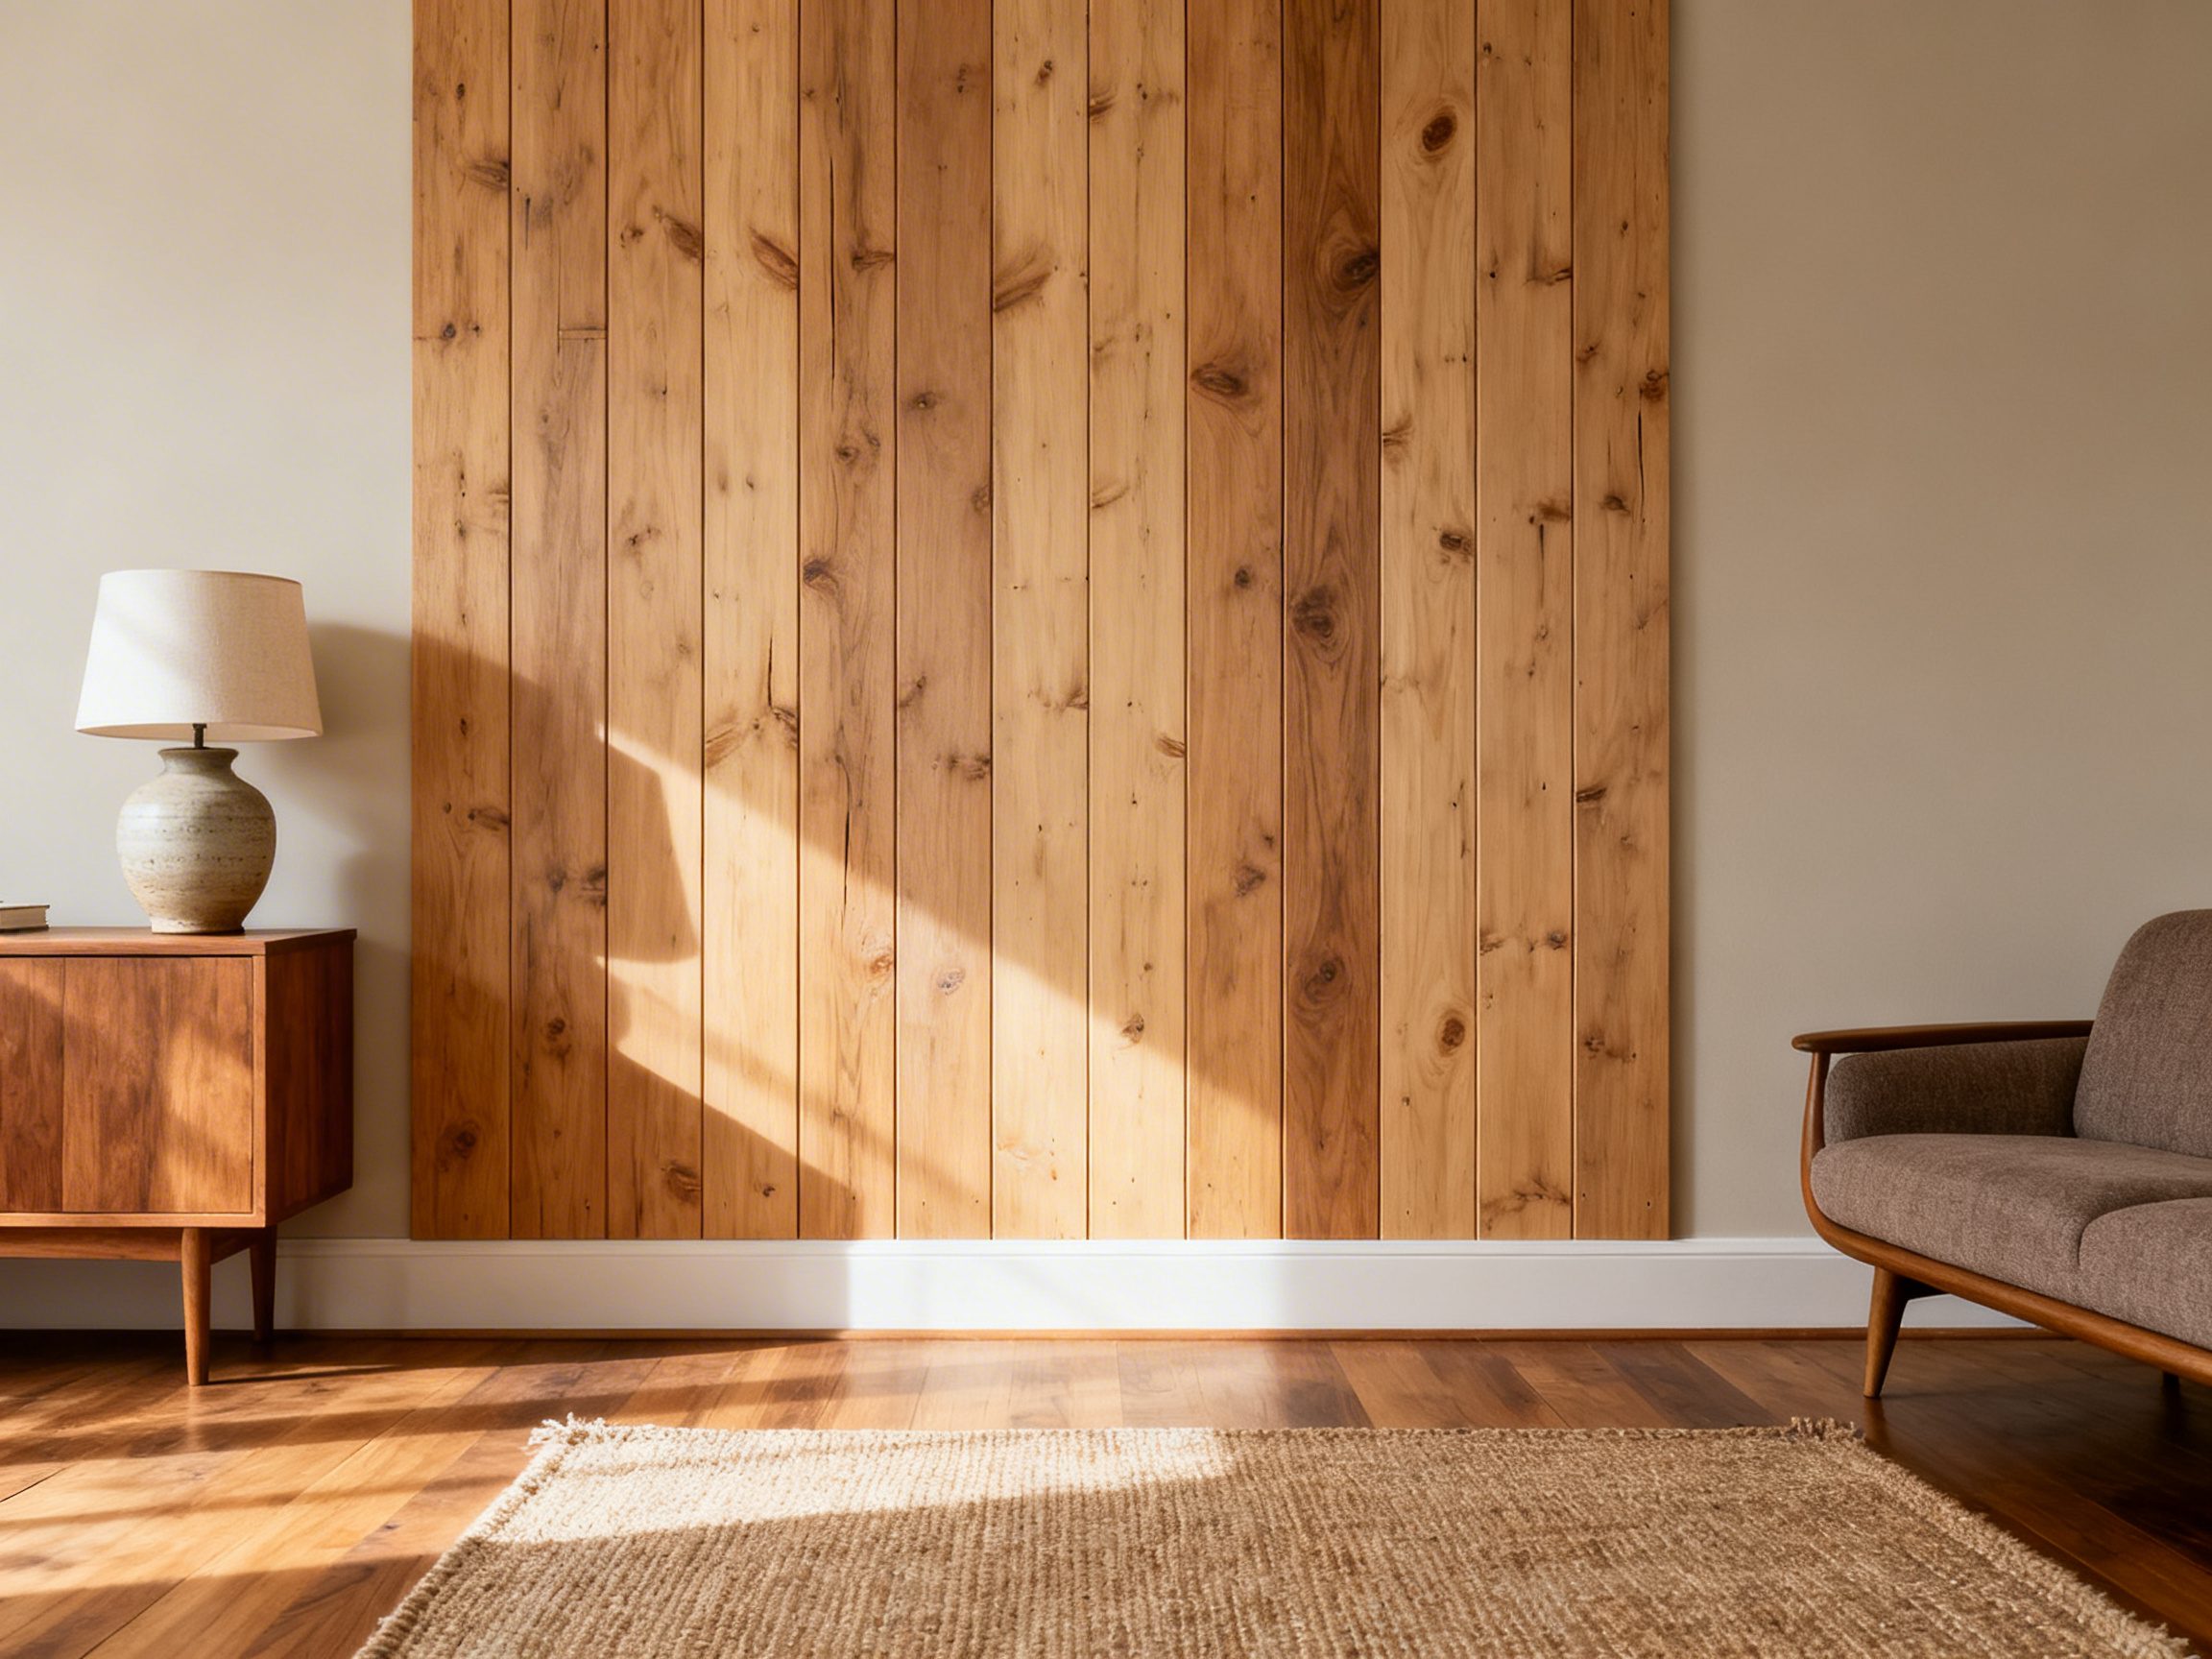
What is shiplap, really, and where does it work?
True shiplap vs lookalikes
True shiplap is a milled board with opposing rabbets on the long edges, creating a tight overlap that manages seasonal movement.
Most DIY stores sell nickel-gap profiles that mimic the look with a built-in spacer, which I prefer for clean alignment and quicker installs.
I continually see clients confuse tongue-and-groove with shiplap. Tongue-and-groove locks, which limit expansion but telegraph irregular framing more. Shiplap overlaps, which is more forgiving on slightly wavy walls if you back-prime and use a level line.
Profiles, materials, and finish options
If you want crisp, contemporary lines, choose MDF or pre-primed radiata pine in a nickel-gap profile. For humidity-prone rooms, use PVC or moisture-resistant MDF and paint with a high-quality enamel.
Color drives the mood. Lighter paints bounce light and emphasize the negative space between boards, while the newer deep tones, like the “Truffle” family championed for moodier interiors, add elegance and shadow play that reads custom in person.
| Material | Best For | Pros | Watchouts | Typical Board Cost (per sq ft) |
|---|---|---|---|---|
| Pre-primed MDF nickel-gap | Living rooms, bedrooms, offices | Super smooth, budget-friendly, paints beautifully | Not ideal for wet zones, needs careful fastening | $2.25–$3.50 |
| Primed pine shiplap | Most interiors, mild humidity | Real wood grain, durable, classic feel | More knots to seal, slight movement | $3.00–$5.00 |
| PVC shiplap | Bathrooms, laundry, basements | Moisture-proof, stable, easy to clean | Needs quality paint, can feel “plastic” if cheap | $4.50–$7.00 |
| Engineered hardwood shiplap | Feature walls, high-traffic areas | Premium texture, dimensional finish | Highest cost, heavier install | $6.00–$10.00 |
Where does shiplap genuinely elevate a room?
I use shiplap to add architecture where there is none. It frames fireplaces, quiets long corridors, and gives small bedrooms a tailored envelope when paired with restrained textiles, like in our cottage schemes discussed in Cottage Bedroom Wall Decor Planning.
It also works beautifully in home offices where a background needs to be composed for video calls. If your project leans rustic or layered, explore palettes and textures through Vintage Cottage for inspiration without slipping into cliché.
Shiplap vs mineral plaster: 2026 style debate
Read the room: movement vs monolith
Shiplap gives you cadence, shadow, and a linear story. Mineral plaster, by contrast, reads as a monolithic surface with nuanced depth, more gallery than farmhouse.
If the architecture is plain drywall and you need instant structure, shiplap earns its keep. If the shell is already busy with openings or trim, mineral plaster calms the envelope and feels editorial.
Durability, maintenance, and cost realities
Painted shiplap is durable if you fill nail holes cleanly, caulk strategically, and use a satin or semi-gloss enamel for wipeability. Mineral plaster resists scuffs because color runs through, and spot repair blends better when applied by a trained finisher.
| Aspect | Shiplap Accent Wall | Mineral Plaster Feature Wall |
|---|---|---|
| Installed Cost (typical 12’ x 9’ wall) | $650–$1,400 DIY, $1,400–$2,800 pro | $1,200–$3,000 pro only |
| Timeline | 1–2 days plus paint cure | 1–2 days including cure |
| Visual Effect | Linear, rhythmic, architectural | Seamless, textural, refined |
| Best Pairings | Matte walls, clean-lined furniture, woven textures | Stone, metal, minimal millwork, art-forward spaces |
| Trend Longevity | High, if color and scale are updated | High, reads timeless and European |
Style call for 2026
Industry chatter and editorials point to mineral plaster edging out basic shiplap for statement walls, largely because it looks timeless in moody palettes.
If you still love the linework, update it: choose a deeper tone, reduce board width to 4–6 inches, and treat it like millwork, not a barn set.
For a darker, sophisticated shiplap color direction, the newer “Truffle” and similar hues deliver the contemporary gravitas trend watchers are calling out.
Best rooms for shiplap accent walls
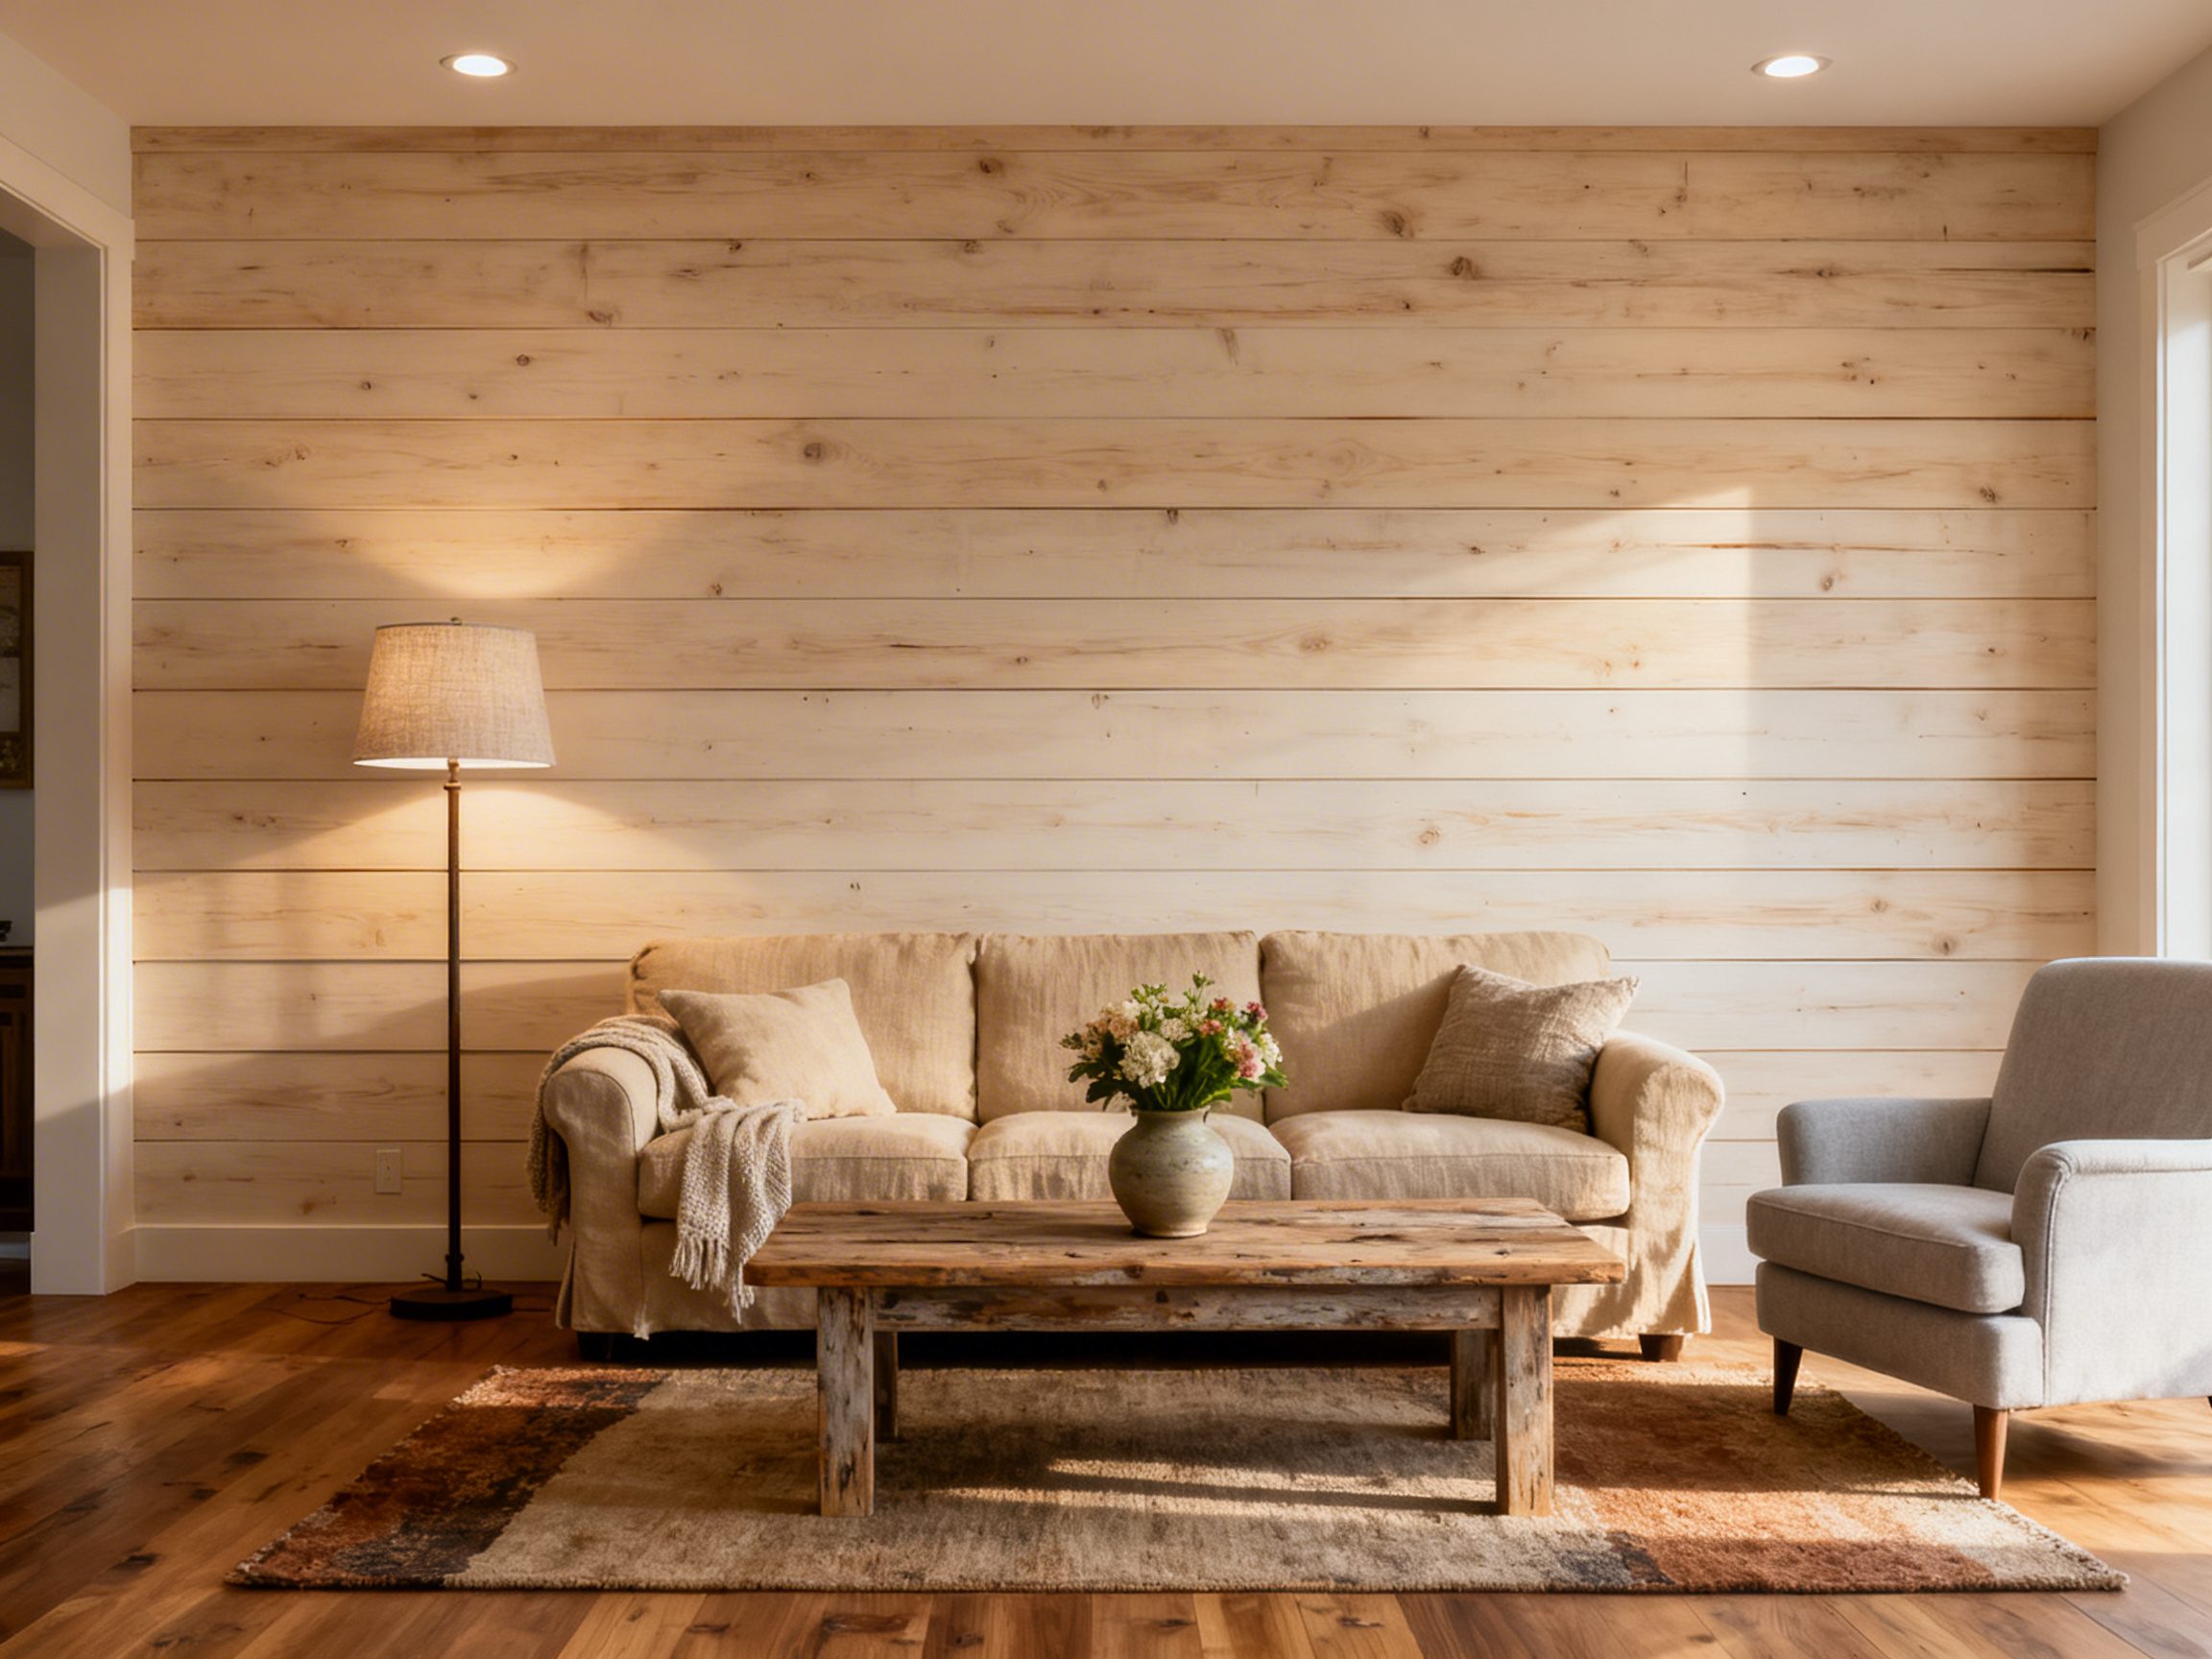
Living rooms and great rooms
Use shiplap to anchor a media or fireplace wall, but keep it to one plane. I center the TV within the board field and route surface conduits so the lines stay undisturbed.
Scale matters. On a 16-foot wall, 5-inch boards feel proportionate and refined. Paint in soft white for daylight rooms, or a deep taupe for evening-forward spaces.
Bedrooms
A headboard-height shiplap panel, 48–54 inches high, reads tailored and avoids the “boxed” feeling of full-height boards. Cap with a simple 1×3 ledge for art.
In smaller cottages, I run boards horizontally for width and keep gaps consistent. For complementary styling ideas, see Cottage Bedroom Wall Decor Planning for art and sconce placement that respects the board rhythm.
Entryways and stairwells
Shiplap tames scuffed walls in tight halls. I specify satin enamel for wipeability and stop the boards at a crisp datum line that aligns with rail height.
In staircases, maintain sightline continuity, avoid cutting short pieces at turns, and plan sconce backplates to land centered on a board, not a gap. If you decorate seasonally, a restrained wall makes greenery and ribbons pop, as shown in Holiday Staircase Decor.
Home office or study
Behind-desk shiplap gives a video-backdrop structure without busy wallpaper. Use narrower boards, 4 inches, to read more “cabinet-maker” than “farmhouse.”
I integrate concealed cable troughs at the baseboard and color-match outlets. If your office leans boho or layered, balance the linearity with a textured rug and soft drapery.
Choosing board profile: nickel-gap vs square
Read the shadow line, not just the spec
Nickel-gap creates a consistent 1/8 inch reveal that reads as a crisp shadow line across the wall. It telegraphs modern-cottage energy and helps smaller rooms feel ordered.
Square-edge can be butted tight or spaced with coins or spacers, but the reveals can wander if your studs are out of plane. In my experience, nickel-gap hides minor wall waves better and photographs cleaner.
Where does each profile excel?
Nickel-gap is my go-to for living rooms, entries, and home offices where you want rhythm without fuss. It pairs seamlessly with painted trim and flat-panel doors.
Square-edge shines in rustic or contemporary spaces where you prefer either a monolithic skin or a variable gap you control on site.
I use square-edge in lofts or true farmhouse settings when I want fewer horizontal lines or a custom reveal.
Installation precision and time
Nickel-gap boards are milled to self-space, which speeds layout and reduces error. Square-edge requires consistent spacers and laser-straight reference lines to avoid a tapering gap at corners.
If your budget can handle a small premium, nickel-gap typically saves an hour or two on a feature wall and reduces callbacks for uneven joints.
| Profile | Look | Install Difficulty | Time Impact | Best For | Common Pitfalls |
|---|---|---|---|---|---|
| Nickel-gap | Crisp 1/8″ reveal, consistent shadow line | Low to medium | Faster by ~10–20% | Transitional, coastal, cottage, media walls | Misaligned starter course makes every reveal look off |
| Square-edge | Tight-joint or custom-spaced reveals | Medium to high | Slower, more layout control | Rustic farmhouse, modern minimalist | Inconsistent gaps, telegraphing if studs not flat |
My call, based on the room type
For a high-traffic hallway or staircase, I prefer nickel-gap for durability and tidy lines, and it complements seasonal layers like garlands if you reference ideas similar to Holiday Staircase Decor.
In a vintage-inspired bedroom, square-edge with a hairline joint reads quieter under art, especially alongside plans like those in Cottage Bedroom Wall Decor Planning.
If you are on the fence, order two short runs and mount them on scrap plywood, then move them around the room under a day and night light to see the shadow behavior.
Color picks for 2026: Truffle, Drift, Arctic
Why do these tones work now?
Darker, moodier palettes are maturing, and manufacturers are meeting the brief with deeper, nuanced hues. According to trade releases, Truffle is emerging as a rich, sophisticated brown that feels grounded without reading flat.
Meanwhile, Drift offers a complex greige that bridges warm floors and cooler stone, and Arctic brings a clean, high-LRV white that avoids the sterile cast you get with contractor whites.
How do they shift in real light?
In my projects, Truffle looks most luxurious in natural light, where its chocolate undertone stays calm. Drift is a chameleon, warming up in incandescent light and cooling under LEDs, which makes it a safe whole-home connector.
Arctic excels in rooms with limited natural light, bouncing illumination, and tightening the shiplap lines so the wall feels tailored.
| Neutral under 3000–3500K LEDs, adapts to daylight | Tone & Undertone | Best Pairings | Lighting Notes | Where I Use It |
|---|---|---|---|---|
| Truffle | Deep brown, subtle cocoa undertone | Brass, walnut, natural linen, aged leather | Glows in north/east light, dramatic under warm LEDs | Dining rooms, libraries, headboard walls |
| Drift | Balanced greige, faint taupe-gray mix | White oak, black metal, soft black doors | Neutral under 3000–3500K LEDs, adapts in daylight | Living rooms, open-plan zones, stair halls |
| Arctic | Clean white, minimal yellow or blue | Chrome, marble, pale oak, crisp cotton | Maximizes brightness, defines shadow gaps | Bathrooms, kitchens, small entries |
How to choose without second-guessing?
Paint a primed sample board of the actual shiplap, not drywall, since profiles catch light differently. Hold it vertically and test under morning, afternoon, and evening light.
If your floors are warm and your countertops are cool, Drift is the peacekeeper. If you crave envelope warmth,
Truffle wraps the room. For a gallery-clean look or to tame busy tile, Arctic wins. For a broader palette context around cottage and farmhouse schemes, see Vintage Cottage or Farmhouse Interior.
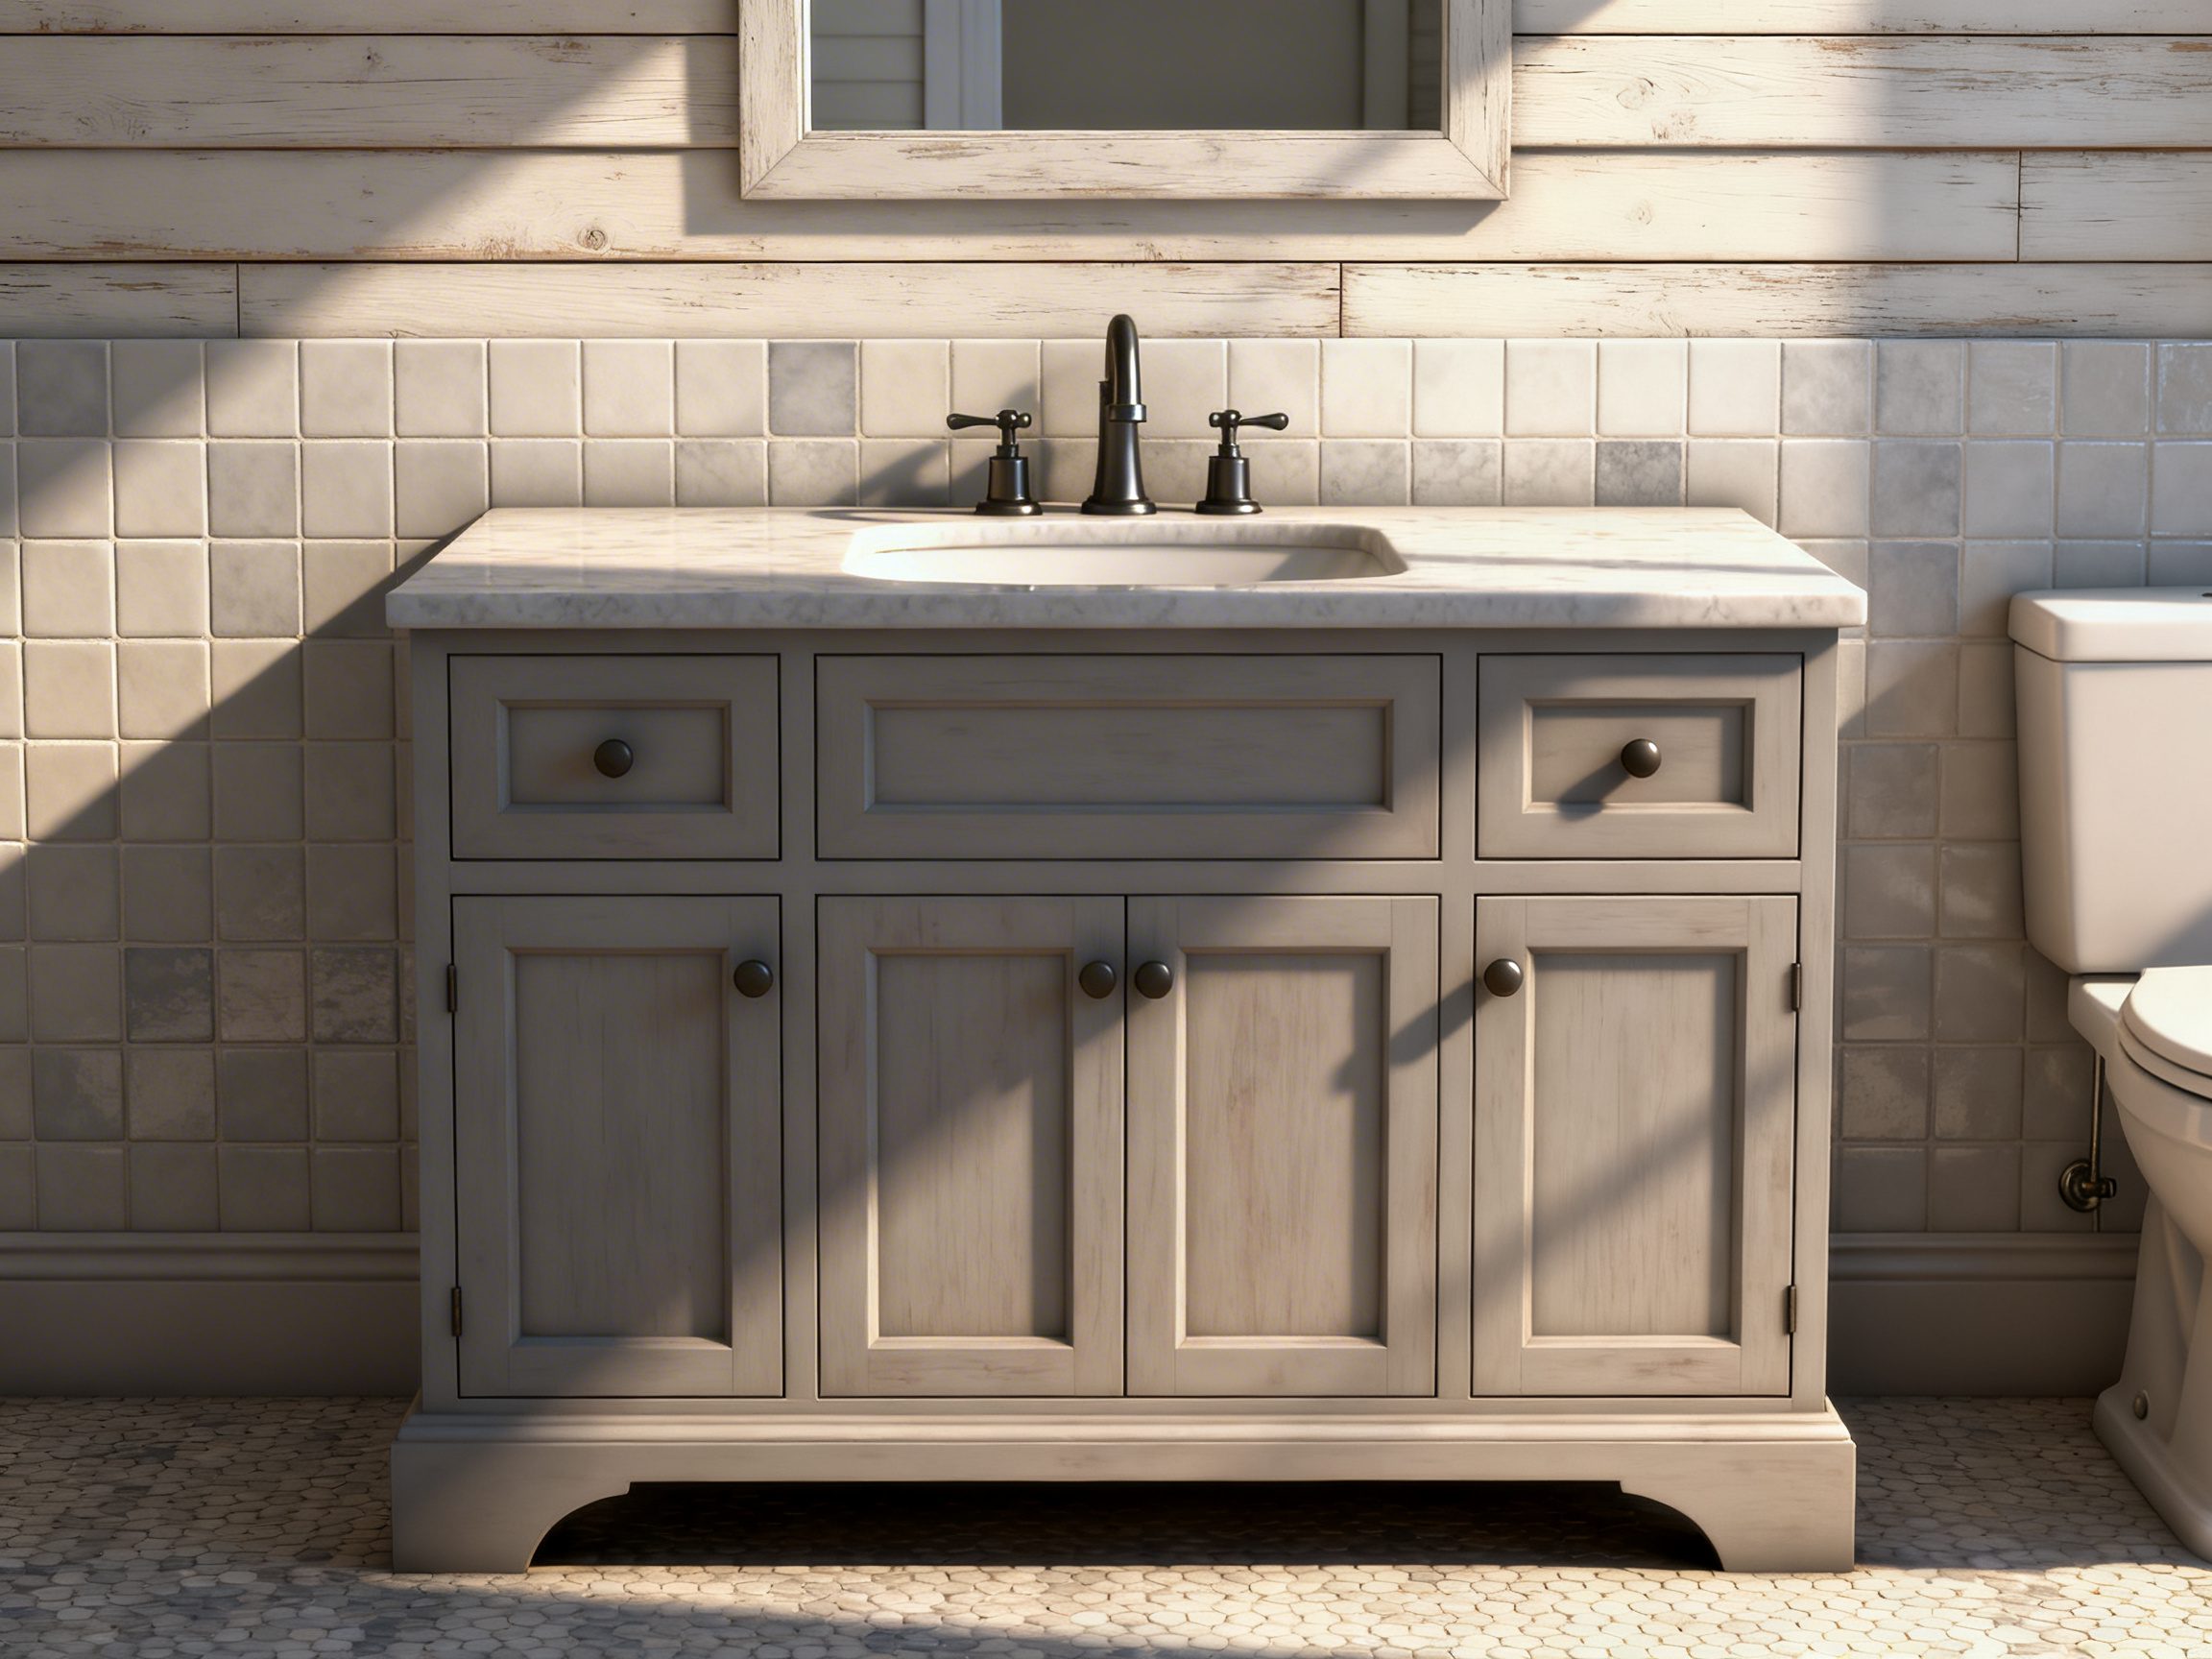
Moisture, movement, and bathroom installation tips
Material and finish selection
In wet zones, choose primed MDF only for powder rooms with stable humidity. For full baths, use PVC shiplap or moisture-resistant wood with factory primer on all sides, including ends.
I insist on sealing cut edges before mounting; it is the difference between a crisp joint in year three and swelling at the baseboard.
Prep the envelope properly
Use a quality vapor-management strategy: a clean, sound substrate, plus a compatible primer like a stain-blocking acrylic on drywall. In splash-prone areas outside code-defined wet zones, add a waterproofing membrane behind the shiplap or tile the lower third and start shiplap above.
Never run shiplap inside shower enclosures or within direct spray range.
Allow for seasonal movement
Even engineered woods move across humidity swings. Maintain a 1/8 inch perimeter gap at ceilings, corners, and baseboards, then cover with trim or flexible caulk.
Acclimate boards in the bathroom for 48 to 72 hours with HVAC running at normal levels before install.
| Zone | Recommended Material | Fasteners & Adhesives | Gaps & Sealing | Maintenance |
|---|---|---|---|---|
| Powder room | Primed MDF or wood, enamel topcoat | 18 ga brads into studs, panel adhesive beads | 1/8″ perimeter, paintable caulk at trim | Wipe splashes promptly, inspect caulk annually |
| Full bath, non-splash walls | Moisture-resistant wood or PVC | Stainless or galvanized fasteners, low-VOC adhesive | Seal cut ends, flexible sealant at transitions | Dehumidify after showers, quarterly check |
| Near vanity/splash zone | PVC preferred, or tile wainscot + wood above | Stainless fasteners, construction adhesive | Back-prime wood, silicone at countertop junction | Reseal gap lines as needed |
Paint systems that survive humidity
I specify a bonding primer followed by two coats of satin or semi-gloss enamel rated for baths. Satin hides surface chatter but still sheds moisture; semi-gloss is tougher around vanities.
Back-roll each coat to drive paint into gaps and end grain, then run a fine bead of paintable sealant in the nickel gaps near sinks to block wicking while keeping the shadow line.
Ventilation and long-term stability
A quiet, efficient fan sized to the room, ideally 80–110 CFM with a humidity sensor, will protect your finish.
Keep bathroom RH under 55 percent; it prevents cupping and joint creep. I continually see clients skip the fan upgrade and call me about open seams a season later.
If you need broader project planning references across rooms, the Sitemap.html is a useful jump-off point.
Costs, DIY difficulty, and pro labor math
Material choices that drive price
In my experience, 70% of your wall cost is material choice and finish level. MDF and primed pine are the budget workhorses, while solid hardwood or composite nickel-gap boards raise the ticket but install cleaner.
Waste factor: order 10% extra for square rooms, 15% for angled ceilings or heavy cutouts.
| Moisture-proof, ideal for wet zones | Typical Board Size | Price per Sq Ft (Material) | Pros | Cons | Best For |
|---|---|---|---|---|---|
| MDF shiplap | 1/2 in x 7.25 in | $1.75–$3.25 | Very smooth, paints beautifully, budget friendly | Swells if wet, needs careful sealing in baths | Bedrooms, living rooms |
| Primed pine (nickel gap) | 1/2 in x 5.5–7.25 in | $2.50–$4.50 | Real wood feel, forgiving to install | Knots can telegraph if primer is weak | Most interiors, light-duty baths |
| Poplar/hardwood | 1/2 in x 5–7.25 in | $4.50–$8.00 | Stains well, minimal movement, crisp reveal | Higher cost, needs skilled cutting | Feature walls, high-end projects |
| PVC/composite | 1/2 in x 5.5–7.25 in | $4.00–$7.00 | Moisture proof, ideal for wet zones | Can look plasticky if not painted well | Bathrooms, laundry, basements |
Real-world totals for common walls
Shiplap math is simple: wall width x height gives area, then multiply by your selected material and add finish costs.
I budget paint and sundries at $0.75–$1.50 per sq ft, and trim or corner beads at $1–$3 per linear foot where needed. Below are typical totals I quote clients before contingencies.
| Wall Size | Material | Materials Subtotal | Finish Materials | Estimated Total (DIY) |
|---|---|---|---|---|
| 10 ft x 8 ft = 80 sq ft | MDF | $140–$260 | $80–$140 | $220–$400 |
| 12 ft x 9 ft = 108 sq ft | Primed pine | $270–$485 | $110–$160 | $380–$645 |
| 14 ft x 9 ft = 126 sq ft | Poplar | $565–$1,010 | $120–$190 | $685–$1,200 |
| 8 ft x 8 ft = 64 sq ft (bath) | PVC/composite | $255–$450 | $60–$100 | $315–$550 |
DIY difficulty by skill level
If you can run a miter saw accurately and hit studs, a standard wall is a confident-beginner project. Challenges arise with outside corners, stair stringers, and wavy plaster, which add scribing and filler work.
I tell new DIYers to start with a clean, rectangular wall and horizontal boards to learn layout and reveals.
| Scope | Skill Needed | Main Pain Points | Time DIY |
|---|---|---|---|
| Flat wall, horizontal boards | Beginner+ | Stud finding, first course level, nail hole fill | 6–10 hours |
| Wall with two outlets and a vent | Intermediate | Jigsaw cutouts, maintaining reveals | 8–14 hours |
| Stair wall or vaulted ceiling | Intermediate+ | Scribing angles, ladder safety, layout math | 12–20 hours |
| Vertical boards with outside corners | Advanced | Edge trims, perfect seams, movement gaps | 14–24 hours |
Pro labor math and when to hire
Pros typically price by square foot or by day rate. For shiplap, I see $4–$9 per sq ft for labor in most markets, plus material. If the wall involves complex scribing, built-ins, or high ladders, expect $10–$14 per sq ft.
| Wall Size | Labor (Std Complexity) | Materials | Pro Project Total | Notes |
|---|---|---|---|---|
| 80 sq ft | $320–$720 | $220–$400 | $540–$1,120 | Add $150–$300 for tall ceilings |
| 108 sq ft | $430–$970 | $380–$645 | $810–$1,615 | Electrical trim-out may add $100–$200 |
| 126 sq ft | $500–$1,130 | $685–$1,200 | $1,185–$2,330 | Complex scribing can add 20–35% |
Cost control tips I actually use
I always pre-prime and sand boards flat on sawhorses, which saves two hours of awkward wall work. Buy a finish nailer or rent one, then back it with construction adhesive to reduce nails and patching.
Finally, batch all cuts by length to minimize waste and keep reveals consistent across the wall.
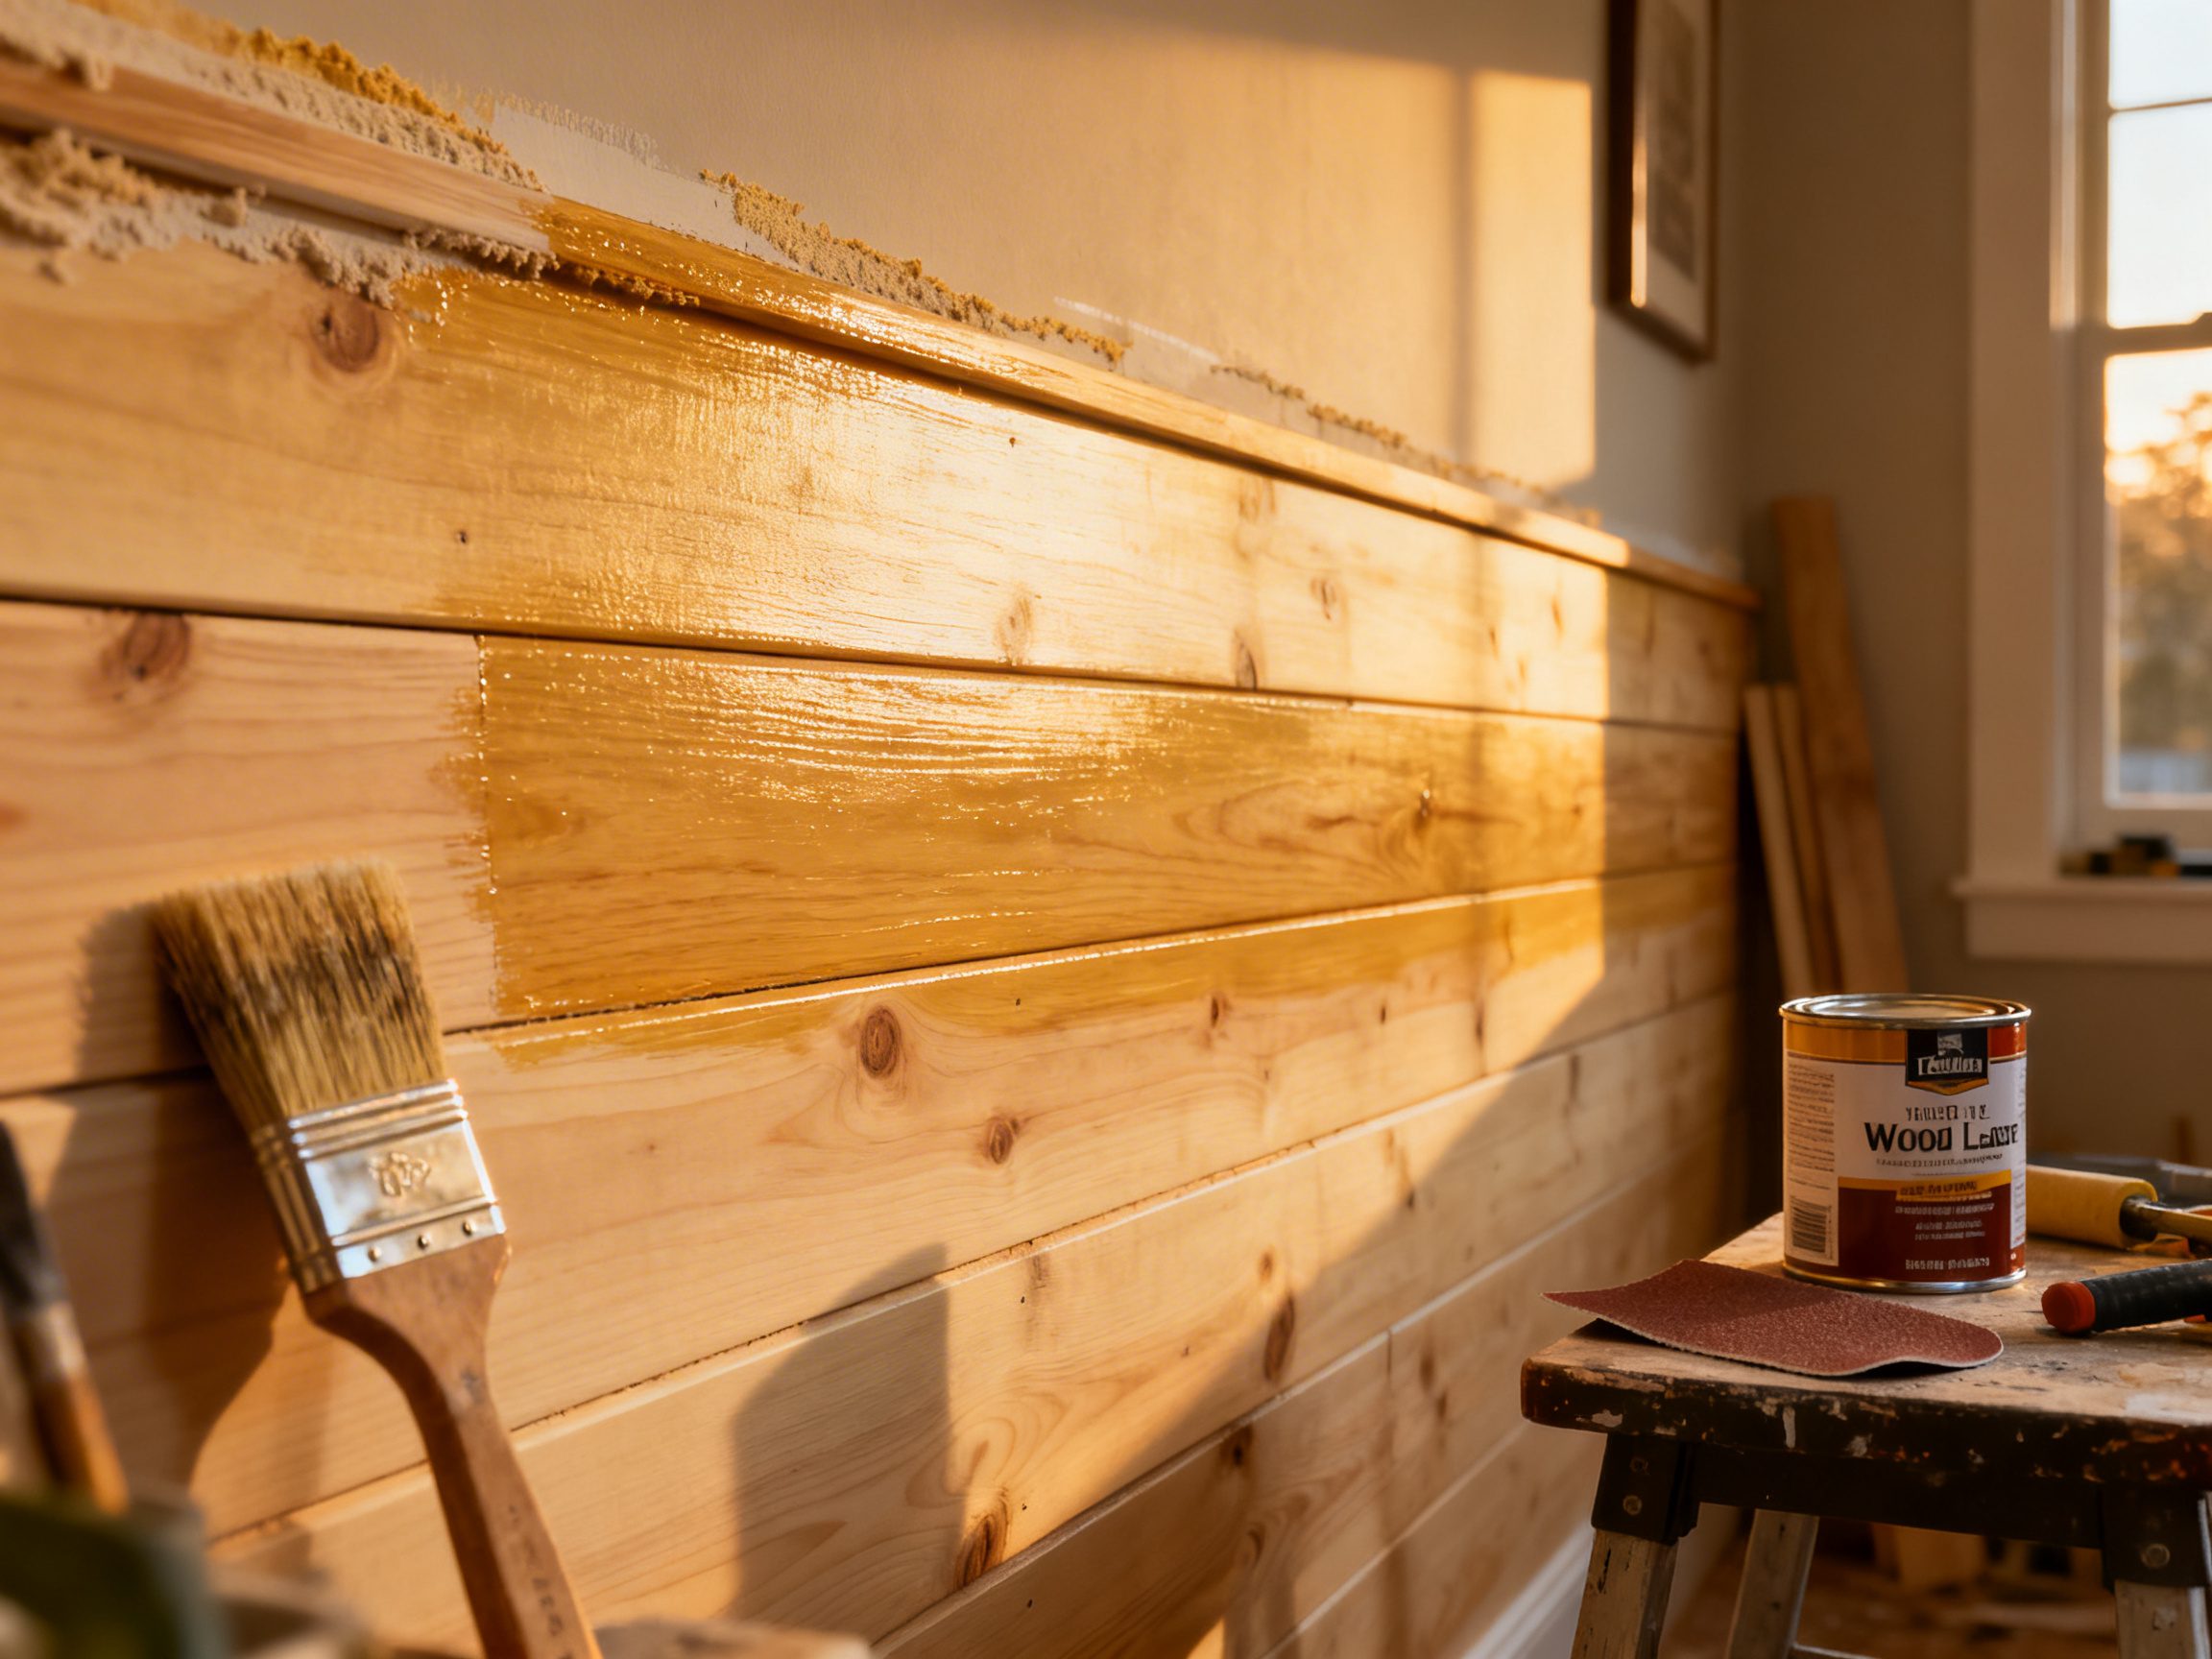
How to finish, seal, and maintain shiplap?
Primers and sealers by room type
Your primer sets the tone for longevity. For MDF and pine in dry rooms, use a high-build acrylic primer that blocks tannins and fills micro-fuzz. In baths or laundry, step up to a bonding primer plus a moisture-resistant topcoat, or use PVC boards with a standard acrylic latex.
| Substrate | Location | Primer | Topcoat | Why It Works |
|---|---|---|---|---|
| MDF | Dry rooms | Acrylic high-build | Scuff-resistant acrylic enamel, satin | Acrylic latex, satin, or semi |
| Primed pine | Most interiors | Stain-blocking (shellac or alkyd) | Acrylic latex, satin or semi | Stops knot bleed, resists yellowing |
| Poplar/hardwood | Feature walls | Acrylic for paint, wood conditioner for stain | Waterborne alkyd or clear polyurethane | Crisp finish, minimal grain raise |
| PVC/composite | Wet zones | Bonding primer for plastics | 100% acrylic exterior-grade, satin | Superior adhesion and moisture resistance |
My paint schedule that avoids hairline cracks
Paint movement is what telegraphs gaps over time. I back-prime all board edges, then lightly break the factory edge with 220-grit to help paint bridge the gap cleanly.
After installation, I fill nail holes with lightweight spackle, spot-prime patches, then apply two thin topcoats for a uniform sheen.
- Back-prime front, back, and cut ends before install, especially MDF.
- Use paintable acrylic caulk very sparingly at inside corners and trim junctions, never in the nickel gap.
- Roll broad faces with a 1/4 in microfiber, tip-off with a quality sash brush for glassy results.
Sealing for baths, kitchens, and entries
In moisture-prone rooms, protection beats over-caulking. I leave the nickel gap uncaulked for breathability, then seal base and top terminations with a thin bead of high-quality acrylic or hybrid sealant.
Where water may splash, add a clear waterborne polyurethane over paint on the lower third, satin sheen, to improve wipeability without looking plastic.
Cleaning, touch-ups, and seasonal checks
Shiplap stays pristine with light, regular care. Wipe with a damp microfiber and mild dish soap, then dry immediately to keep edges tight.
Each spring and fall, I run a quick visual for popped nails, caulk shrinkage at corners, and any hairline movement, then touch up with the original sheen to avoid flashing.
Finish colors that feel current without dating fast
I prefer soft whites with a touch of warmth, or moody mid-tones that lean earthy rather than blue-gray.
If you want to nod to current deeper palettes, richer tones like truffle or chocolate-olive read sophisticated and photograph beautifully, while still pairing with natural wood and stone.
Test in morning and evening light, since shiplap’s shadow lines deepen color by about half a step.
- Sample three sheens in place: eggshell, satin, semi. Satin is my default for durability and subtle shadowing.
- Paint a full board off-site first to confirm undertones against flooring and trim.
FAQ
Pre-prime and apply one finish coat to loose boards, then install and do a final coat on the wall. This seals edges and speeds up clean finishing while avoiding paint bridges in the gaps.
Yes, in most dry interiors. Hit studs with fasteners, and use construction adhesive to reduce nail holes. In uneven plaster, add thin furring or skim with joint compound for a flatter base.
A 1/8 inch nickel gap feels crisp and timeless. Wider gaps can trap dust and skew farmhouse, while tight V-grooves read more formal and hide dust better.
Use factory corner trims or build mitered returns with a tiny eased edge. I prefinish these pieces, test-fit dry, then install with adhesive plus pins to avoid visible fasteners.
Final Thoughts
Shiplap rewards precision. Choose the right substrate for the room, prefinish smartly, and respect expansion with breathable detailing. Do that, and your accent wall will read intentional, not trendy, and it will wear beautifully for years.