

Make the plunge feel intentional, not incidental. Cold plunge spaces now read like curated rooms, where material choice, lighting, and scale communicate ritual and respite, not just function.
This collection focuses on aesthetics that support daily use, recovery, and a sense of calm, with practical calls on finishes, placement, and budget-aware alternatives.
Good design reduces barriers to use, so every idea below includes a concrete decision: choose matte basalt for contrast, place the tub for privacy and sightlines, or swap stone for a heated timber deck in cold climates.
Expect alternatives for renters, small yards, and tight budgets, plus one common mistake to avoid per idea.
- 1. Cold Plunge Alcoves
- 2. Textured Stone Basins
- 3. Warm Timber Surrounds
- 4. Mediterranean Tubs
- 5. Portable Inflatable Tubs
- 6. Integrated Sauna Pairings
- 7. Verdant Greenery Walls
- 8. Ambient LED Niches
- 9. Tactile Concrete Finishes
- 10. Minimalist Zen Platforms
- 11. Soft Textile Mats
- 12. Hidden Filtration Systems
- 13. Rustic Cedar Cladding
- 14. Floating Step Access
- 15. Glass-Enclosed Cubes
- 16. Monochrome Tile Schemes
- 17. Curved Organic Forms
- 18. Compact Backyard Kits
- 19. Heated Towel Rails
- FAQ
- Summary
1. Cold Plunge Alcoves
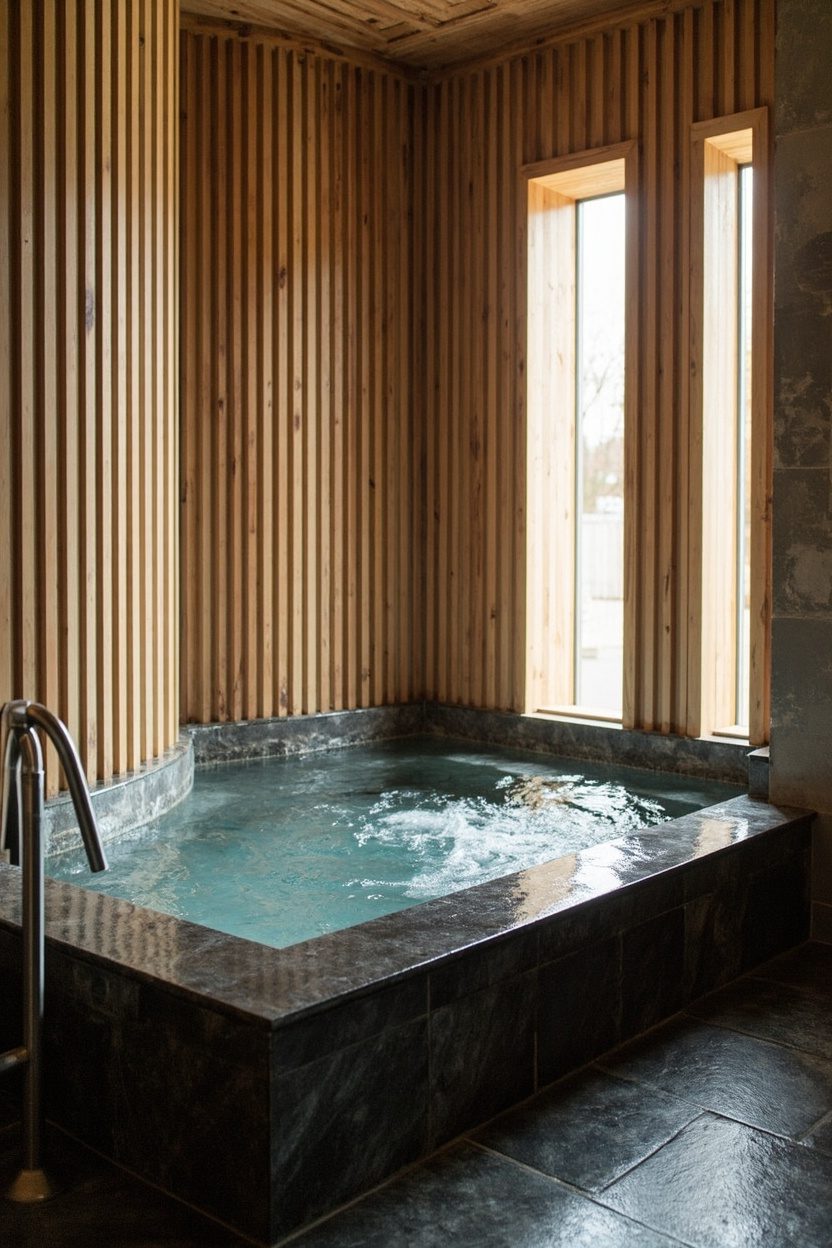
Alcoves frame the plunge like a chapel for recovery, creating a private ritual space that signals purpose.
Use a recessed niche when floor plans are tight, ideally 4 to 6 feet wide, so the basin reads like furniture rather than an afterthought.
Prioritize sightline and acoustics, placing the alcove away from noisy zones and adding a single wall sconce to draw the eye inward.
Avoid overly tight clearances, keep at least 36 inches of circulation on the entry side, and allow for a small bench for drying off or dressing.
Styling Blueprint
- Depth: recess width 4–6 feet, depth 2–3 feet for single-user basins.
- Finish: matte plaster or micro-cement for low-maintenance walls.
- Lighting: dimmable, warm 2700K wall sconce at eye level.
- Accessory: teak bench 18 inches deep for towels and robes.
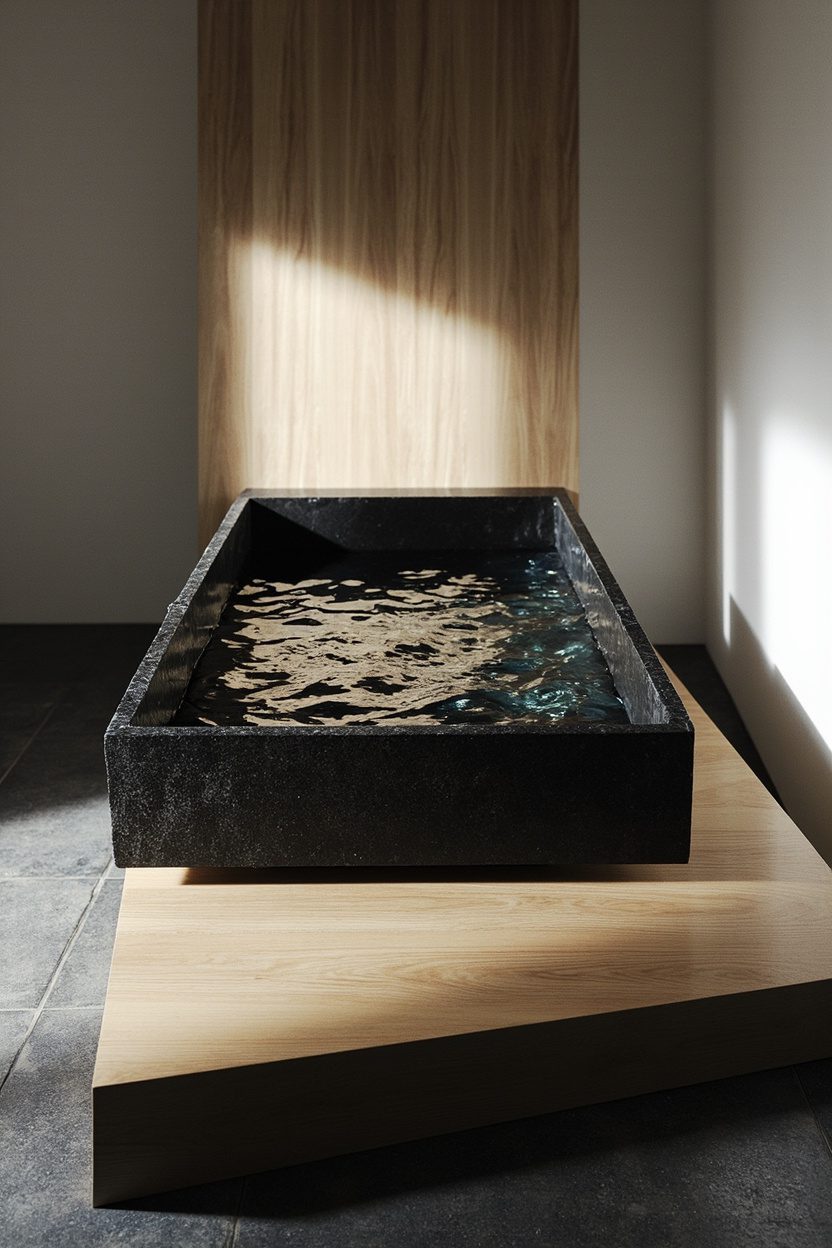
2. Textured Stone Basins
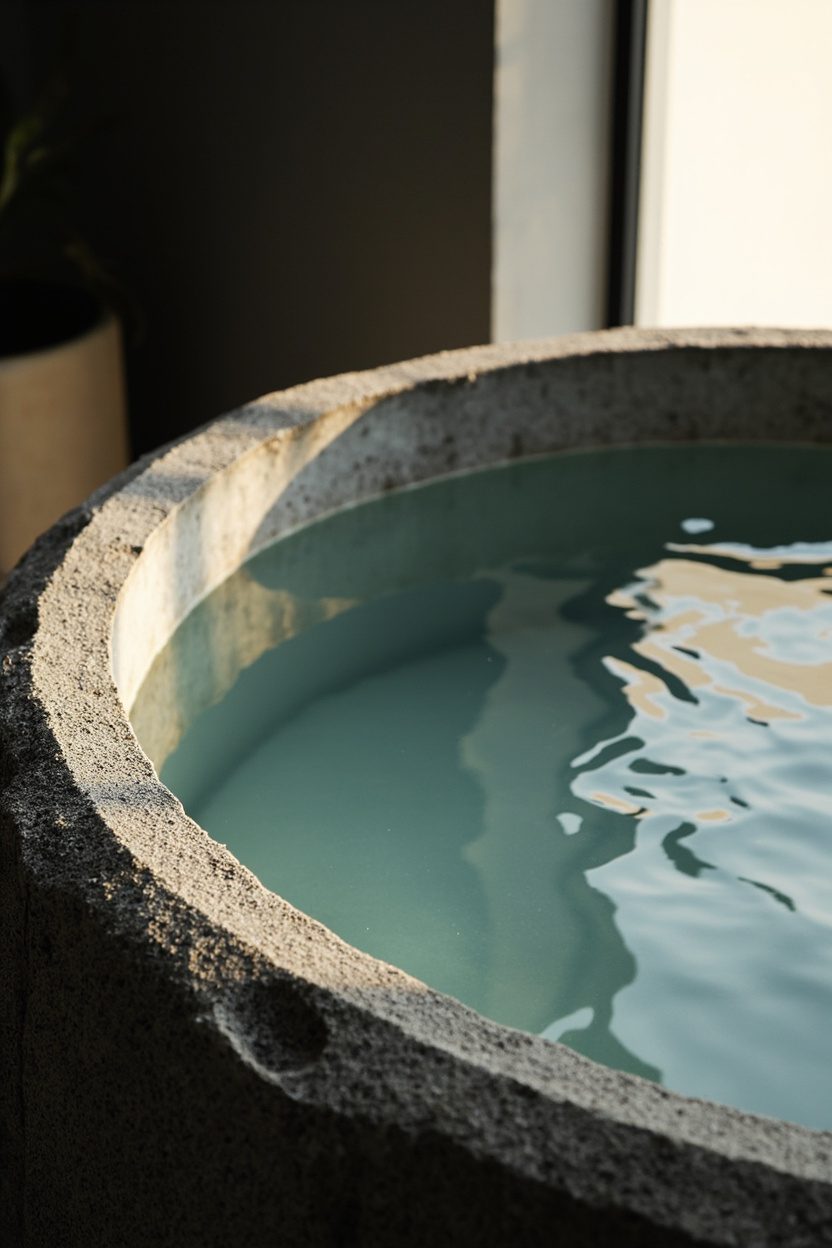
A hand-hewn stone basin anchors a plunge with tactile depth, the kind of material that improves with water and age.
Select volcanic basalt or honed granite for durability and a slip-resistant surface, with a 1-to-2-inch honed edge to reduce chipping.
Consider integral overflow planning to keep the stone uninterrupted, and budget for professional sealing every 2–3 years to prevent staining.
Skip glossy honed finishes in cold climates; they show salt bloom and require frequent maintenance.
Essential Elements
- Material: basalt or granite, honed finish for grip and patina development.
- Edge profile: 1–2 inch eased edge to avoid chipping.
- Plumbing: hidden perimeter overflow with linear drain connection.
- Maintenance: annual sealant, quarterly rinse to avoid mineral deposition.
3. Warm Timber Surrounds
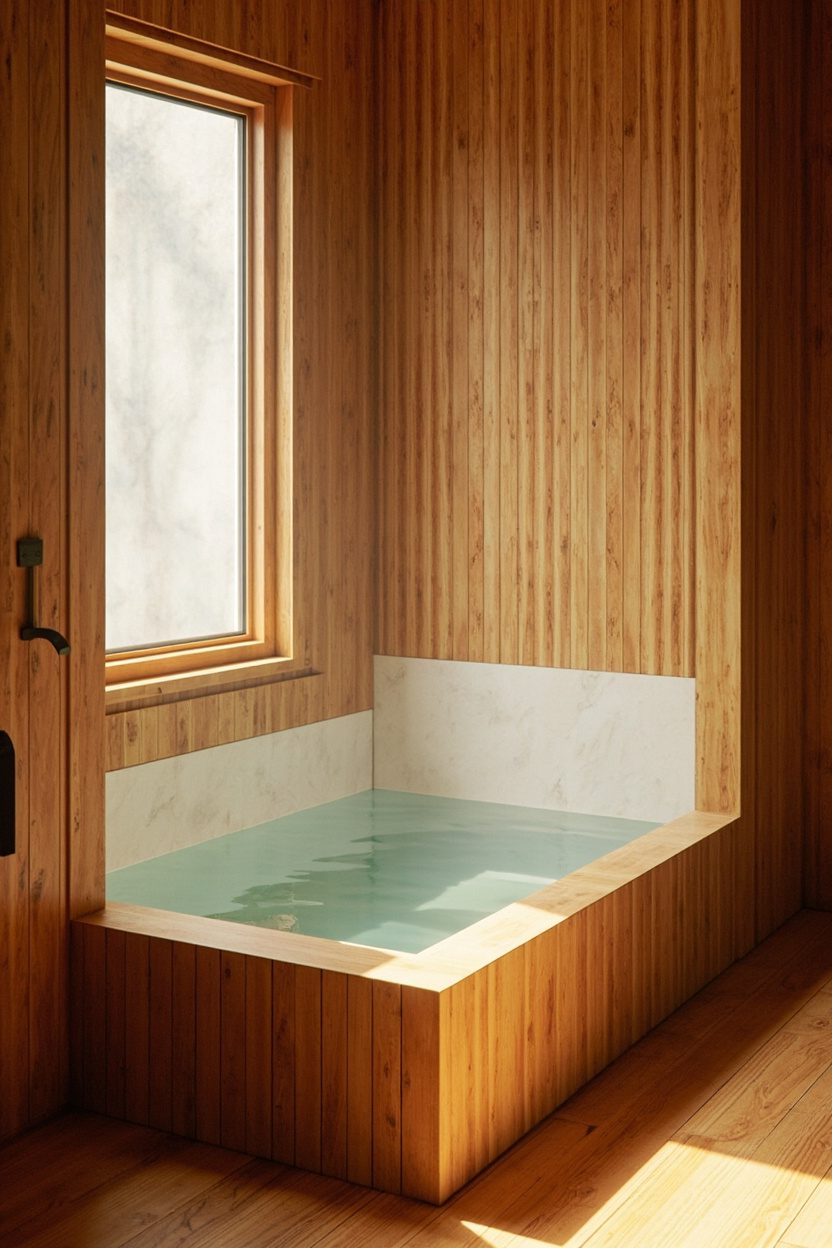
Timber warms the eye, balancing the coolness of the water and making the plunge feel inviting year-round.
Use naturally rot-resistant species like teak or Accoya, spaced for drainage, and fix with stainless steel screws to prevent staining.
For colder regions, incorporate radiant heating beneath the timber deck to cut shock when stepping out, and avoid softwoods that splinter when wet.
Design for replacement: specify removable deck panels so you can treat or swap boards without draining the entire system.
What to Focus On?
- Wood choice: teak or Accoya for longevity and low maintenance.
- Fasteners: stainless steel or concealed clips for clean lines.
- Drainage: 1–2% slope away from the plunge, vertical gap for airflow.
- Comfort: radiant heated pads under top-step for winter use.
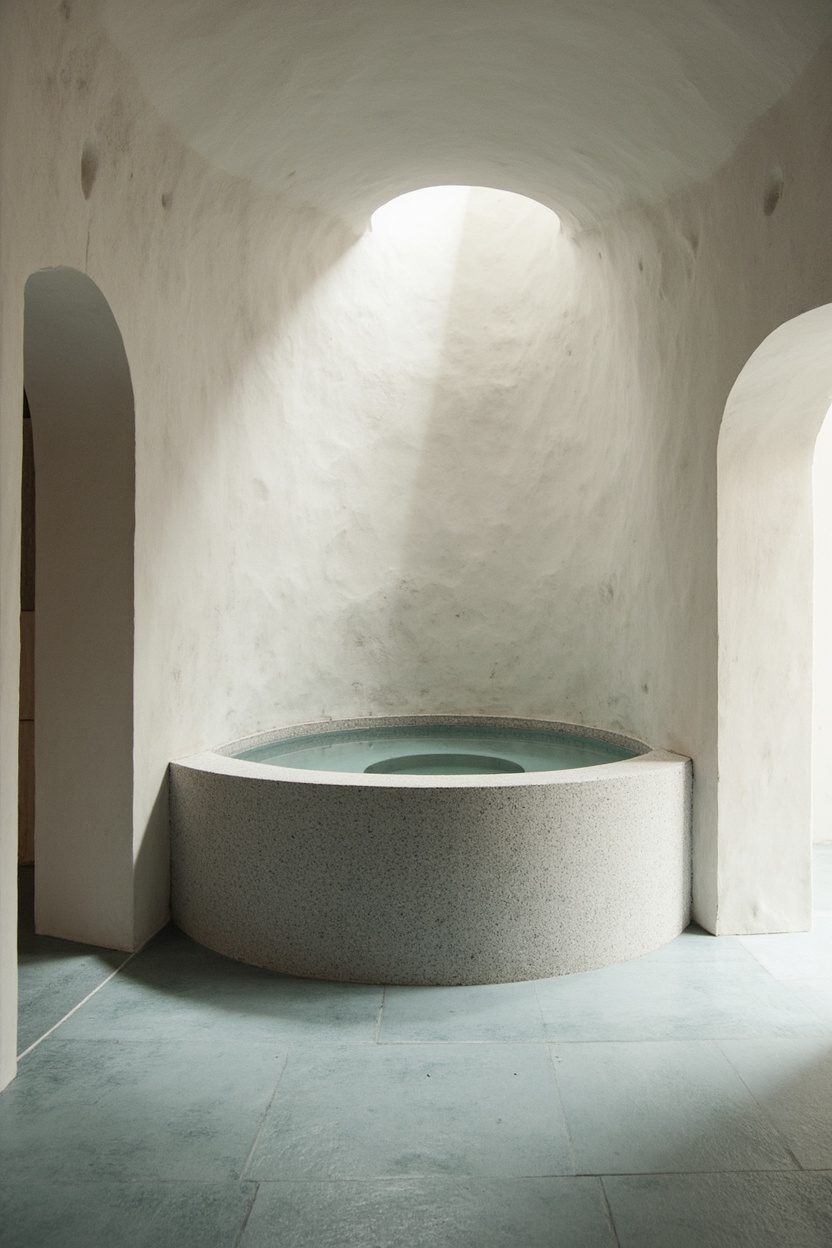
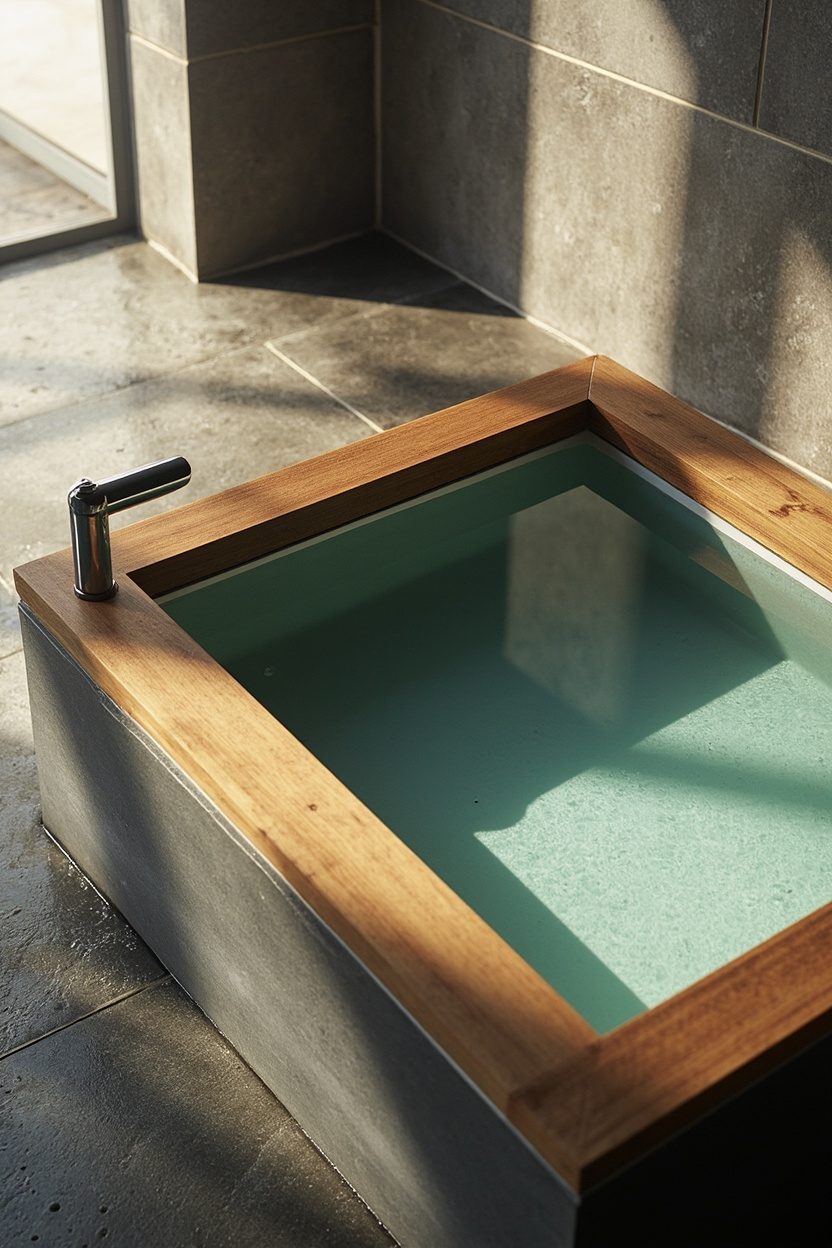
4. Mediterranean Tubs
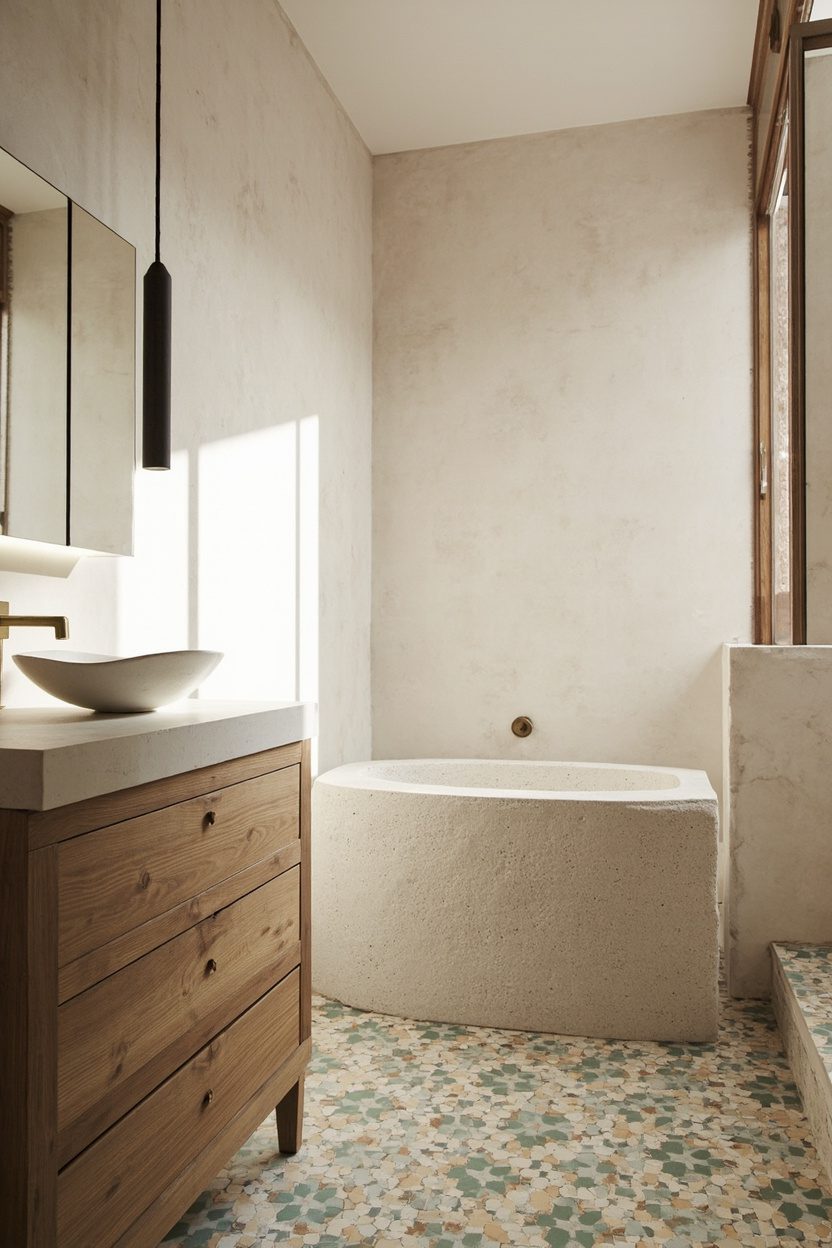
A shallow, sun-warmed tub finished in tadelakt or lime plaster gives cold plunges a Mediterranean attitude and softens the shock visually and physically.
Position the tub against a terrazzo or sun-baked limestone wall, keeping the rim at hip height for easy step-in access and a relaxed, seated plunge posture.
Choose warm, earthy pigments, such as sienna, ochre, and sage, instead of clinical whites to make the cold-water experience feel like a deliberate ritual.
Scale matters: opt for a 4.5–6 ft length for single users, or a 6–7 ft oval for duo use, and avoid oversized depths that complicate maintenance.
Styling Blueprint
- Material: tadelakt or lime plaster finish, sealed for water resistance and texture contrast.
- Color: warm earth tones, aim for mid-value pigments that hide mineral stains.
- Placement: against a textured stone wall, with a built-in bench nearby for drying.
- Budget tip: Use plaster finish over a concrete shell to mimic luxe at moderate cost.
5. Portable Inflatable Tubs
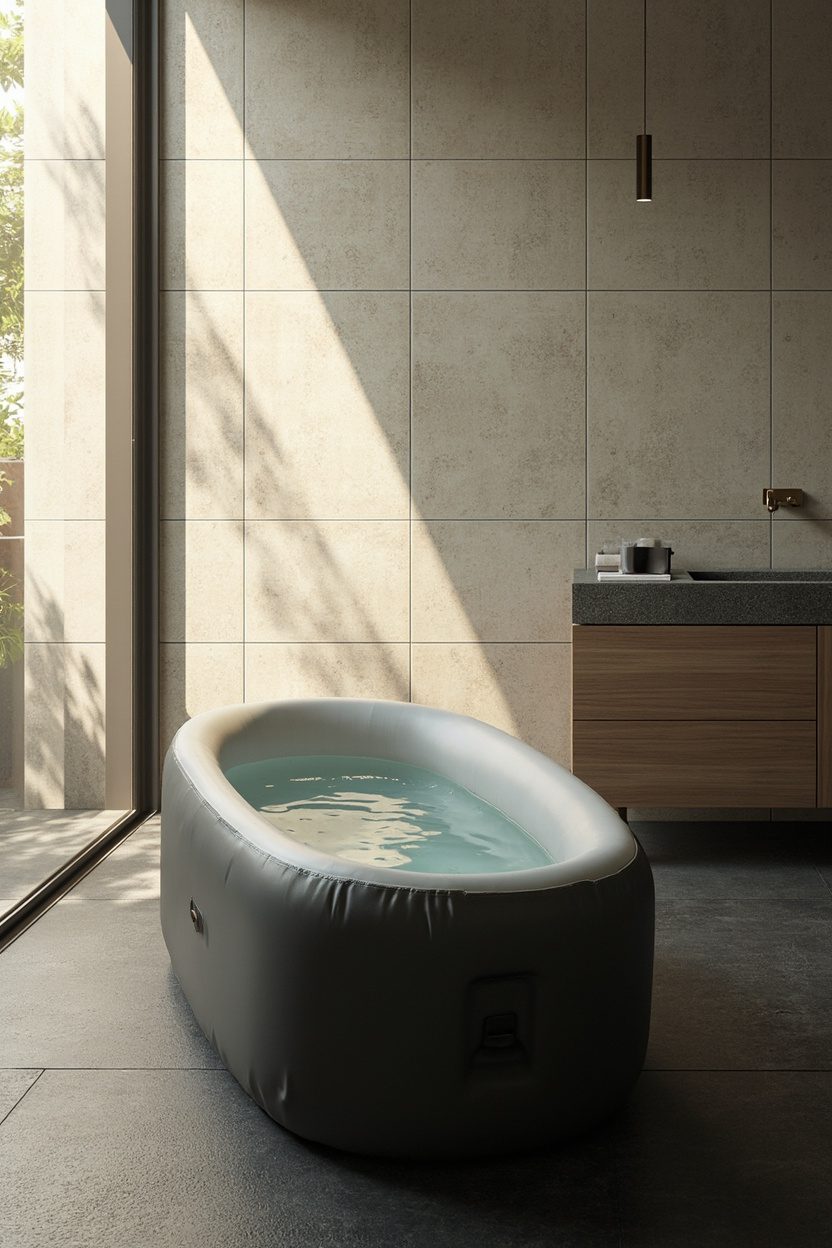
Inflatable tubs democratize cold plunges, they’re ideal for renters or seasonal plunge rituals, and they collapse for off-season storage.
Prioritize heavy-gauge PVC with thermal liners, and pick models with insulated covers to keep chill levels stable between sessions.
Design-wise, choose matte neutrals, or wrap a wicker tray around the rim to disguise the temporary aesthetic and add a stable surface for towels and timers.
Plan for placement: flat, shaded outdoor spots with easy drainage or a reinforced balcony corner, and always factor in a small pump and chemical storage nearby.
What to Focus On?
- Construction: heavy-duty PVC, multi-layered walls, and an insulated top for thermal retention.
- Accessories: rigid tray or wicker surround to elevate styling and protect the shell.
- Placement: flat, level surface with drainage and access to a small electric pump.
- Cost: budget-friendly options under $500, upgraded models with liners and heaters up to $2,000.
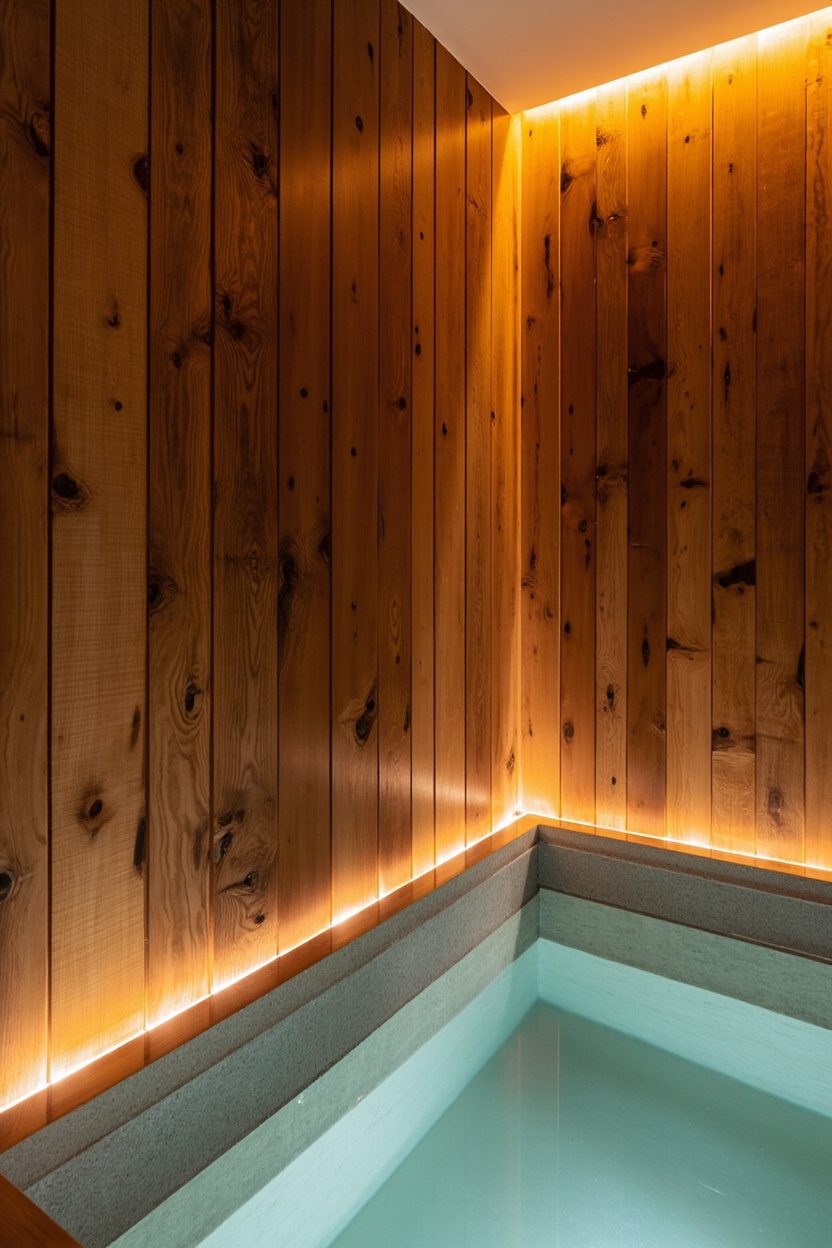
6. Integrated Sauna Pairings
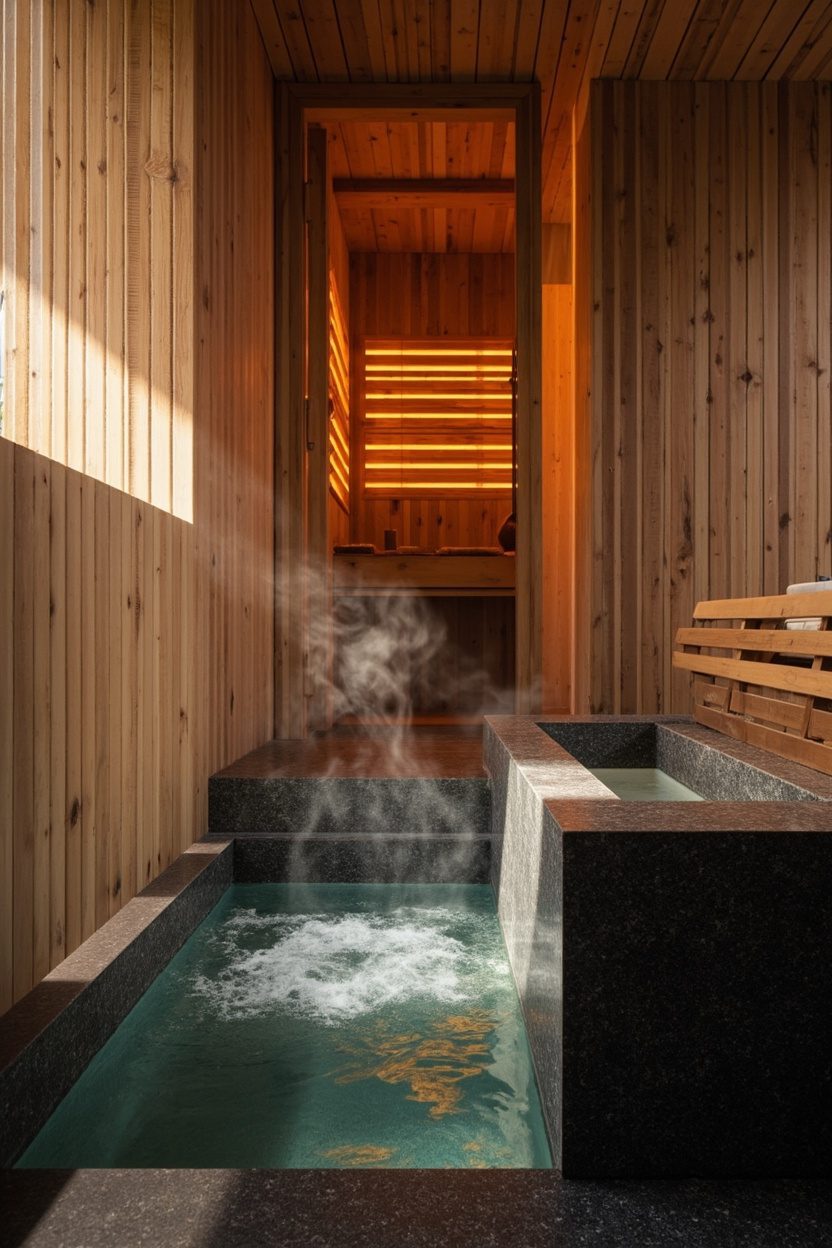
Placing a sauna adjacent to a cold plunge creates a deliberate, ritualistic flow, and it’s the classic contrast that sells the wellness narrative.
Plan door placement so the sauna exit faces the plunge, keeping the thermal exchange direct and safe.
Material choices matter; choose heat-tolerant cedar for the sauna and honed granite or acid-washed concrete for the plunge surround to avoid thermal shock damage.
Allow for a 900–1200mm clear transition zone between volumes, to give users space to towel off and steady themselves after hot to cold shifts.
What to Focus On?
- Ventilation strategy, exhaust near the sauna bench and intake by the plunge area for airflow control.
- Non-slip finishes, textured stone, or brushed tile around the plunge to prevent slips when wet.
- Sequential controls, install linked timers for sauna and plunge to encourage safe session lengths.
- Storage placement, integrated towel hooks, and a bench within 1.5m of the plunge for convenience.
7. Verdant Greenery Walls
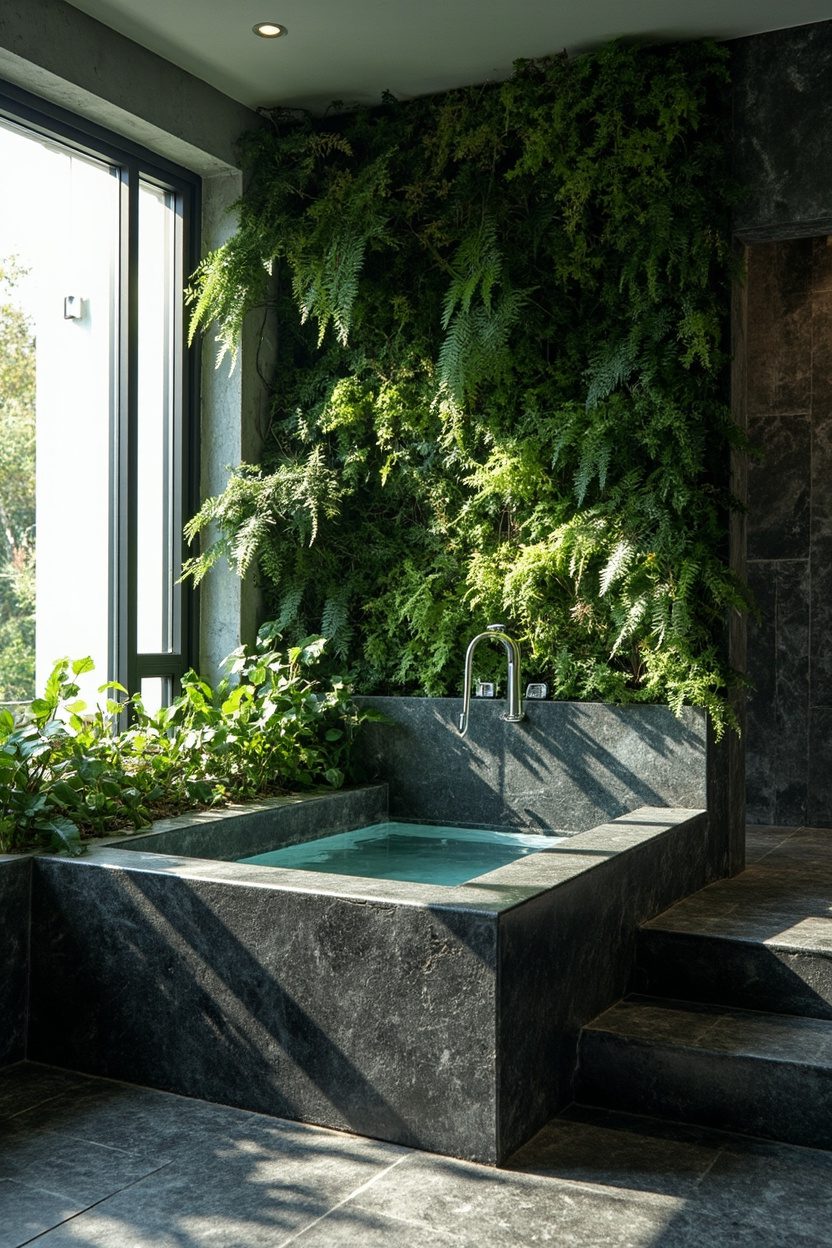
A living wall softens the clinical look of a cold plunge, and introduces humidity-tolerant species like ferns and maidenhair for lush texture.
Select corrosion-resistant planters and a drip irrigation system to protect surrounding timber or steel finishes from moisture damage.
Keep plant palettes to three complementary greens, adding a splash of variegation with pothos or philodendron for visual depth without clutter.
Position the greenery so foliage overhangs the plunge edge by 100–200mm, creating that immersive, cave-like feel while avoiding leaf debris in the water.
Essential Elements
- Plant selection, use moisture-loving, low-maintenance species rated for indirect light and high humidity.
- Irrigation, automated drip lines with a separate shutoff to prevent oversaturation near finishes.
- Planter material, opt for powder-coated steel or sealed cedar for longevity in damp conditions.
- Maintenance access, design removable panels or a front service zone for pruning and cleaning.
8. Ambient LED Niches

Recessed LED niches create cinematic pockets of light around the plunge, and they’re an easy way to set the mood without glare.
Use warm 2700–3000K tones for relaxation, and cooler 3500K accents when the design leans high-contrast or spa-clinical.
Incorporate RGBW strips behind textured tiles or stone reveals, and hide channels to prevent direct bulb view, which keeps the glow diffuse.
Control integration is key; run a wall-mounted dimmer or app-linked controller so users can program contrast between plunge and sauna cycles.
Styling Blueprint
- Layering, combine backlit niches with overhead wall grazers to sculpt stone or concrete textures.
- Waterproofing, specify IP67-rated strips and silicone-sealed channels for wet-area durability.
- Color strategy: reserve colour-changing LEDs for accent moments, keep baseline white light warm for daily use.
- Placement: install niches at eye level and near steps to aid depth perception during low-light sessions.
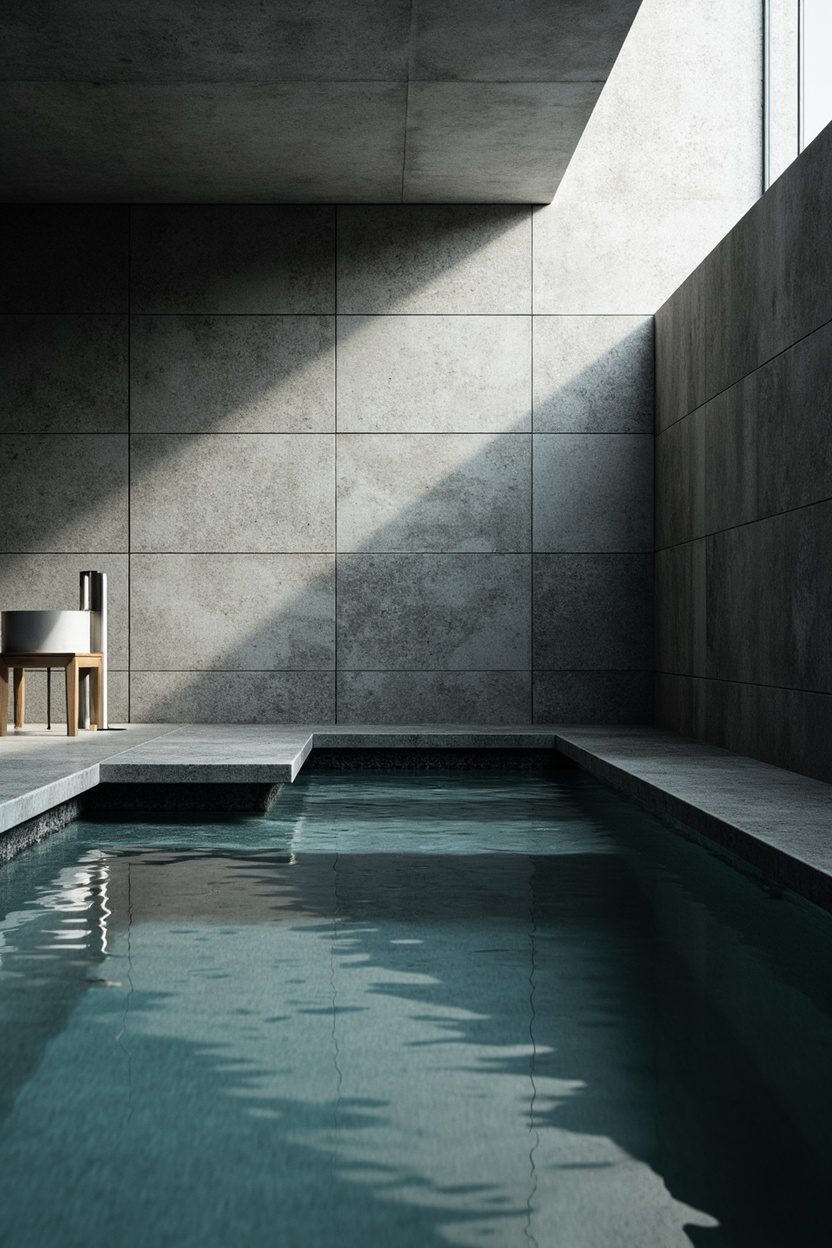
9. Tactile Concrete Finishes
Concrete brings a modern, grounded look to cold plunges, and when finished with texture, it reads as deliberate, not industrial.
Choose a honed or brushed finish to avoid slipperiness, and seal with a matte, breathable sealer to preserve texture while protecting against chlorine or salt water.
Stick to warm gray tones with subtle ochre undertones to keep the material from feeling cold visually, and scale the poured panels to match the pool length for visual continuity.
Avoid large, polished expanses that glare, and instead use segmented panels or hand-troweled patterns to add human scale and tactility.
Essential Elements
- Honed concrete finish with matte sealer, suitable for wet environments and 2–3 mm surface texture for grip.
- Warm gray pigment, avoid blue-gray to prevent a sterile feel.
- Segmented panel joints every 4–6 feet to break up scale and control cracking.
- Complement with teak or warm stone coping to soften the edge contrast.
10. Minimalist Zen Platforms
A raised platform frames a cold plunge like a sculptural focal point, and minimal detailing keeps the composition calm and spa-like.
Use narrow, recessed steps of poured concrete or kiln-dried cedar to maintain clean sightlines and a low profile that reads meditative.
Limit palette to two neutrals, for example, soft white plaster walls and charcoal platform, so the plunge feels intentional, not decorative.
Mind the scale, set platform height to allow easy entry, typically 12–18 inches above the surrounding floor, and include a concealed handrail for safety without visual clutter.
Styling Blueprint
- Platform material: sealed cedar for warmth, or honed concrete for permanence. Choose one primary texture.
- Step rise: 6–8 inches with non-slip treads, width matched to pool length for proportional balance.
- Hidden drainage and linear overflow to keep surfaces dry and minimalistic.
- Soft indirect lighting under the platform edge to emphasize the floating effect at night.
11. Soft Textile Mats
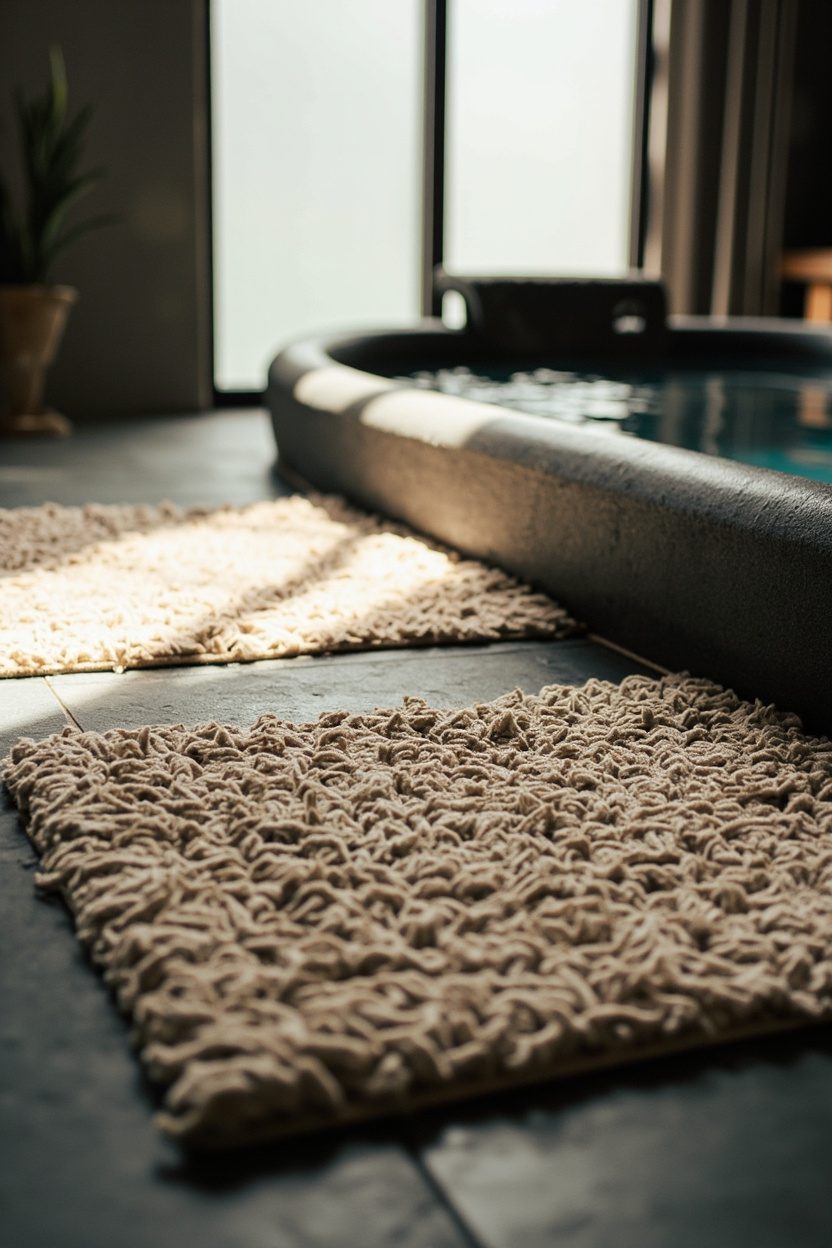
Textiles around a cold plunge introduce necessary softness, and carefully selected mats reduce splash, add warmth, and prevent slips.
Opt for high-performance fabrics like quick-dry olefin or polypropylene with textured weaves to trap water and still feel pleasant underfoot.
Go for muted, spa-friendly colors such as sand, sage, or dove gray to layer warmth without competing with the plunge finish.
Place mats with a 2–3 inch gap from the pool edge to avoid trapping water against the structure, and choose machine-washable sizes for practical upkeep.
What to Focus On?
- Material: quick-dry olefin or polypropylene, mildew-resistant, machine washable for hygiene.
- Color: neutral palette—sand, sage, dove gray—to complement natural stone or wood finishes.
- Placement: Leave a small gap from the edge, use multiple small mats rather than one large runner for drainage.
- Backing: non-slip rubber with perforations to shed water and prevent pooling underneath.
12. Hidden Filtration Systems
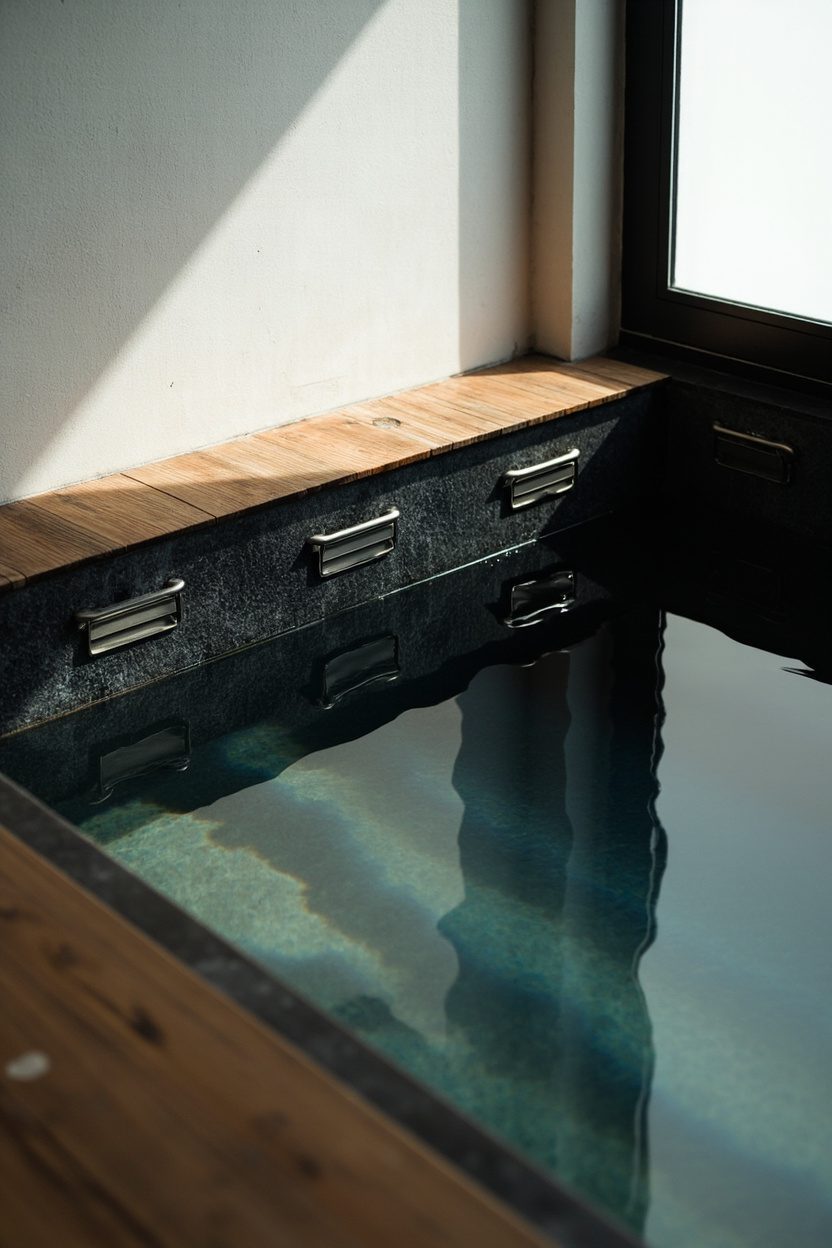
Concealing pumps and filters preserves the serene look around a plunge, so the water element reads as pure and uncluttered.
Choose compact, cartridge-based systems rated for the plunge volume; they reduce plumbing runs and maintenance time.
Place service access panels on a side that faces the house, not the courtyard, to keep technician visits discreet.
Avoid oversized equipment, which forces bulky enclosures; specify quiet, low-vibration units for night dips and meditation sessions.
Essential Elements
- Compact cartridge or UV filtration sized to water volume and turnover rate, typically 1–2 turnovers per day for cold plunges.
- Insulated service cavity with removable panels, located on a non-view elevation for discreet servicing.
- Sound-dampening mounts and flexible hoses to minimize vibration and noise transmission.
- Easy-access drain and winterization valve, to simplify seasonal maintenance and rapid water changes.
13. Rustic Cedar Cladding
Cedar wraps instantly warm the palette, softening the clinical feel that cold water can create, and the scent improves the ritual of use.
Opt for clear-grade Western red cedar or thermally modified cedar to resist rot and minimize maintenance in wet zones.
Install horizontally scaled boards for a contemporary look, or rough-sawn planks for a cabin-like, tactile finish that pairs well with matte stone.
Treat visible fasteners as a design detail, use hidden clips or stainless screws flushed and filled, to keep the cladding elegant and durable.
Styling Blueprint
- Choose grade and finish for exposure, use thermally modified cedar for longevity if budget allows, mid-tier to premium cost range.
- Match board width to plunge scale; 100–150mm boards read modern, wider boards feel more rustic and bold.
- Apply a natural oil finish annually, or let cedar weather to a silvery patina for a low-maintenance aesthetic.
- Combine with matte black metal trim and simple stone coping for a balanced, layered outdoor composition.
14. Floating Step Access
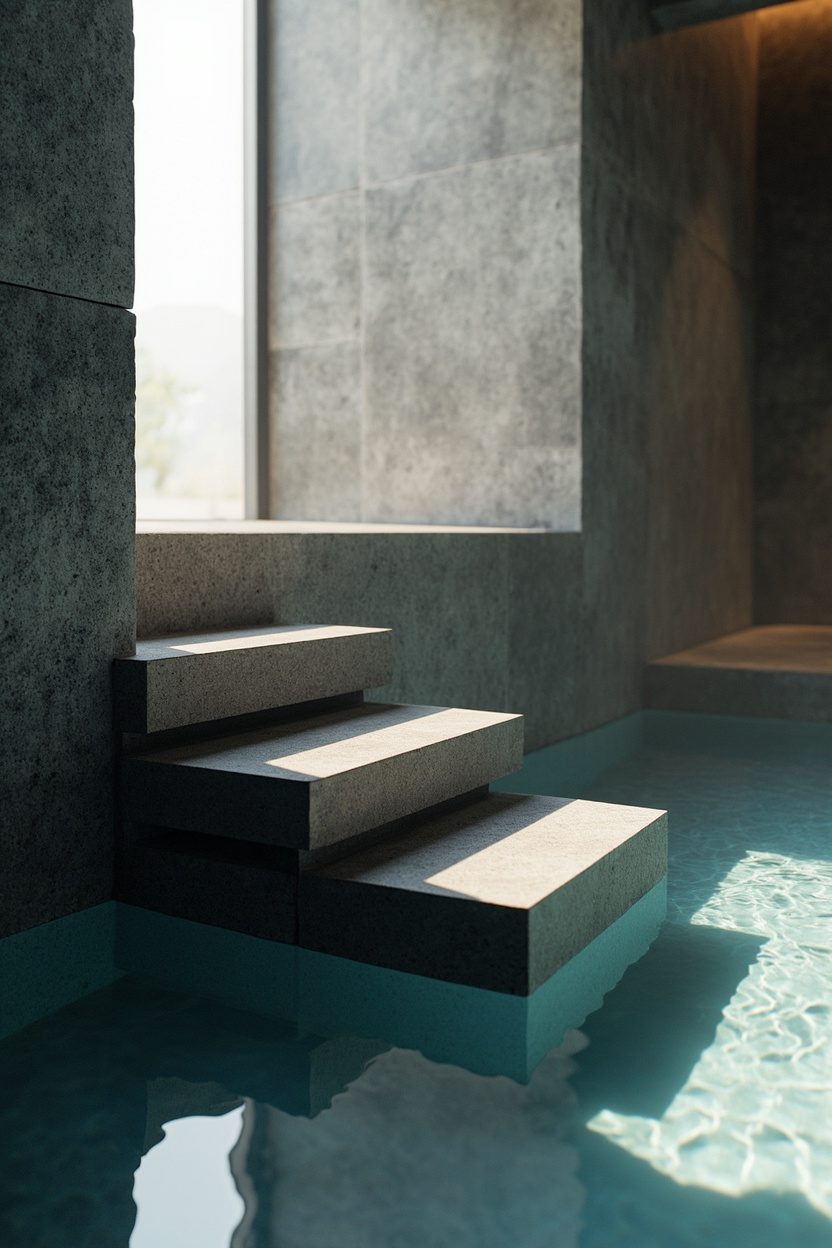
Floating steps give a sculptural entry; they create a visual bridge that keeps the plunge area feeling airy and uncluttered.
Use dense, water-tolerant hardwoods like ipe or composite decking to withstand splash and freeze cycles without warping.
Anchor treads to concealed stainless steel supports, set at 200–250mm riser height for safe, slip-resistant access with a solid handrail option.
Avoid overly narrow treads; 300–400mm depth feels comfortable and allows for towel placement. Choose textured finishes to improve grip.
What to Focus On?
- Material: ipe or high-quality composite for longevity, budget accordingly for hardwood vs composite trade-offs.
- Support: concealed stainless brackets, sized for live load and local code, to keep the look minimal and secure.
- Slip resistance: textured surface or integrated grooves, especially important for barefoot use and cold water temperatures.
- Placement: align steps with sightlines and shelter, allow 600–900mm clearance at landing for safe circulation around the plunge.
15. Glass-Enclosed Cubes
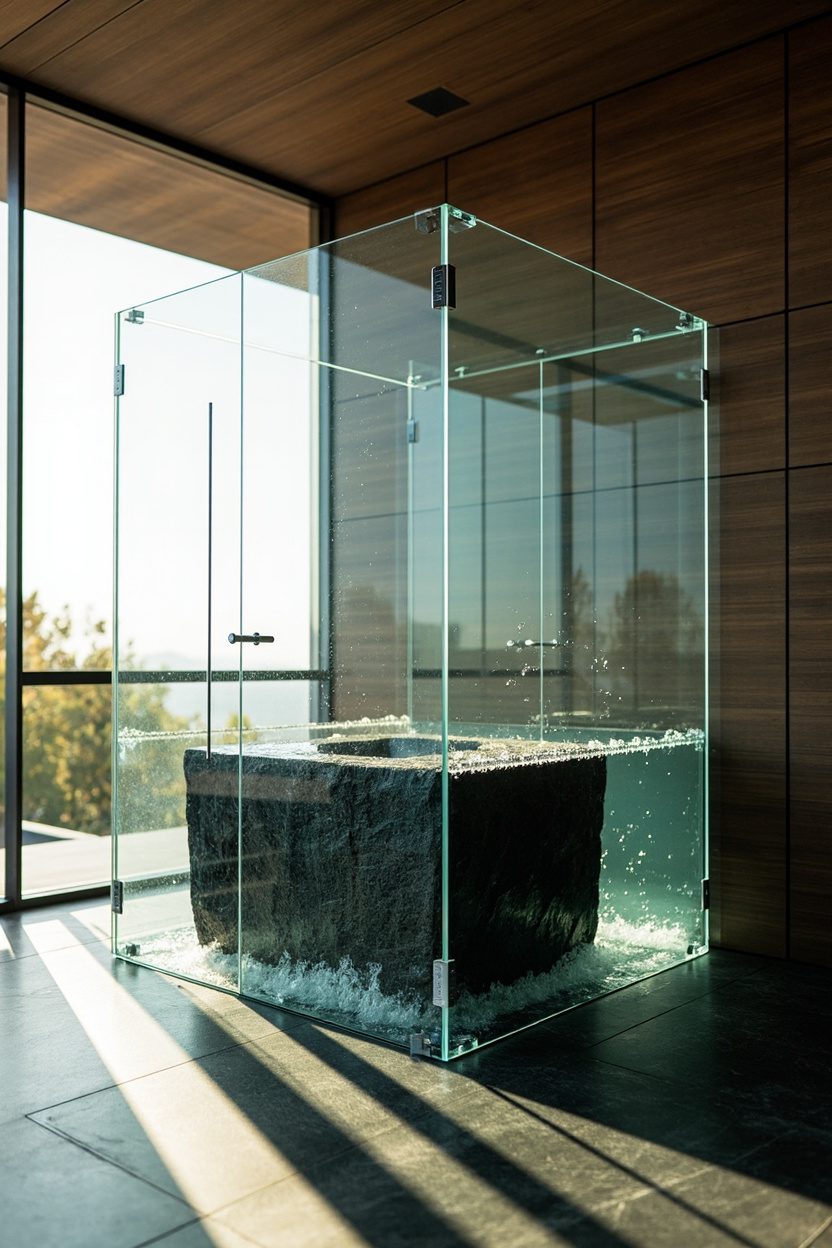
A glass cube makes the cold plunge a showpiece, with full transparency that celebrates water movement and body language during immersion.
Position the cube near a verdant wall or a sculptural heater to balance the clinical clarity with tactile warmth.
Choose structural glass, 3/4-inch laminated, and a stainless steel frame to handle thermal stress and frequent use without visual distortion.
Lighting is critical; place 2700K LED strips recessed beneath the rim to avoid glare, and specify dimming for post-plunge relaxation.
Styling Blueprint
- Use 3/4-inch laminated glass and a brushed stainless steel frame for longevity and clarity.
- Allow 18–24 inches of circulation space around the cube for safe access and maintenance.
- Install warm 2700K recessed LED with dimmer to soften the glass, and avoid overhead spotlights.
- Pair with a textured towel ladder and a single sculptural plant to add warmth without clutter.
16. Monochrome Tile Schemes
A strict monochrome tile approach reads modern and edited, translating the bite of cold water into a calm, cohesive backdrop.
Opt for matte porcelain tiles in a single pigment, scaled large to reduce grout lines and simplify waterproofing details.
Pick a color with personality, like deep charcoal or pebble gray, to hide mineral streaks and keep maintenance realistic.
Introduce contrast through texture, for example, a honed tile bench or fluted step, rather than adding another color that dilutes the aesthetic.
Essential Elements
- Select large-format matte porcelain, 24×48 inches or larger, to minimize grout and create a seamless look.
- Use a matching epoxy grout for longevity and easy cleaning, color-matched to the tile shade.
- Add tactile interest with one textured surface, such as a fluted tile or honed bench, in the same tone.
- Keep fixtures matte black or brushed nickel for subtle contrast without breaking the monochrome story.
17. Curved Organic Forms
Soft, curved shapes humanize the cold plunge, visually countering the sharpness of temperature with calming, biomorphic design.
Consider a freeform basin with a continuous edge, cast in a light terrazzo or bio-resin to marry warmth and durability.
Scale matters, so keep the plunge width at least 30 inches, but avoid excessive depth; 18–24 inches is restorative and accessible.
Combine with rounded, cushioned seating and warm woods to create a gentle, Mediterranean-inspired ritual space around the cold water.
What to Focus On?
- Specify a basin radius that allows 30–36 inches inner width for comfortable movement and shoulder clearance.
- Choose bio-resin or terrazzo with small aggregate to resist cold shock and reduce maintenance needs.
- Keep depth to 18–24 inches for effective immersion without creating a strenuous climb out.
- Complement forms with curved wooden benches and 3000K lighting to soften the sensory impact of cold water.
18. Compact Backyard Kits
Small footprint, big impact. Compact kits arrive prefabricated, with timber surrounds or powder-coated steel shells, so you can install a cold plunge on a postage-stamp lot without heavy construction or a concrete pad.
Choose a kit with built-in filtration and an insulated cover; these two details reduce maintenance and keep costs down, especially if you want year-round use in chilly climates.
Scale matters; pick a length around 6–7 feet for one person or a 4–5 foot tub for a dedicated plunge seat, that preserves yard circulation and keeps the kit from overpowering plantings.
Budget-tier decisions are clear: basic inflatable or rotomolded tubs for under $2,000, midrange stainless or composite shells for $3,000–6,000, custom cedar-clad kits start higher but age beautifully.
What to Focus On?
- Choose a kit with integrated insulation and cover for heat retention and energy savings.
- Prioritize compact dimensions that leave at least 3 feet of clearance for movement and landscaping access.
- Select materials that tolerate outdoor exposure, like marine-grade stainless or rotomolded polyethylene.
- Opt for kits with simple electrical needs, GFCI-protected plugs, and plug-and-play plumbing where possible.
19. Heated Towel Rails
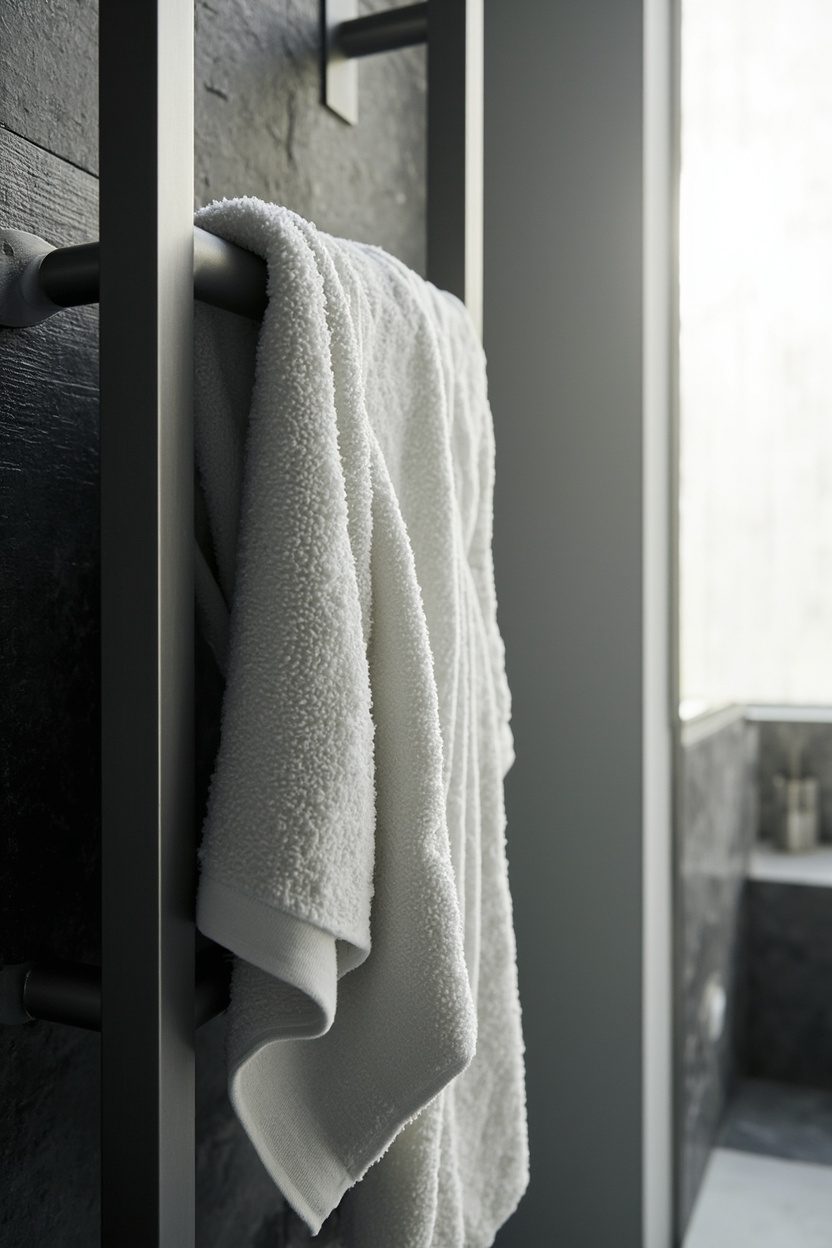
A heated towel rail is a finishing touch that transforms the exit from a cold plunge into a curated comfort ritual, adding warmth and drying without bulky heaters.
Choose a wall-mounted ladder in brushed stainless or matte black to match pool fittings, aim for 24–36 inches width to accommodate two towels without crowding the circulation space.
Hardwired rails offer cleaner power and higher heat output, while plug-in, thermostat-controlled units are flexible for renters or quick retrofits; specify IP44 or better for damp-room safety.
Placement matters: install 18–24 inches from the plunge edge and at 48–54 inches height for ergonomic towel reach, avoid mounting directly above electrical outlets to reduce moisture risk.
Essential Elements
- Select a corrosion-resistant finish, stainless steel or powder-coated, for poolside longevity.
- Prefer a thermostatic control or timer to manage energy use and avoid overheating towels.
- Position within easy reach of the plunge, but not directly over drainage or splashes.
- Confirm the IP rating of the unit and use a licensed electrician for hardwired installations.
For a related idea, see Boho Bedroom.
For a complementary decor approach, see 10 Home Staircase Design Ideas That Make a Statement in Any Style Home.
FAQ
Most compact kits require a minimum footprint of about 6 by 4 feet to accommodate the tub plus clearance for access and equipment, but allow extra room for decking and circulation. Measure for service access, and plan at least 3 feet of clear walkway on one side for comfortable entry and maintenance.
Yes, when you choose a damp-rated unit, IP44 or higher, and have it installed by a qualified electrician, heated towel rails are safe for pool-adjacent wet zones. Avoid plugging into outdoor outlets directly and keep electrical components away from direct splashes to reduce risk.
Near-coast conditions demand high-corrosion-resistance, so prioritize marine-grade 316 stainless, powder-coated aluminum, or rotomolded composite shells. Also, choose hardware and fasteners rated for salt environments, and plan for more frequent rinse-downs to remove salt residue.
Yes, many plug-in or low-voltage models are designed for retrofit and create minimal disruption, ideal for renters or quick upgrades. For a seamless, permanent solution with higher output, hardwiring and professional installation are recommended.
Summary
Small, thoughtful details like compact backyard plunge kits and heated towel rails determine whether a cold plunge feels like a lifestyle upgrade or an afterthought.
Prioritize material durability, correct scale, and sensible electrical choices to ensure the ritual is both restorative and reliably stylish.