

Sunbaked feet, a cold drink on a low table, and a deck that feels like an extension of the lawn, that is the promise of a ground-level deck done well.
These low-profile platforms are about seamless transitions, durability underfoot, and finishing details that read like an invitation rather than a fortress, they are the kind of outdoor project you’ll use every day without fuss.
This list focuses on decks that sit close to the ground, prioritize barefoot comfort, and keep maintenance low. Expect concrete paver pairings, composite surfaces with wood accents, and layout moves that increase usable square footage for lounging, dining, and play, all while respecting budget and climate considerations.
- 1. Modular Floating Decks
- 2. Pebble-Paver Pathways
- 3. Mixed-Material Platforms
- 4. Low-Maintence Composite
- 5. Integrated Planter Benches
- 6. Linear Grouted Pavers
- 7. Ground-Level Pergolas
- 8. Built-In Fire Pit
- 9. Sunken Seating Nooks
- 10. Outdoor Tile Mats
- 11. Mood Lighting Strips
- 12. Native-Grass Borders
- 13. Privacy Lattice Screens
- 14. Compact Dining Pads
- 15. Multi-Use Storage Steps
- Final Thoughts
- FAQ
1. Modular Floating Decks
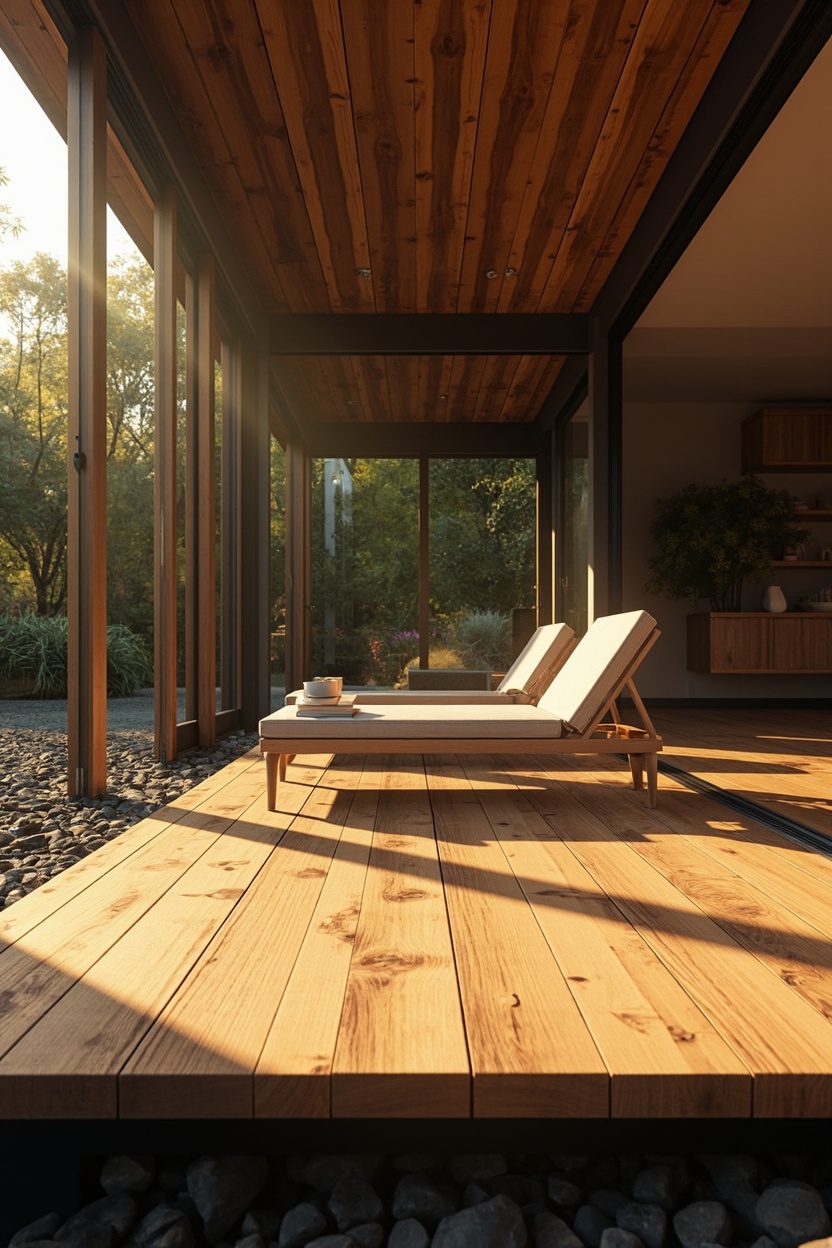
Modular floating decks use interlocking composite or hardwood tiles, they lift just slightly above the soil for drainage without the bulk of a full deck frame.
They are perfect for renters or gardeners who want a non-permanent solution that can be reconfigured by one person in an afternoon.
Choose composite tiles with a soft-grain finish for barefoot comfort, or select hard maple or ipe for a richer natural feel, noting cost jumps for exotic hardwoods.
Avoid placing tiles directly on uneven ground without a weed barrier and compacted base, or you’ll get shifting and noisy joints after the first season.
Styling Blueprint
- Material: 30, 40mm composite tiles with hidden connector clips for a smooth surface.
- Edge treatment: add a charcoal aluminum trim to protect the perimeter and create a crisp outline.
- Layout: start with a 3×3 tile module for a lounge nook, scale up in multiples for dining areas.
- Budget tip: select high-quality plastic clips and mid-range composite to balance longevity and cost.
2. Pebble-Paver Pathways
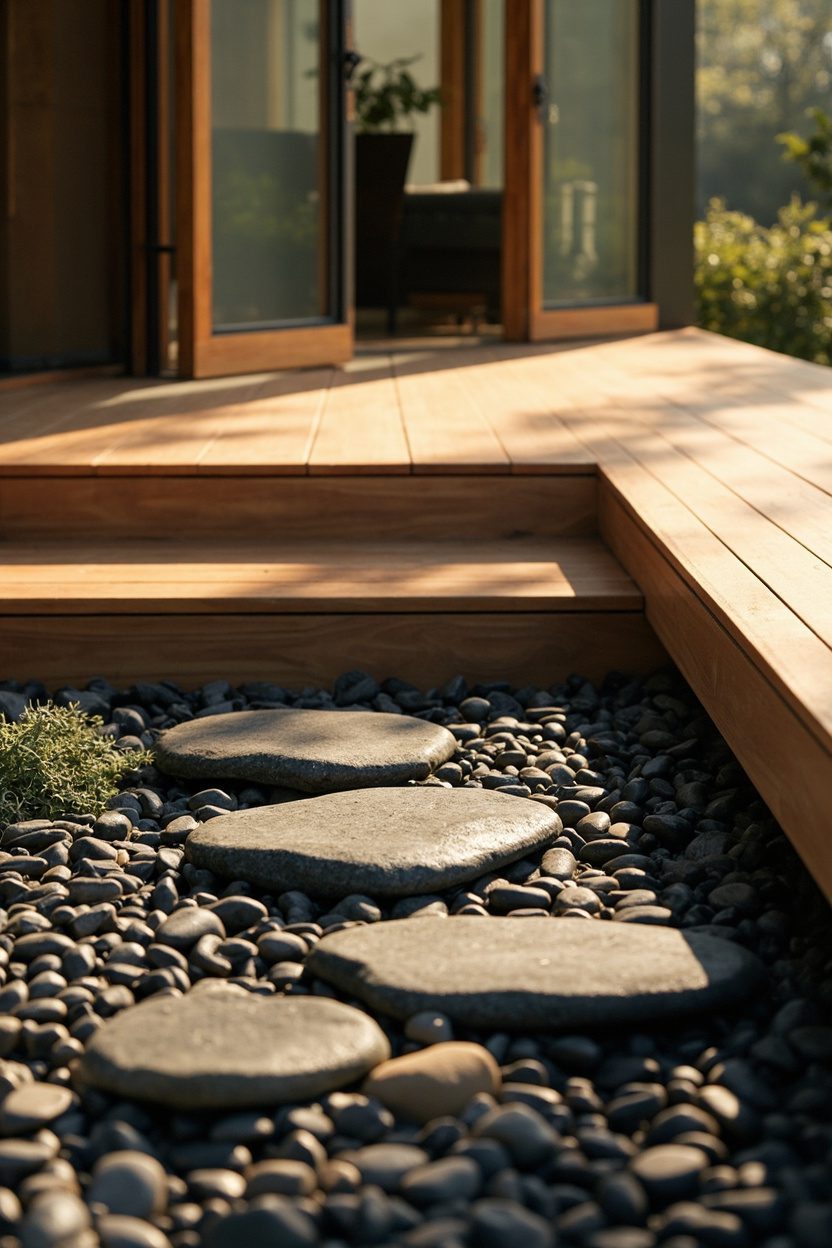
Pebble-paver pathways blend smooth river pebbles with concrete or natural stone pavers, they create a barefoot-friendly path that drains well and looks intentional.
Install pavers on a compacted sand bed with perimeter restraint to keep pebbles from migrating into plantings after heavy rain.
Select 2, 3 pebble hues that read warm against the house, and choose pavers at least 2 inches thick to avoid cracking under a hose cart or wheelbarrow.
Keep spacing narrow, about 1/4 inch mortar joints or low-profile polymeric sand between pebbles to maintain stability and reduce weed growth.
Essential Elements
- Sub-base: 4 inches compacted crushed stone under the sand layer for drainage and stability.
- Paver choice: 2-inch thick bluestone or poured concrete squares for consistent stepping surfaces.
- Pebble size: smooth 1/2 to 3/4 inch river pebbles for comfortable barefoot use.
- Maintenance: sweep polymeric sand into joints annually to control weeds and shifting.
3. Mixed-Material Platforms
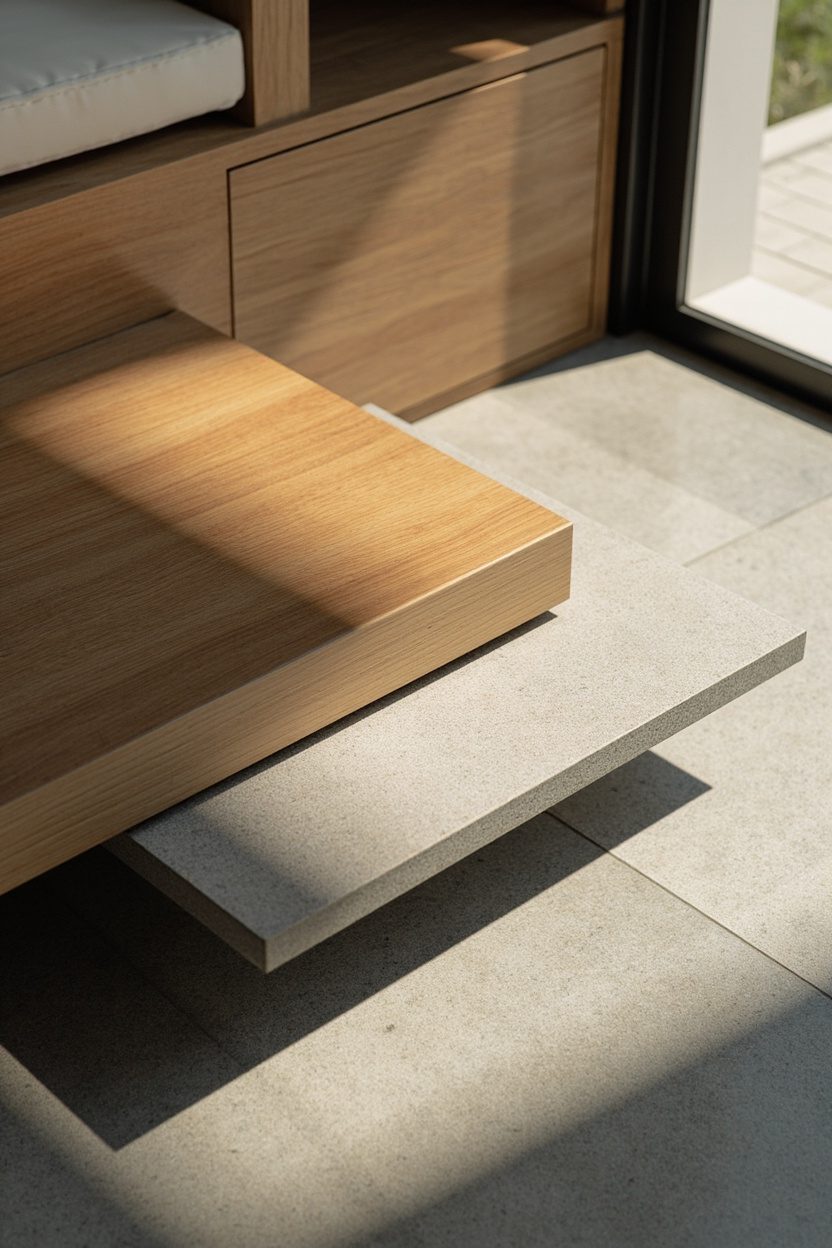
Mixed-material platforms combine composite decking with inset gravel, concrete, or turf to create visual zones without raising the deck height significantly.
This approach uses a primary walking surface of capped composite that meets a strip of smooth concrete pavers or artificial turf, providing textural contrast underfoot.
Specify a 6, 8 inch recessed channel for inset materials to ensure a flush transition and prevent tripping, this is crucial for barefoot comfort.
Limit the palette to two materials and a metal accent to avoid visual clutter, and choose low-absorption composites to keep the surface cooler in full sun.
What to Focus On?
- Transition detail: 6, 8 inch recessed insets with aluminum edging for a flush, snag-free seam.
- Material pairing: light gray concrete pavers with warm teak-toned composite for balanced contrast.
- Scale: keep inset strips no wider than 18 inches to maintain walkability and rhythm.
- Budget consideration: use porcelain pavers for the look of stone at a lower long-term upkeep cost.
4. Low-Maintence Composite
Composite decking is the practical choice when barefoot comfort meets a low-effort summer routine, opt for a narrow 5/4 board in warm gray to mask wear and sun exposure.
Choose capped polymer composite with a textured finish, it resists staining and gives enough grip for wet feet without needing sanding or sealing.
Keep the joist spacing tighter, 12 inches on center for ground-level, to eliminate flex underfoot and prevent the spongey feel common with cheaper composites.
Budget-wise, this sits in the mid to upper range, but factor in the long-term savings from skipping annual staining and deck renewals.
Essential Elements
- Pick capped composite in a matte, grippy texture for barefoot traction and lower glare.
- Use 12-inch joist spacing to ensure solid underfoot feel and longevity.
- Select hidden fasteners for a smooth walking surface and fewer snags.
- Plan for a 1, 2% slope off the house for drainage, to avoid pooling and mold growth.
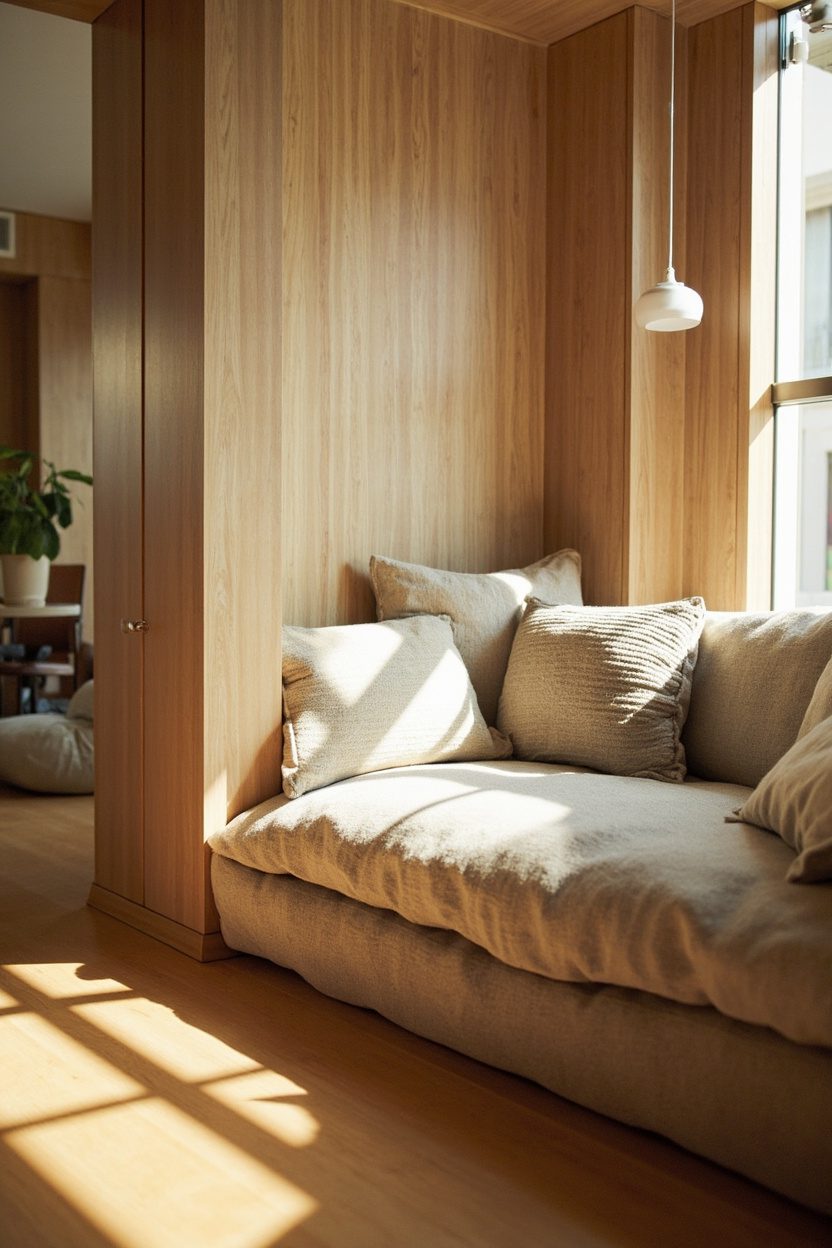
5. Integrated Planter Benches
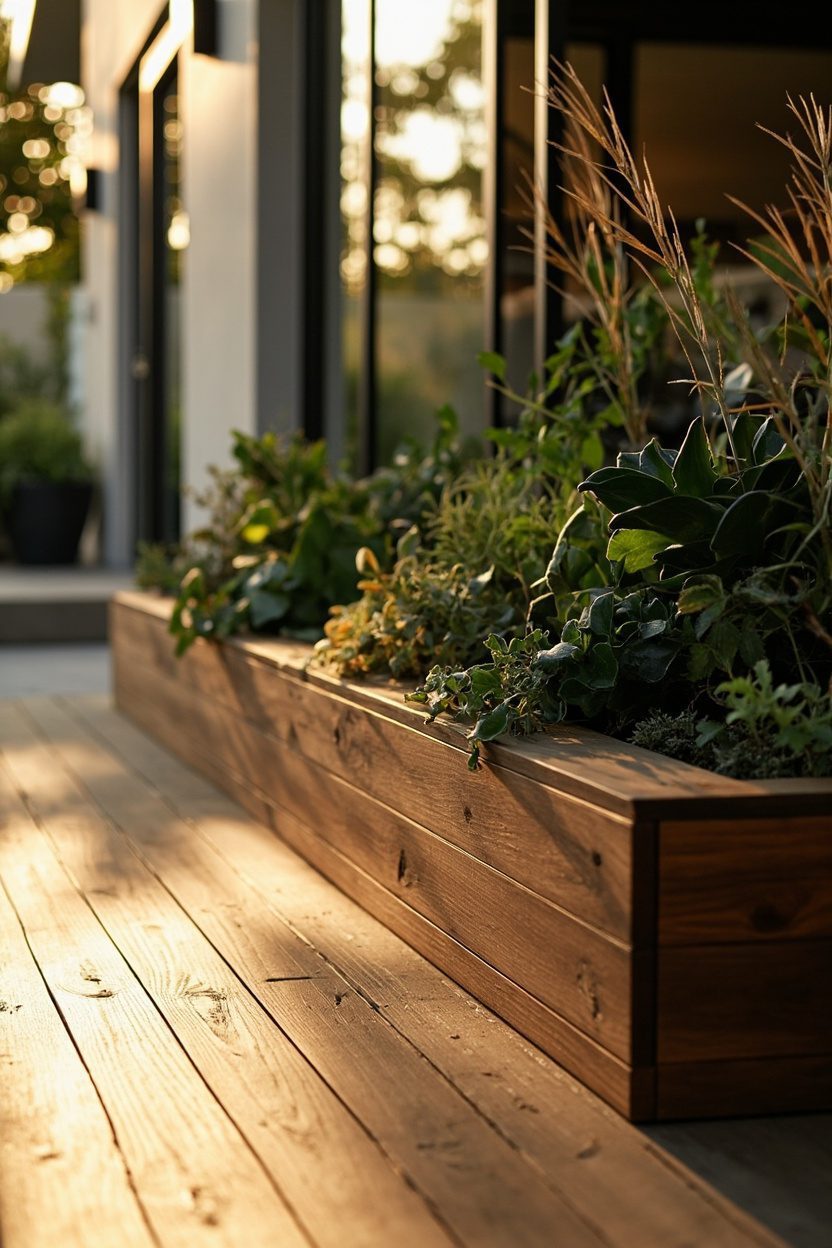
Combine seating and greenery by building wide benches with planted cavities, oak or cedar trim frames the boxes and keeps the look elevated but informal.
Planting beds should be shallow for drought-tolerant perennials and herbs, aim for 12, 18 inches depth to keep roots happy without adding heavy soil weight.
Position the bench planters to define zones, use them to screen a path or back a dining area, and make the seat depth 18, 20 inches for comfortable lounging.
Use rot-resistant materials for the planter interior, like galvanized steel liners or composite sheathing, to protect the structure and simplify maintenance.
Styling Blueprint
- Frame planters in cedar, leave to age naturally or oil for a warmer tone.
- Choose Mediterranean herbs and sedums for low-water, low-maintenance planting.
- Build bench seat at 18 inches high with a 2, 3 inch overhang for comfort.
- Include drainage holes and a removable liner for easy seasonal refreshes.
6. Linear Grouted Pavers
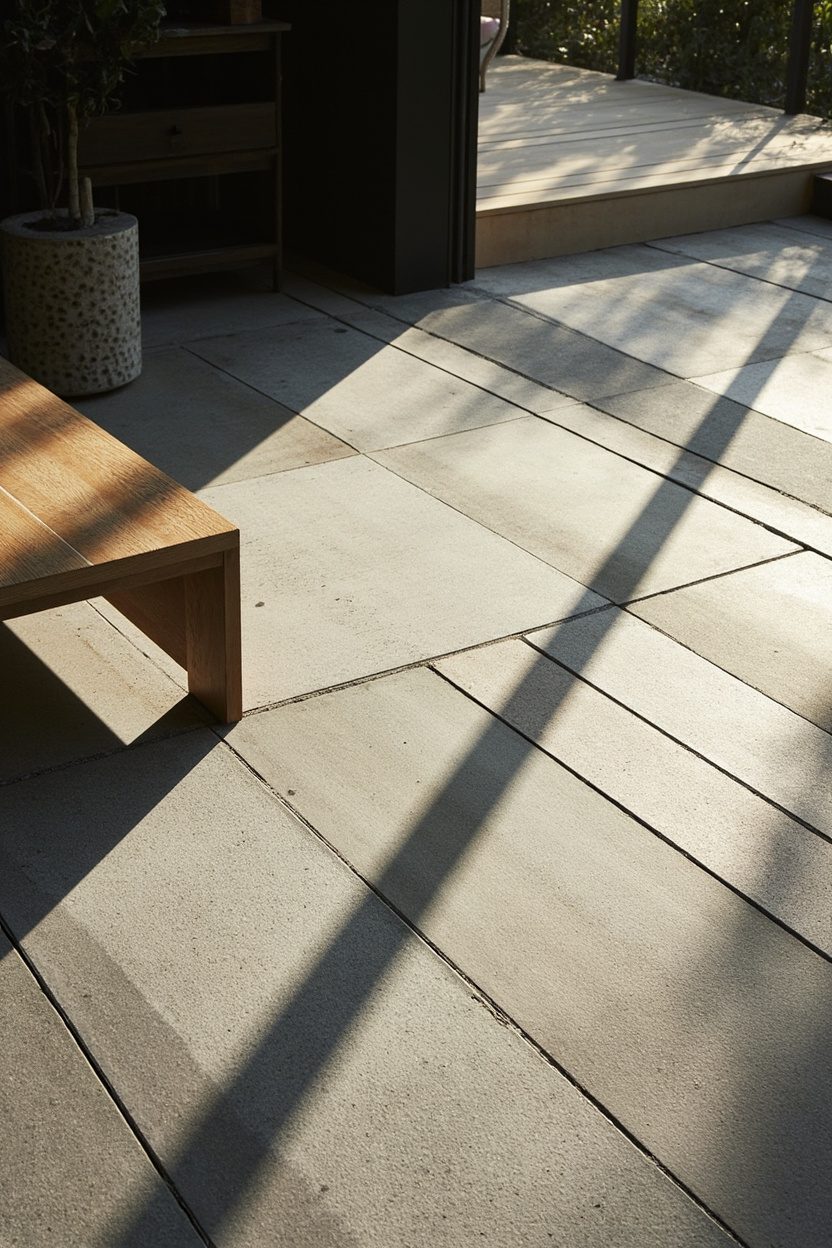
Run long-format pavers in a tight, linear layout with contrasting grout lines to elongate the yard and create a modern, barefoot-friendly surface.
Use textured concrete or porcelain pavers with a slight sanded finish, they stay cool, provide traction, and resist chips from garden tools or chairs.
Select a medium-width grout joint, 1/8 to 3/16 inch, filled with polymeric sand to prevent weeds while keeping a smooth feel underfoot.
Install on a compacted sand bed with edge restraint to avoid shifting, and slope the field slightly toward a planted strip for discreet drainage.
What to Focus On?
- Choose pavers rated for pedestrian use, with a slip rating suitable for bare feet.
- Contrast grout color slightly to emphasize the linear pattern, use charcoal or warm taupe.
- Compact the sand base and use edge restraints to maintain tight joints over time.
- Include a narrow planting band or pebble strip for water run-off and visual relief.
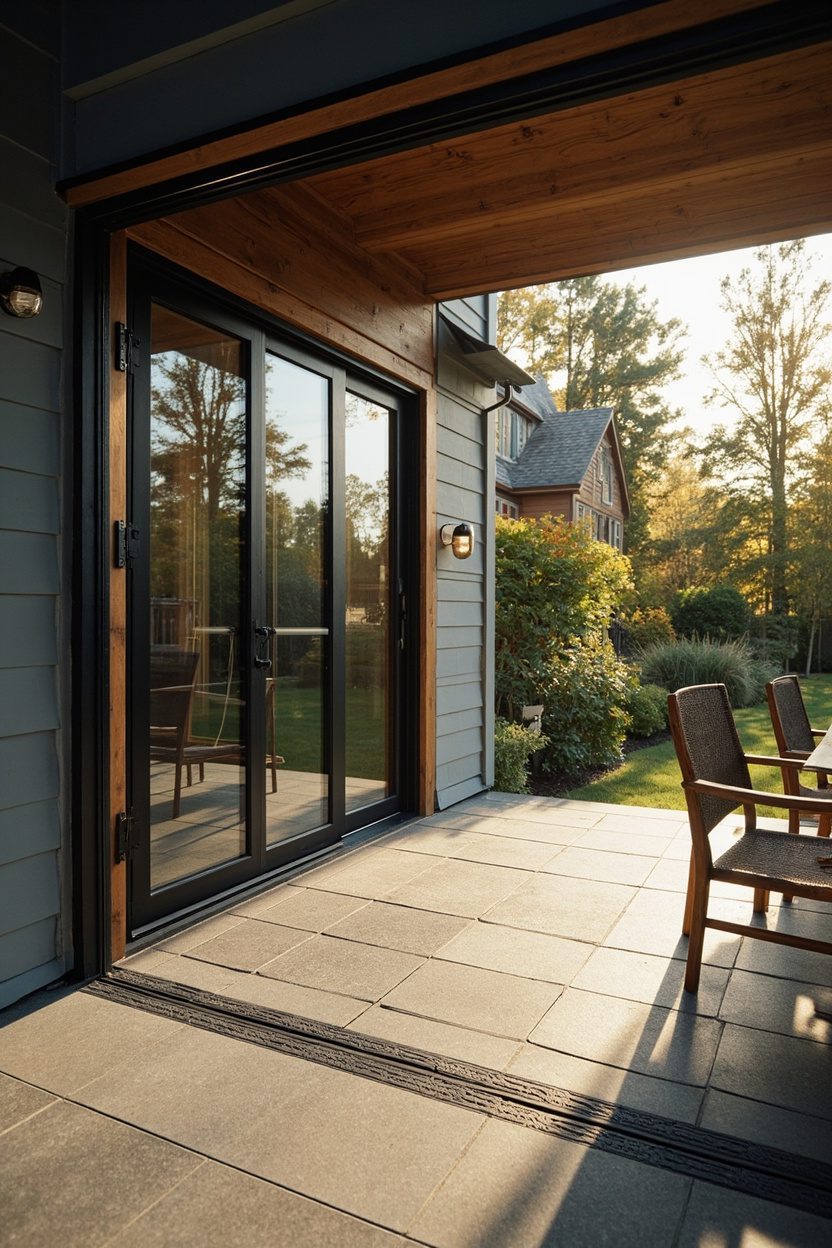
7. Ground-Level Pergolas
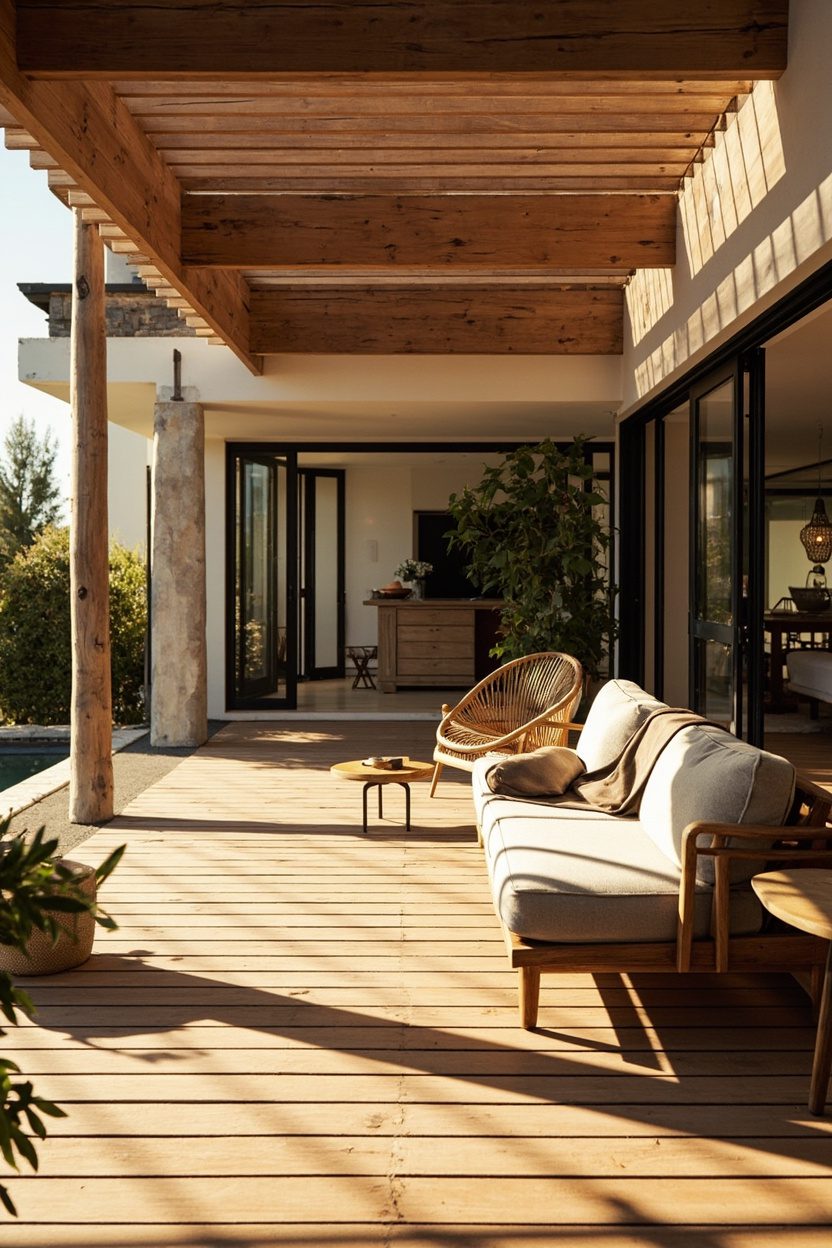
A pergola at ground level defines outdoor rooms without blocking sightlines, ideal when you want shade but not a full roof overhead.
Choose pressure-treated pine for budget builds, or thermally modified wood for longevity, and space rafters 18 to 24 inches apart to create a soft light pattern.
Keep the footprint low, about 8 to 12 inches above the deck surface, to preserve that barefoot, grounded feel while preventing water pooling at joints.
Avoid heavy lattice that traps heat, and instead consider a retractable fabric panel or widely spaced slats for airflow and adjustable sun control.
Essential Elements
- Material: thermally modified wood or capped composite for low maintenance and weather resistance.
- Scale: keep header beam under 10 inches tall to retain ground-level proportion.
- Shade strategy: 18, 24 inch rafter spacing or retractable fabric for adjustable coverage.
- Mounting: use metal brackets to elevate wood off deck surface by 8, 12 inches to prevent rot.
8. Built-In Fire Pit
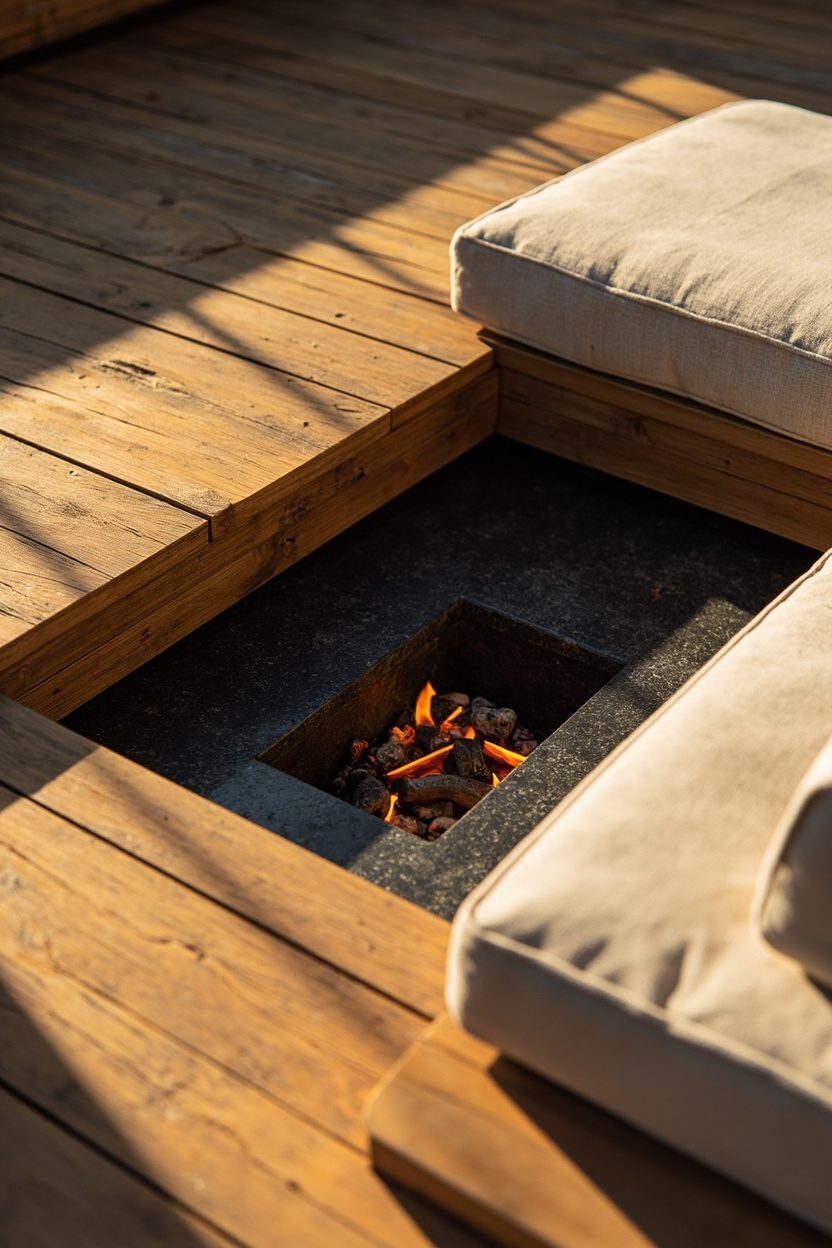
A shallow, built-in fire pit anchored into a low deck becomes a living-room focal point that reads as permanent and polished.
Opt for a gas insert for predictable flames and lower clearances, or choose a lined masonry bowl with a steel ring if you prefer wood, but plan for proper ventilation.
Keep the pit rim no higher than 8 to 10 inches above the deck surface to maintain barefoot safety and sightlines, and use non-combustible materials within a 24-inch radius.
Design seating 12 to 18 inches lower than the surrounding deck level so people can recline comfortably, and leave a 36-inch clearance for circulation and ember safety.
Styling Blueprint
- Fuel type: gas insert for clean use and low upkeep, budget from mid to high depending on controls.
- Material palette: concrete surround with a steel bowl for an understated, durable finish.
- Height: rim 8, 10 inches above deck for barefoot comfort and easy roasting height.
- Safety: non-combustible zone of at least 24 inches, and 36 inches clear for movement.
9. Sunken Seating Nooks
Sunken nooks read as cozy islands, they lower the social setting for intimate conversation while preserving an open deck plane.
Excavate just 6 to 12 inches below the deck surface to create a snug feeling without drowning the space or complicating drainage.
Use built-in bench backs and weatherproof cushions in olefin or solution-dyed acrylic, and choose foam with quick-dry cores for barefoot, splash-prone use.
Mind drainage by sloping the sub-base toward a channel drain, and finish edges with rounded trim to prevent stubbed toes and snagged fabric.
What to Focus On?
- Depth: keep sunken area 6, 12 inches below deck for comfort and simple drainage solutions.
- Seating: built-in benches with 4, 6 inch-thick quick-dry cushions for barefoot durability.
- Materials: closed-cell foam cushions and marine-grade fabrics for fade and mildew resistance.
- Drainage: slope base to a hidden channel drain, avoid flat pans that collect water.
10. Outdoor Tile Mats
Placing interlocking outdoor tile mats over a simple timber or composite platform instantly upgrades footing, without a full rebuild.
Choose porcelain-look or capped-wood composite tiles for durability, they resist moisture and stand up to sunscreen and sand.
Keep tile size in proportion to deck area; a 12×12 inch module reads casual on small decks, while 24×24 suits wider expanses.
Avoid slick finishes by specifying textured or non-slip surfaces, particularly where feet will be wet after a swim.
Essential Elements
- Material: textured porcelain or capped composite for slip resistance and low maintenance.
- Module size: 12×12 inches for small decks, 24×24 for broader areas.
- Edge treatment: use perimeter trim to prevent tripping and to hide gaps.
- Budget tip: buy pre-finished interlocking tiles to save on labor costs.
11. Mood Lighting Strips
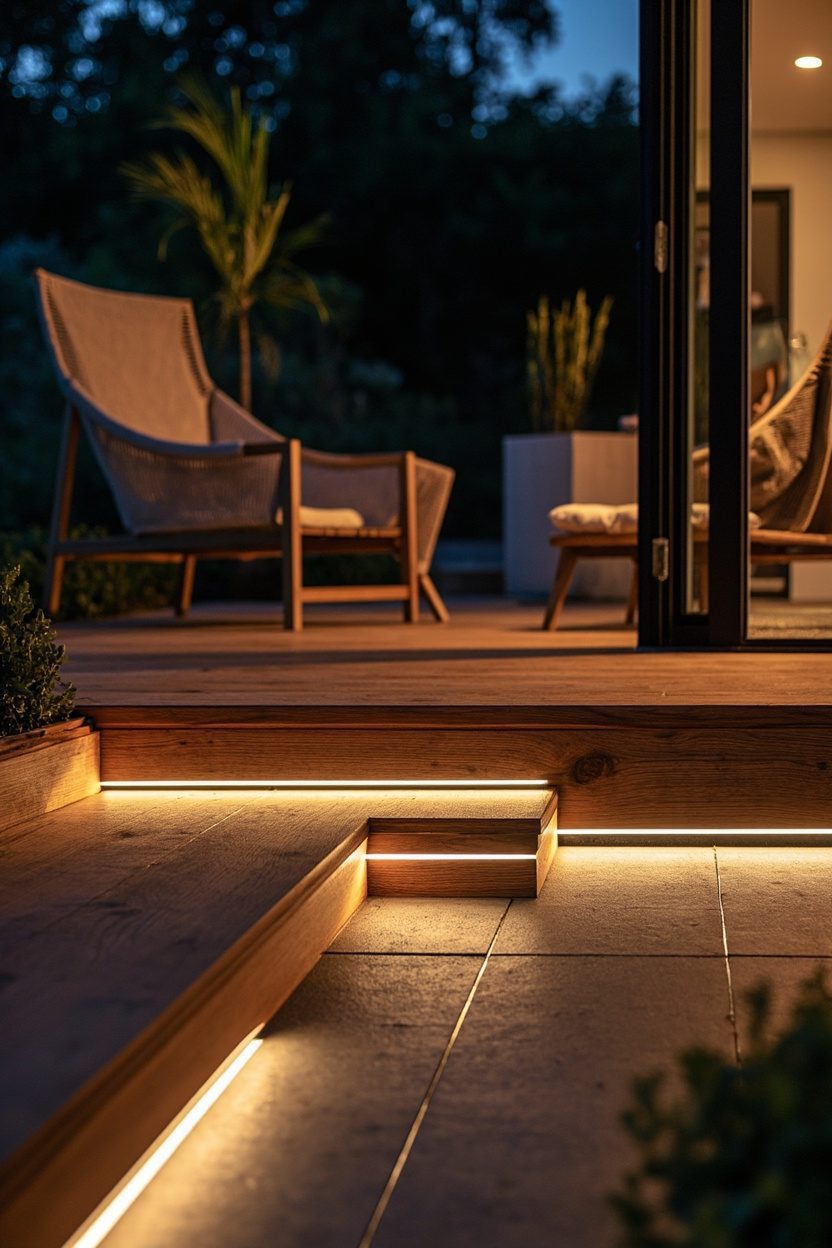
Thin, recessed LED strips tucked under the deck rim or along planter edges create soft glow without glare, perfect for barefoot evenings.
Opt for warm white, 2700K to 3000K, to keep the light flattering and to preserve that summer dusk feeling.
Use IP67-rated strips and conceal wiring in a shallow conduit; durability beats cheaper tape when exposed to weather.
Apply a dimmable driver and zones so you can shift from bright task light for cooking to a low ambient wash for late-night lounging.
Styling Blueprint
- Color temperature: 2700K, 3000K warm white for comfortable evenings.
- Protection: choose IP67 or higher for wet locations and hidden wiring runs.
- Placement: under seat fronts, planter tops, and stair treads for layered light.
- Control: install a dimmer or smart controller for scene-setting and energy savings.
12. Native-Grass Borders
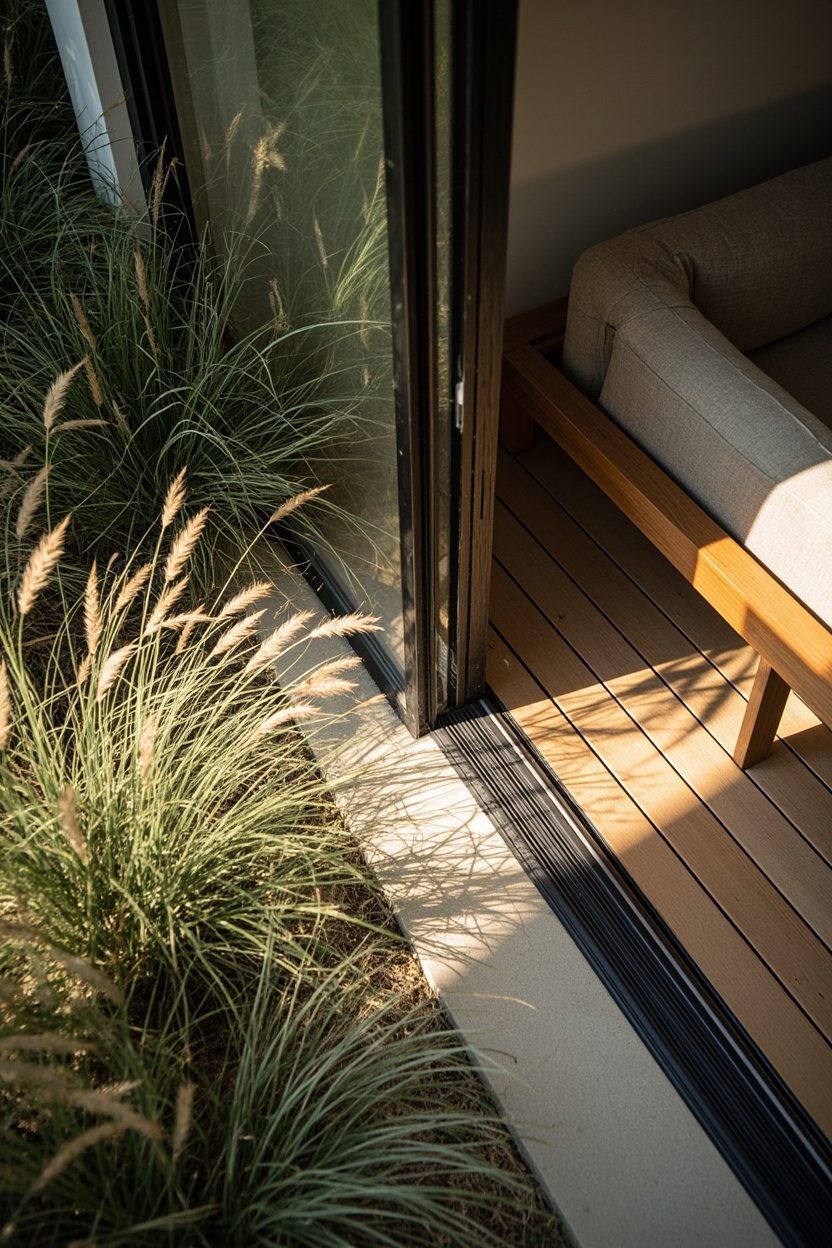
Planting low native grasses along the deck perimeter softens the line between lawn and deck, and reduces maintenance compared with ornamentals.
Select species suited to your region, like blue fescue for drier climates, or carex varieties for shaded, moister sites, to ensure year-round resilience.
Keep the planting strip narrow, 12 to 18 inches, to maintain barefoot access and to prevent roots from heaving the deck surface.
Use a gravel buffer and root barrier at the deck edge to stop soil and mulch from washing onto the deck and to limit irrigation needs.
What to Focus On?
- Species choice: match grasses to local climate for low water and no-fuss care.
- Width: 12, 18 inches keeps plants decorative, not obstructive to movement.
- Installation: add root barrier and gravel buffer to protect deck integrity.
- Maintenance: choose clump-forming grasses to avoid invasive spread and frequent trimming.
13. Privacy Lattice Screens
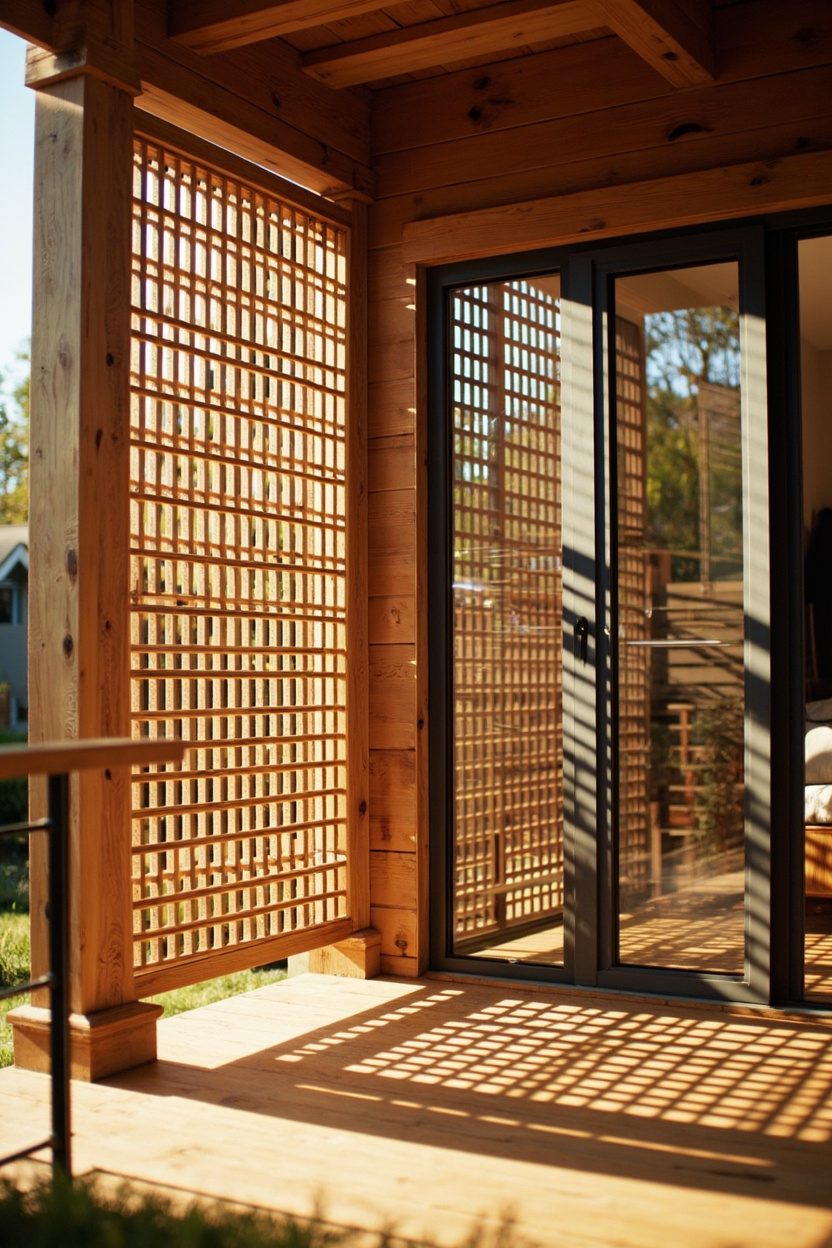
A privacy lattice gives a roomlike feeling to a ground-level deck without blocking light, choose a 1×2 cedar lattice set in a 45-degree pattern for a subtle, modern texture.
Cedar tolerates moisture and weathers to a soft gray, pair with a clear satin exterior stain to extend life, or paint for a bold statement, budget around $50 to $120 per panel installed.
Spacing matters, leave 1.5 to 2 inches between slats to let air circulate while screening sightlines, avoid solid panels that trap heat and reduce airflow on hot afternoons.
Install lattice sections as freestanding screens or anchored to 4×4 posts, set posts in gravel footings for a non-permanent, repairable solution that won’t crack concrete or disturb shallow utilities.
Essential Elements
- Material: knot-free cedar or composite for low maintenance and longevity.
- Pattern: 45-degree lattice for privacy and daylight balance.
- Attachment: post-mounted with gravel footings for easy removal.
- Finish: clear satin stain or exterior paint, recoat every 3, 5 years.
14. Compact Dining Pads

A compact dining pad transforms 20 to 40 square feet of deck into a functional alfresco spot, choose a round bistro table 30 to 36 inches in diameter to keep circulation clear.
Scale chairs to the table and leave a 30-inch clearance behind seating for easy passage, opt for stackable or folding chairs to store against a wall when not used.
Select materials built for outdoor life, like powder-coated steel frames with quick-dry olefin cushions, or teak for a warmer, weather-tolerant look that ages gracefully.
Add a 6-foot cantilever umbrella or an anchored cantina shade to control midday sun, and fix a flush-mounted outlet nearby if you want a portable grill or string lights for evening dining.
Styling Blueprint
- Table size: 30, 36 inch round for tight footprints and conversational layout.
- Seating: two to four stackable or folding chairs, polyester cushions with quick-dry fill.
- Shade: compact cantilever umbrella or small pergola attachment for sun control.
- Extras: outdoor rug 4×6 feet to define the pad and protect feet from hot decking.
15. Multi-Use Storage Steps
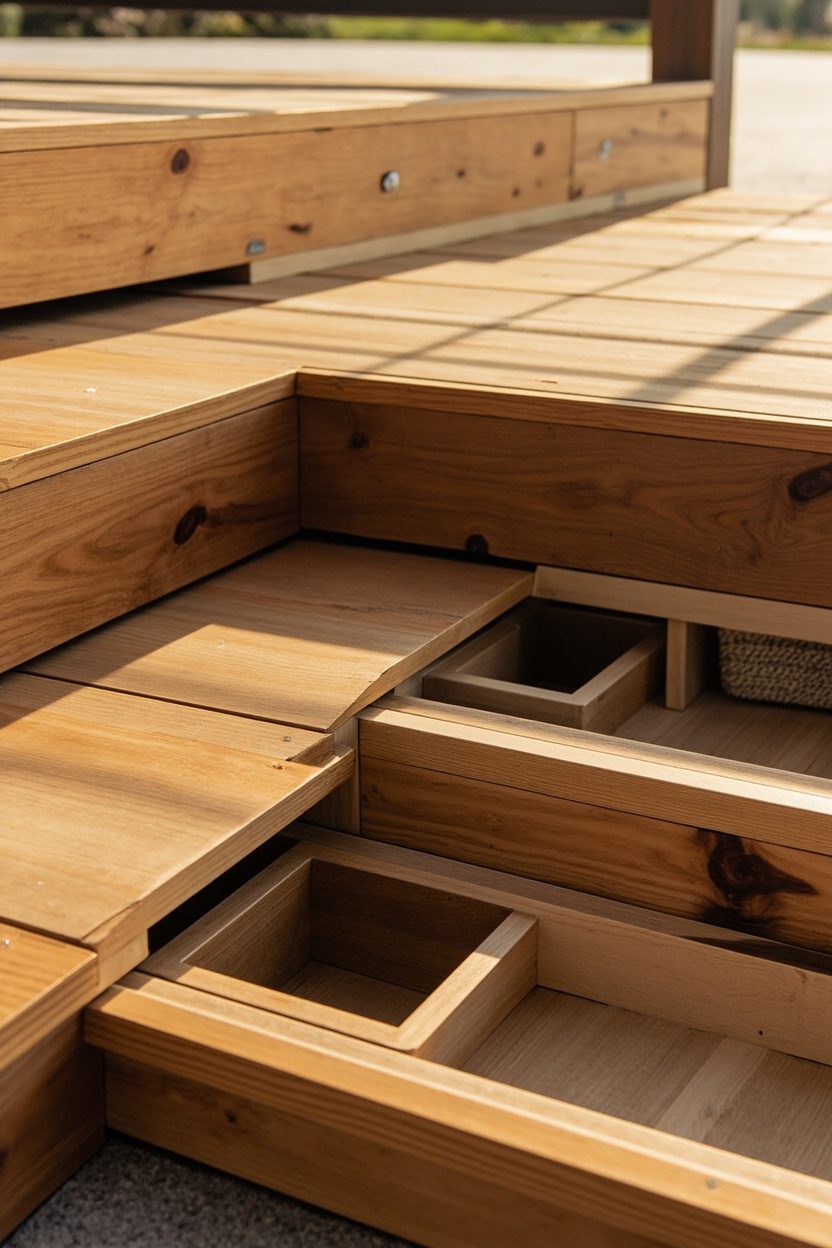
Storage steps combine access and utility, build the risers as hollow compartments with hinged tops, use rot-resistant wood like treated pine or Ipe for all-weather durability.
Each step should be 6 to 8 inches high for a comfortable rise, and wide enough to store cushions, kids toys, or grilling tools, allocate at least 12 inches of depth per compartment for practical capacity.
Incorporate ventilation slots and marine-grade stainless steel hinges to prevent mildew and corrosion, line interiors with a breathable mesh to keep items dry and avoid trapped moisture.
For a polished look, face the steps in the same decking boards as the deck, or contrast with a painted pop of color on the risers, plan a medium budget, expect $300 to $900 for DIY materials depending on wood choice.
What to Focus On?
- Dimensioning: 6, 8 inch riser height, 12+ inch compartment depth for usable storage.
- Hardware: marine-grade stainless hinges and ventilation to prevent rot.
- Material: rot-resistant wood or capped composite for long-term performance.
- Finish: deck boards on treads, painted or stained risers for a cohesive look.
For a related idea, see Eclectic Cottage Decor.
Final Thoughts
Low decks are about deliberate, human-scale choices, favor materials that feel good underfoot, details that breathe, and multipurpose elements that simplify life outdoors.
Keep scale, ventilation, and durable hardware at the forefront, and you’ll have a barefoot-ready summer deck that performs season after season.
If you want another practical angle, read 13 Cottage Garden Bird Bath Ideas Looking Perfectly Natural.
FAQ
Leave at least 6 to 12 inches of clearance between the deck edge and landscaping to allow airflow and access for surface cleaning, more space helps prevent moisture buildup and insect problems.If you plan on pressure washing or replacing boards, a clear perimeter of 18 inches is more comfortable for tools and maneuvering.
Yes, use a pier-and-beam approach with precast concrete deck blocks on compacted soil or gravel pads, they distribute weight and avoid deep excavation, making future removal easier. Ensure the blocks sit on a leveled, crushed stone base and follow local codes for frost depth or anchoring if you live in colder climates.
Capped composite boards with a textured, low-heat surface are the easiest to maintain, they resist splinters and need only periodic cleaning, choose lighter tones to reduce surface heat. Natural woods like Ipe feel great barefoot but require annual oiling to retain color and smoothness, and they can be pricier upfront.
Slope the deck surface slightly, about 1/8 inch per foot away from the house, and leave 1/4 inch gaps between boards for drainage, paired with perimeter gravel to encourage runoff. Regularly clear debris from gaps and under the deck, and consider adding a French drain or dry well if the yard has slow-draining soils.